
Use and Care Manual
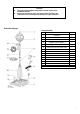

2
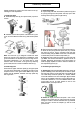
Please assemble the product from the bottom to the up,
following the main steps below:
1. Install lamp base
A. Assemble lamp base (9) and square base (10) with 4
screws:
B. Assemble connect the 4 pieces of the base trim (7) into
a one, and then attach the base trim (7) with the lamp base
(9).
Note: The base trim (7) is designed to fasten the street
lamp more securely. If the street lamp is installed on a flat
ground and there is no external force (such as high wind or
man-made interference), or if the street lamp is used
outdoors and it can be fixed on the ground by fastening
ground nails; there is no need to install the base trim (7).
2. Install lamp post
Screw the two upper and lower posts (3), lamp post joints
(12) and square lamp base (10) together according to the
sequence shown in the figure below. Note: Every screw
thread must be tightened; otherwise, the lamp posts may
lean or get loose.
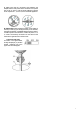
3. Install lamp holder
A. Lay the lamp post down to thread the power wire (6) and
its joint (5) through the lamp base and lamp post. After
drawing out the joint (5), place it right side up.
B. Take out the lamp holder (2) and put on the lamp top (1);
C. Draw out the joint (6) and the power line (14), connect
the joints (5) and (6), put the combined joints and their
wires into lamp post (3). Note: At this time, it will be better
to ask another person to hold the lamp holder (2).
D. Rotate the lamp holder (2) to fasten it on the lamp post
(3). Note: The screw thread shall be tightened as far as
possible. Meanwhile the direction of the lamp holder (2)
shall be slightly adjusted to make it match the direction of
the lamp bases (9) and (10).
4. Positioning and powering on
A. Positioning: Place the assembled street lamp at the set
position. Note: (1) If the street lamp will be outdoors, place
the lamp base into the ground with nails to avoid falling; (2)
The street lamp should be placed at a location without
man-made interference in case of damages. (3) If the street
lamp is to be installed indoors and can be influenced by a
man-made interference or is to be installed outdoors and
ground nails can not be used, please be sure to use
additional base (7) to keep it secure.
B. Power on: Tightly connect the two joints 1 and 4 of the
adaptor (4) and power wire (6). If the power wire isn’t long
enough, it is able to add the extended wire (5) between
them, and then connect the adapter (4) with the main
power source.
√
Assembly Instructions