® Ice Cube Machine User’s Manual Be sure the ice machine has been standing upright for at least 24 hours prior to plug-in. Franklin Industries, LLC 4100 First Avenue Brooklyn, NY 11232-3321 Tel.: 1-888-424-8278 E-mail: customerservice@franklinchef.
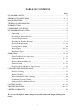
TABLE OF CONTENTS Page ICE MAKER SAFETY................................................................................................. 2 IMPORTANT SAFEGUARDS ............................................................................. 2 – 4 MAJOR FEATURES .................................................................................................. 4 TECHNICAL INFORMATION .................................................................................. 5 INTRODUCTION ................................
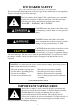
ICE MAKER SAFETY Your safety and the safety of others are very important. We have provided many important safety messages in this manual and on your appliance. Always read and obey all safety messages. This is the Safety Alert Symbol. This symbol alerts you to potential hazards that can injure or kill you and others. All safety messages will follow the Safety Alert Symbol and either the words “DANGER”, “WARNING” OR “CAUTION”.
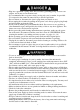
? Plug into a grounded 3-prong outlet. Do not remove grounding prong, do not use an adapter, and do not use an extension cord. ? It is recommended that a separate circuit, serving only your ice maker, be provided. Use receptacles that cannot be turned off by a switch or pull chain. ? Do not connect or disconnect the electric plug when your hands are wet. ? Never unplug the ice maker by pulling on the power cord. Always grip the plug firmly ? ? ? ? ? ? and pull straight out from the outlet.
? If the ice maker will not be used for a long time, before the next use it must be ? ? ? ? thoroughly cleaned. Follow carefully any instructions provided for cleaning or use of sanitizing solution. Do not leave any solution inside the ice maker after cleaning. DO NOT touch the condenser fins. The condenser fins are sharp and can be easily damaged. DO NOT use solvent-based cleaning agents or abrasives on the interior. These cleaners may transmit taste to the ice cubes, or damage or discolor the interior.
Technical Information Model: Electrical input: Power consumption: Ice-making/Ice-harvest rated current: Refrigerant: High/Low side pressure: Unit width x depth x height: Unit weight: Ice storage capacity: Ice-making capability: Ice shape: Ice cube dimensions: FIM200 115VAC ~ 60Hz 9.4 kW·h /100 lbs of ice 9.2A/12A R404a, 24.7 oz. 290psig/190psig 24” x 24” x 39” 144 lbs maximum 65 lbs maximum 250 lbs/day* Cube 1” x 1” x ¾” *The actual quantity of ice produced per day can vary with room and water conditions.
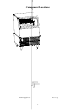
Component Locations Water supply hose Ice scoop 6
Ice Maker Installation Unpacking Remove packaging materials IMPORTANT: Do not remove any permanent instruction labels or the data label on your ice maker. Remove tape and glue from your ice maker before using, ? To remove any remaining tape or glue, rub the area briskly with your thumb. Tape or glue residue can also be easily removed by rubbing a small amount of liquid dish soap over the adhesive with your fingers. Wipe with warm water and dry.
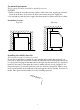
Location Requirements This ice maker should be installed by qualified personnel. NOTICE: 1. Before setting the ice maker inside a cabinet, connect the water supply pipe correctly. Untie the drain hose, insert it into the drain, and connect the power supply line. 2. Do not kink or pinch the power supply line between the ice maker and wall or cabinet. Installation clearance Top view Side view Installing the stability brackets This operation requires at least two persons.
? To ensure proper ventilation for your ice maker, the front of the unit must be completely unobstructed. ? When installing the ice maker under a counter, follow the recommended spacing ? ? ? ? dimensions shown. Allow at least 2/5? (10 mm) clearance at rear, 1/5” (5 mm) at the sides and 1? (25 mm) at the top for proper air circulation. The installation should allow the ice maker to be pulled forward for servicing if necessary.
Before you move your ice maker into its final location, it is important to make sure you have the proper electrical connection. A standard electrical supply (115 VAC only, 60 Hz, 15 A), properly grounded in accordance with the National Electrical Code and local codes and ordinances, is required. The ice maker should always be plugged into its own individual electrical outlet. It is recommended that a separate circuit, serving only your ice maker, be provided.
IMPORTANT: 1. All installations must be in accordance with local plumbing code requirements. Professional installation is recommended. 2. Make certain that the hoses are not pinched or kinked or damaged during installation. 3. Check for leaks after connection. Tools required: ½? open-end wrench, Phillips screwdriver Connecting the water line: 1. Turn off main water supply. 2. Find a ½? to ¾? vertical water pipe near the installation location. The distance should be less than 9 feet.
Operation Final Check List before Operation 1. Have all packing materials and tape been removed from the interior and exterior of the ice maker? 2. Did you clean the ice storage bin? (See pages 15 - 17.) 3. Have the installation instructions been followed, including connecting the machine to water and electricity? 4. Has the machine been leveled? 5.
and storage, the first batch of cubes must be discarded. ? Never turn the water supply tap off when the ice maker is working. ? Never touch the evaporator when the machine is running. ? Except to take ice from the unit, keep the door closed to reduce melting and insure proper ice formation. How the Machine Makes Ice When the power switch is first turned ON, the machine is in Stand-by mode. After about 3 minutes, it will automatically proceed to the ice-making stage.
? Running water may make a splashing sound. ? You may hear air being forced over the condenser by the condenser fan. ? During the Harvest cycle, you may hear the sound of ice cubes falling into the ice storage bin. Preparing the Ice Cube Machine for Long Storage If the ice cube machine will not be used for a long time, or it is to be moved to another place, it will be necessary to drain the system of water. 1. 2. 3. 4. Shut off the water supply at the main water source.
Exterior Cleaning The door and cabinet may be cleaned with a mild detergent and warm water solution such as 1 oz of dishwashing liquid mixed with 2 gallons of warm water. Do not use solvent-based or abrasive cleaners. Use a soft sponge and rinse with clean water. Wipe with a soft clean towel to prevent water spotting. Clean stainless steel with a cloth dampened with a mild detergent and warm water solution. Never use an abrasive cleaning agent.
Water Distribution Tube Cleaning When you find that the ice cubes are incompletely formed or the output of ice cubes is low, the water distribution tube may be blocked. Set the power switch to OFF. Unscrew the six screws holding the top panel and remove the panel. You will see the water distribution tube. Rotate the water distribution tube so that the holes in it are facing up. Using a toothpick or similar tool, dredge the holes, then rotate the water distribution tube back to its original position.
Sanitizing the Ice-Making System 1. Set the power switch to OFF. 2. Remove all ice cubes from the storage bin. 3. Prepare a sanitizing solution by mixing 1 oz. household bleach with 1 gallon of warm water. 4. Keep the ice maker connected to the water supply. Fill the water tank with the sanitizing solution. 5. Turn the power switch ON. Within 3 minutes, press the CLEAN button. The machine will run the Automatic Clean mode. The yellow Ice Harvest and the red Ice Full LEDs will blink. 6.
Control Panel (located at left side of front bottom louver panel) Push the control panel cover to open it. The control panel includes one power switch, one button, one adjustable screw and four indicator lights. Operation of the control panel: 1. When the unit is plugged in and the power switch is turned on, the power indicator and the other three indicator lights are all on. 2. After 3 minutes for water inlet, the ice machine will start to make ice automatically.
2. 3. 4. 5. 6. for 3 minutes. Then the unit will restart and return to the ice-making mode. Ice Making (Green) LED: Ice Making indicator light When this LED is on, the unit is working in the ice-making mode. When the green LED is flashing, the unit is working in the ice-making mode but approaching the ice harvest mode. Ice Harvest (Yellow) LED: Ice Harvest indicator light When this LED is on, the unit is working in the ice harvest mode controlled by the ice-full probe. I. S.
Troubleshooting Before Calling for Service If the unit appears to be malfunctioning, read through the OPERATION section of this manual first. If the problem persists, check the Troubleshooting Guide below and on the following page. The problem may be something very simple that can be solved without a service call. ON. air screen.
The ice cubes are not completely formed when being dumped. The sprinkler is blocked. 21 Clean the sprinkler. See Interior Cleaning.
Limited Warranty Franklin Industries, L.L.C., warrants this product to be free from defects in materials and workmanship for a period of one year from the date of the original purchase. Franklin also warrants the compressor for 5 years with a Parts-only warranty from the date of purchase. Any parts that are determined to be defective will be replaced or repaired, at its sole discretion, by Franklin Industries, L.L.C.
Tested and certified to NSF Standard 12 by NSF International FIM200 OM-E-2 Printed in China 23