
Installation Owner manual
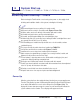

7 Page 7 - 34 TANK SENTINEL
®
INSTALLATION GUIDE
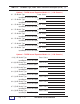
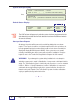
I N S T A L L A T I O N S T E P S:
1) Printout all system and tank setup reports
2) Download all setup data using INCON's
System Sentinel software !
3) Turn off the power to the console at the Electrical Panel !
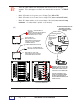
4) Remove the older version EPROM. Use a non-metallic tool,
to prevent damage to the PC Board and pry-out the old
EPROM.
5) Align the upgrade EPROM over its socket so that the notched
end is facing left as shown. Make sure each leg (pin) is
positioned exactly above its mating socket.
6) Press to seat the EPROM into its socket by using even
pressure at both ends.
7) Adjust jumper on J2 when required... J2 does not exist on
system boards later than Rev. B. For Rev. 1.1 and above
position the jumper link as shown (over right two pins of J2).
8) Turn the power back on & reprogram the Tank Sentinel as it
was previously and according to any special upgrade setup
instructions provided.
9) Upload setup data from the remote PC to the ATG using
the INCON remote management software.
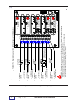
INCON 050-0200
1001/2001
REV X.XX
U10
U10
Pin
1
J2
EPROM
Enlarged
View
REAR VIEW
- CONSOLE DOOR -
170- 1 057
Pin
36
170- 1067
J11
J9
PRINTER
PC Bd
CABLE
TO J4
J4
U35
J10
U47
J2 1
J8 J7
D13
D12
D14
F16
RXD
S1
TXD
DTR
F17
TS-10 01/N-N U10
VER No. DATE
U36
MAIN
SYSTEM
PC Bd
TS- M SB 1
J4
J5
U10
J6
D15
J22
J2
D2
DCD
F14
3V
BR2032
+
+
B1
F15
J15
SW1
OFF
J17
J16
J1 4
POW ER
ON
J13
dd
Figure 7-14. Console EPROM Upgrade Instructions & Diagram
EPROM Software Revision Upgrade Installation
Follow the instructions shown in Figure 7-14. Other documentation may be
provided with the Upgrade EPROM -- follow these instructions as well.