
Installation Sheet


Installation
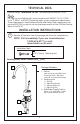
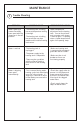
O-Ring
Ensure proper hole is in place for the
faucet. This faucet is designed for a
1-3/8” (35mm) mounting hole. Be-
fore inserting the faucet in the hole
in the sink or counter top, make sure
the O-ring is positioned in its seat. All
supply hoses are factory installed for
convenience and to ensure a proper
connection. Place the faucet in the
hole, orienting the spout towards the
sink bowl.
NOTE: There should be a service
label attached to one of the supply
hoses on the faucet. It is important
that this label remains connected to
the faucet should you ever need to
service the faucet.
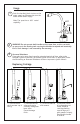
4
5
Install fastening set as shown: mounting
washer, mounting spacer (if necessary),
and mounting nut. Tighten the mounting
nut with wrench from the underside of
the sink. The mounting spacer is only
needed for installations where the faucet
is mounted directly to a stainless steel
sink, or where the counter top is less
than ½” thick.
Mounting Washer
Mounting Nut
Mounting Spacer
5