
Installation Sheet


Installation
3
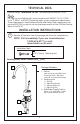
It is recommended to take the components and locate their optimum positions
before starting the installation. Make sure there is adequate clearance for the
dispenser handle(s) to open fully without interference. Make sure all plumbing
and electrical connections will reach the intended mounting positions for all the
components and there will be no obstructions or sharp bends in plumbing. Make
sure the counter top is no thicker than 2-¼”.
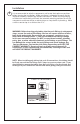
WARNING: Before inserting poly-tubing into the push fittings in subsequent
steps, ensure the ends of the tubing used are cut square and free of burrs,
both inside and outside. Ensure there are no gouges, scratches, or any
other form of damage within 1” from the cut end of the tubing. Damage
in this area can cause leakage. Do NOT use any thread sealant, plumbers
putty, glue, or other adhesive chemicals on the tubing or push fittings. This
can damage the o-rings inside the push fittings and cause leakage. Any
foreign substances used on the push fitting connections will VOID THE
PRODUCT WARRANTY. Do not use tools or modify any of the push fit
connections as this could damage the connection, resulting in leaks and
will VOID THE PRODUCT WARRANTY.
3
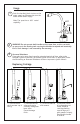
Push Fit Connections
Collar
NOTE: When installing poly-tubing into push fit connections, the tubing should
be firmly pressed into the fitting until it stops to ensure a proper seal. If you
should need to remove the tubing from the push fitting, use your thumb and
forefinger to press and hold in on the collar while gently pulling the tube out.
4