
Installation Guide
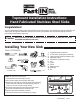


Press down evenly on the sink until the Fast-in patented clip system snaps in place and holds sink firmly in countertop opening.
Check that the sink is firmly attached. It is only necessary to draw the rim down snugly to the countertop.
Wipe excess sealant from perimeter with a wet cloth.
4.
5.
6.
Connect and tighten hot and cold faucet supply lines, strainer, drain and trap assembly. Note: Depending on the
location of sink drain holes, it may be necessary to adjust the drain pipe fittings under the sink to accommodate
the new sink installation.
Turn on water supply and examine all connections for leaks. If leak appears, tighten joint slightly. Do not overtighten.
With stopper in place, fill sink and examine area under sink and around drain flange for leaks.
Remove stopper and let water drain while examining drain connections for leaks.
1.
2.
3.
4.
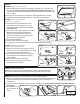
Blades such as putty knives are required to disengage
the Fast-in system from the countertop. To disengage
simply slide the blades between the Fast-in clips and
the countertop and push the sink carefully out of the
countertop. Be careful of sharp edges. Gloves and
other protective gear should always be worn when
working with metal surfaces.
Locate the position of the sink using the template provided
and make the cut-out from the countertop. Note: This
template will align the edge of the countertop to the
tangent of the top radius of the bowl (see illustration).
If there is a preference to show more reveal of sink flange
(lip), adjustments to the cut out need to be made by installer.
STEP 5: Final Steps
STEP 1: Determine position of the sink
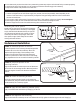
Align the bowl under the countertop cut-out and determine
the location for the mounting brackets. Mounting brackets
have been supplied. Installer will determine attachment
method.
STEP 2: Determine position of the
mounting brackets
Attach the mounting brackets loosely to the countertop
from underneath, using the fastener and attachment method
recommended by the countertop supplier.
STEP 3: Attach the mounting brackets
Apply a continuous bead around the top flange (lip) of the sink.
STEP 4: Apply silicone sealant or plumber’s putty
Removing the Fast-in System
Undermount Installation
Putty
Knives
Align the bowl with the countertop cut-out from underneath and fully tighten the brackets against the sink flange (lip).
STEP 5: Sink alignment and mounting
Place template on
countertop & co
rm where
to cut hole.
Countertop
Cabinet
Template
Step 1
Mounting bracket
(provided)
Wing nut & washer
(not provided)
Countertop
Epoxy
Silicone sealan
t
(not provided)
Sink
Step 2-5