
Installation Guide
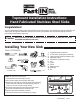


STEP 2:
OPTION A: Prepare existing countertop
Make sure existing countertop cut-out opening is the proper size. Set the new sink
into opening. Caution: do not push the sink tight to the countertop at this time. The
sink rim should rest evenly on the countertop. Slight adjustments can be made using
a file or a jigsaw.
Use caution to avoid chipping or cracking the countertop while filing or sawing.
Countertop should not be warped in order for sink to fit flush in the opening.
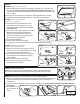
1.
2.
3.
Carefully place the sink upside down on the
countertop at the desired position. Trace the
outline of the sink onto the countertop. Do not
cut along this line.
Draw a line 1/2” (12.7mm) inside the sink outline.
Measure the cut-out line you just drew and
compare to all sink dimensions. The cut-out
should be approximately 1” (25.4mm) smaller
than the overall sink dimensions.
Verify both measurements.
Drill a pilot hole inside the cutting line.
Using a jigsaw, cut along the inside line to create the opening in the countertop.
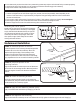
1.
2.
3.
4.
5.
Measure the cut-out line and compare to all sink
dimensions. The cut-out line should be 1” (25.4mm)
smaller than the overall sink dimensions.
Place template on countertop. Trace completely
around the edge of the template directly onto
your countertop.
Drill a pilot hole inside the cutting line.
Using a jigsaw, cut along the line to create
the opening in the countertop.
1.
2.
3.
4.
With sink in the upside-down position, place a continuous and generous bead of silicone
sealant or plumber’s putty around the entire perimeter of the rim. This serves as a
watertight seal.
Lift sink, turn face-up and lower into the countertop opening evenly. Do not tip sink to the front or back when lowering
into opening.
Line up front rim with
the front edge of the
counter.
1.
2.
3.
Attach faucet and drains to the sink. Use plumber’s putty or silicone sealant under
the faucet base and under the top flange of the drain to provide a leak-proof seal.
OPTION B: Prepare a new countertop
using the sink as a template
OPTION C: Prepare a new countertop
using the cut-out template provided
STEP 3: Install accessories
STEP 4: Inserting and securing Fast-in Quick Install System
OPTION C: 1
2
43
OPTION B: 1
4
2
5
Step 3
Step 2
Step 4: 1 Step 4: 2
Step 4: 3