Warning This device complies with Part 15 of the FCC Rules, Operation is subject to the following conditions: I. This device may not cause harmful interference, and 2. This device must accept any interference received, including interference that may cause undesired operation.
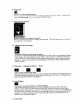
User's Guide Introduction This guide shows you how to scan an image into the bundled image editing software, i Photo Plus, using the scanner’s TWAIN program. You can also use the TWAIN program to scan from any other image editing, OCR, or other programs that can accept scans. Typically, you may do so by using the familiar select source and acquire commands (various programs may use slightly different procedures.) Getting ready 1. Click on the Start button at the lower left corner of your PC screen.
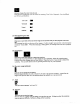
To make sure your scan comes out as best as possible, please spend a few minutes to familiarize yourself with functions described in the next TWAIN User's Interface section.
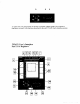
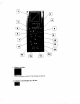
1. About Contains information on how to contact us. 2. Selection Lets you select scan areas. . Selection allows you to activate a specific scan area by drawing a rectangular crop frame over the image. To adjust the size, follow instructions in “3. Scan size” 3. Zoom Zoom in or zoom out the viewing area. Zoom lets you take a more detailed look at what you are scanning. Click the Zoom button and then move the magnifying glass cursor aver the area you would like to zoom in and click the [eft mouse button.
8. Power Off Click here to close the TWAIN interface. When you want to leave the TWAIN User's Interface, click on Power Off button. Follow steps 24 from the Getting ready section to reopen the TWAIN interface 9. Main preview window Displays a preview of the image to be scanned. | N Here you can see how your scan will appear after scanning. The crop frame shows you the area of the image that will be scanned. 10. Alternative preview image Provides an alternative look of the preview image.
Lets you choose the color mode to scan. There are four modes that you can select for scanning: True Color, Gray scale, Line Art (Black and White) and Halftone. True Color TEE Gray scale mm Line ant el Halftone 14. Message/Progress bar Gives you a quick [ook at the size of the image to be you the progress of the scan task.
19. Resolution Lets you select frequently used resolutions for scanning. Resolution is the level of detail in an image, expressed in dots per inch (dpi). High resolution value produces sharper image but takes more time and memory. aced Settings Click here to evoke the advanced settings dialog box. | For more detail scanning, click here to customize features such as resolution, exposure time, brightness, contrast Refer to Part IT for more advanced settings.
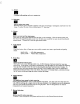
1 ; 2 ald Display window This is a display window for the settings you specify. 2.
wn oe LCD box 1s where you enter of adjust the value of resolution, exposure, brightness, contrast, mama, highlight and shadow. Each digit con be adjusted mv lucidly. Press 8 button to increase the valve and to decrease it. For example, when you want to change irresolution value from 320 to 150, follow these two steps 1) Press down Be under digit 3 and hold until it becomes 1 2 Press down BB above digit 2 and hold until it becomes 3. .
default value is 0.) To increase the lightness of an image, increase the highlight value and vice versa. To adjust the highlight , see instructions in “2. Liquid Crystal Display (1.CD) box". 9. Shadow (-100 to 100) Shadow is the darkest portion of an image. When the shadow is set to a higher value, the image becomes brighter. To adjust the shadow , see instructions in "2. Liquid Crystal Display (LCD) box”.
image is scanned, these dark edges will be automatically whitened 15. Desk Desk function is for sheet feed scanners only. It is disabled for all flatbed scanners. 16. Calibrate Calibration 1s to adjust your scanner device to ensure accurate scan output. Through the process of calibration, images can be correctly captured by your scanner and then be transferred accurately to your PC monitor. 17.
Smart Key The Smart Key includes 6 function keys which correspond to the buttons on the scanner and could be also acquired at the bottom right corner of the Windows screen. You can simply click on the Icon or press the button on the scanner to perform any scanning-related tasks. You can also adjust the default settings to achieve the best performance of the scanner.
This is the Preview button When you click the Preview, or press the Preview button on the scanner, you activate the scanner automatically using the following process: 1. Activate i Photo Plus Evoke TWAIN UL (User Interface) Scanner Previews and shows the previewed image in the main preview window wk If you are satisfied with the previewed image, you can click on the other to perform other tasks. Otherwise, relocate your scanning object and use Preview again.
Color Scan The Color Scan button which provides the quickest way to scan a photo, A or other size image. When you click on the Color Scan Icon, or press the Color Scan button on the scanner, you activate the scanner automatically according to following process: 1. Activate i Photo Plus 2. Evoke TWAIN Ul (User Interface) 3. Scanner Previews and auto-cadges the previewed image (or adjust area by mouse) 4. Scan the selected area of the image 5. Close UT and display the scanned image.
Copy The Copy button provides the quickest way to scan a document and print it out using a connected printer, like a copy machine. See the Setup section to learn more about how to set up your printer driver. When you click on the Copy icon, or press the Copy button on the scanner, you activate the scanner automatically using the following process: 1. Scan document / image 2. Print it out via default connected printer. The default settings of Copy button are Scan size: Ad, 85x 11.
OCR The OCR button provides the quickest way to perform OCR function. When you click on the OCR Icon, or press the OCR button on the scanner, you activate the scanner automatically using the following process: 1. Activate Text Bridge OCR . Evoke TWAIN UL . Scan the object {GO} Close UT and display the scanned image . Recognize Document . Add more page? No: Save the file by Key in File Name as .rtf format Yes: Evoke TWAIN Ul and continue above steps Daw Na Then use your word processor to edit the file.
Fax The Fax button provides the quickest way to fax a scanned document using the connected modem or LAN. See the Setup to learn how to set up you fax driver. When you click on the Fax, or press the Fax button on the scanner, you activate the scanner automatically using the following process: 1. Scan the object 2. Select in More Page Dialog by user 3. Go to Fax Driver To complete the fax action, key in Subject and Message, select fax number or destination address are necessary.
« E-mail The E-mail button provides the quickest way to send a scanned document or image file using the connected modem or LAN. When you click on the E-mail Icon, or press the E-mail button on the scanner, you activate the scanner automatically using the following process: 1. Preview and auto-edge . Scan the selected area . Select in More Page Dialog by user Exchange to send attached file(s) To complete E-mail function, user should be familiar with MS Exchange applications.
L122 Enable / Disable The Enable/Disable Icon allows user to enable or disable the polling from PC to scanner. When vou select Enable, polling from PC to scanner is activated. If you are not going to use the scanner, we recommend user to select Disable polling so that your PC system's performance could be highly utilized. The small Icon at the bottom right corner shows the polling status.
Setup This Setup page allows the user to customize the definition for each key. User chooses which key to be customized from the “Choose Your Key” window and set the desire action for this key from the list box below. “The Add button allows user to add additional applications for the Smart Key to launch. The Remove button removes applications in the list box When the OK button is pressed, a new icon for the action the user chooses will replace the old icon on the main window's Smart Key button.