EMI Warning This device complies with part 15 of the FCC Rules. Operation is subject to the following two conditions: (1) This device may not cause harmful interference, and (2) this device must accept any interference received, including interference that may cause undesired operation, Warning | This equipment has been tested and found to comply with the limits for a Class B digital device, pursuant to part 15 of the FCC Rules.
User's Guide Introduction This guide shows you how to scan an image into the bundled image editing software, i Photo Plus, using the scanner's TWAIN program. You can also use the TWAIN program to scan from any other image editing, OCR, or other programs that can accept scans. Typically, you may do so by using the familiar select source and acquire commands (various programs may use slightly different procedures.) Getting ready 1. Click on the Start button at the lower left corner of your PC screen.
To make sure Y Our scan comes out as best as possible, please spend a few minutes to familiarize yourself with functions described in the next TWAIN User's Interface section. TWAIN User's Interface Part I: For Beginners breed Scrisscormiisesisiic 10 16 [12].
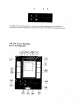
1. About Contains information on how to contact us. 2. Selection Lets you select scan areas, RN Selection allows you to activate a specific scan area by drawing a rectangular crop frame over the image. To adjust the size, follow instructions in "S. Scan size”. 3. Zoom Zoom in or zoom out the viewing area. Zoom lets you take a more detailed look at what you are scanning, Click the Zoom button and then move the magnifying glass cursor over the area you would like to zoom in and click the left mouse button.
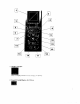
8. Power Off > Click here to close the TWAIN interface. . When you want to leave the TWAIN User's Interface, click on Power Off button. Follow steps 24 trim the Getting ready section to reopen the TWAIN interface. 9. Main preview window 3ST Displays a preview of the image to be scanned. | BN Here vou can see how your scan will appear after scanning. The crop frame shows you the area of the image that will be scanned. 18. Alternative preview image Provides an alternative look of the preview image.
Lets you choose the color mode to scan. There are four modes that you can select for scanning: True Color, Gray scale, Line Art (Black and White) and Halftone. True Color Gray scale Linear Halftone Rr Ni 14. Message/Progress bar Rives you a quick lank at the size of the image to be you the progress of tha scan task. The message bar tells you the size of the image in “width x height" and converts it into disk space needed in "bytes When the scanning 1s taking place, the message bar turns into a progress bar.
19. Resolution Lets you select frequently used resolutions for scanning. Resolution is the level of detail in an image, expressed in dots per inch (dpi). High resolution value produces sharper image but takes more time and memory. 20. Advanced Settings Click here to evoke the advanced settings dialog box. . | For more detail scanning, click here to customize features such as resolution, exposure time, contrast Refer to Part II for more advanced settings.
LCD box 15 where you enter or adjust the value of resolution, exposure, brightness, contrast, gamma, highlight and shadow. Each digit con be adjusted individually. Press BE button to increase the value and Walton decrease it. For example, when you want to change a resolution value from 320 to 150, follow these two steps: 1) Press down BE under digit 3 and hold until it becomes 1 21 Press down @8 above digit 2 and hold until it becomes 5 .
default value is 0.) To increase the lightness of an image, increase the highlight value and vice versa. To adjust the highlight | see instructions in "2. Liquid Crystal Display (LCD) box". 9. Shadow (-100 to 100) Shadow is the darkest portion of an image. When the shadow is set to a higher value, the image becomes brighter. To adjust the shadow , see instructions in "2. Liquid Crystal Display (LCD) box".
image is scanned, these dark edges will be automatically whitened | 15. Desk Desk function is for sheet feed scanners only. [tis disabled for alt flatbed scanners. 16. Calibrate Calibration is to adjust your scanner device to ensure accurate scan output. Through the process * calibration, images can be correctly captured by your scanner and then be transferred accurately to your PC monitor. 17.