Foxit WebPDF for SharePoint Installation Guide
Table of Content Chapter 1 ---Overview ............................................................................................................... 3 Chapter 2 ---Install and Configuration ....................................................................................... 3 Install Foxit WebPDF for SharePoint 2010 ........................................................................ 3 1. Plugin Installation ...........................................................................................
Chapter 1 ---Overview This document will guide the Administrator of SharePoint farm to deploy, activate, upgrade and uninstall a Foxit WebPDF Reader into a SharePoint environment.
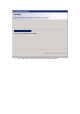
System checking will be triggered automatically. If any item fails to pass the system checking, you should check the related configurations. If all the items pass the system check, click “Next” to continue.
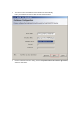
The Server name and database name will be read automatically. Fill in your windows account or SQL account and click “Next” Please read the EULA in the dialog, check I accept the terms in the License Agreement, and then click “Next”.
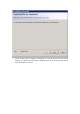
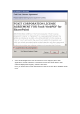
Select the Web Applications and Site Collections to be deployed (all the Web Applications and Site Collections in SharePoint service farm will be listed in “Site Collection Deployment Targets”), and then click “Next”. Note: you should select central administration as well as the sites where WebPDF will be used.
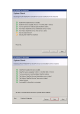
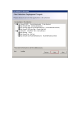
Click “Next” when all operations have been successfully completed.
Check the deployment information, and click “Close” to finish the plugin installation.
2. Install COM Component COM component provides the core function of PDF conversion. We need to install the COM component on each Application server, which runs the Foxit PDF conversion service. Please run following command to install and upgrade the COM component: Install-SPFoxitComs To check whether the COM components have been installed in the server, please use the PowerShell command: Test-SPFoxitComs Foxit WebPDF for SharePoint will then be installed successfully. 3.
But the user also can register to try out the plugin for a 30 days trail. In trail version, a watermark of evaluation will be added to every PDF page. You can register a 30-day trial version by the following steps. First, run the “SPWebReaderActivation.exe” program as an administrator in an Application Server (each application server has to do this register), then the following dialog box will be shown. Then click the “Register for 30-day trial” button to continue.
A dialog box with successful information will pop up if the registration is successful. Click “OK” button to close the activation program.
4. Activate After the license is paid, you will get the Activation code. Run “SPWebReaderActivation.exe”, click the “Activate” button, Copy and paste the license code, and click the “Install the key” button.
If you input an invalid license code, the dialog will be shown as following. Input a valid license code.
Click “Next” button, and input Licensee. Click “Active now” button, following dialog will pop up if the activation is successful.
Note: Please clear up the existing cache file if you activate the plugin from a trail version. Since the existing cache files are converted with a trail watermark from PDF, use the below command to clear it up. $webapp = Get-SPWebApplication Remove-SPFoxitWebReaderCache $webapp 5. Get started Until now, all the configurations have been completed. You can “Home” to start to use Foxit WebPDF Reader. Upload a PDF file to the document library.
Click the pop-up menu, select “Open by Foxit WebPDF Reader” or just click the button , and the PDF file will be opened in a new webpage with WebPDF Reader.
Chapter 4 ---Uninstall and Upgrade Uninstall Foxit WebPDF for SharePoint Double click the executable file (run as Administrator), and you will see the setup wizard (as shown below). Click “Next” to continue.
System checking will be triggered automatically. If any item fails to pass the system check, you should check the related configurations. If all the items pass the system check, click “Next” to continue.
If “Foxit WebPDF for SharePoint” has been installed, a dialog (as shown below) will pop up. Choose the “Remove” option, and then click “Next”. Foxit WebPDF for SharePoint will be removed automatically.
.
Repair Foxit WebPDF for SharePoint Double click the executable file (run as Administrator), and you will see the setup wizard (as shown below). Click “Next” to continue.
System checking will be triggered automatically. If any item fails to pass the system check, you should check related configurations. If all the items pass the system check, click “Next” to continue.
If “Foxit WebPDF for SharePoint” has been installed, a dialog (as shown below) will popup. Choose “Repair” option, and then click “Next”. The Upgrade/Repair will run automatically. Restart the IIS to complete upgrade/repair. Note: “Foxit WebPDF Reader” will be reset in all site collections after upgrade or repair. Please re-activate for further use.
Upgrade Foxit WebPDF for SharePoint Double click the executable file (run as Administrator), and you will see the setup wizard (as shown below). Click “Next” to continue.
System checking will be triggered automatically. If any item fails to pass the system check, you should check related configurations. If all the items pass the system check, click “Next” to continue.
If “Foxit WebPDF for SharePoint” has been installed, a dialog (as shown below) will popup. Choose “Upgrade” option, and then click “Next”. The Upgrade will run automatically. Restart the IIS to complete upgrade/repair.
Install COM Component After upgrade the Foxit WebPDF, you should reinstall COM component on on each Application server, which runs the Foxit PDF conversion service. Please run following command to install and upgrade the COM component: Install-SPFoxitComs To check whether the COM components have been installed in the server, please use the PowerShell command: Test-SPFoxitComs Restart the IIS to complete the upgrade.