
11.1

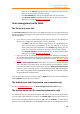
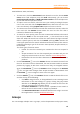

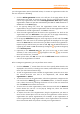

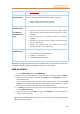

Table Of Contents
- Contents
- Foxit Admin Console Overview
- Set up and activate
- Home
- User ID Management
- License Management
- Internal Update Configuration (On-premise environments only)
- Internal Update Configuration (On-premise environments only)
- Products
- Reports
- Settings
- Support (On-cloud environments only)
- Content Logs
- Contact Us

Foxit Admin Console
Administrator Guide
15
email addresses, status, and more.)
• To invite users, click the Invite users button above the user list, choose Invite
users, enter email addresses, and click Send. Alternatively, you can choose
Invite users with CSV file and Bulk operation results to invite multiple users
by CSV and view the operation results.
• To export users to a CSV file, select the users you need by checking the boxes
next to the users and click the Export Users button above the user list. If no
users are selected, clicking Export Users exports all users in the list.
• To remove users from the Admin Console and revoke their licenses, select the
users and click the Remove button above the user list. The user that is
removed is allowed to be invited again.
• To search for a user quickly, enter the user’s name/email address in the Search
box and press Enter. Or click the Down arrow in the Search box to drop
down the Advanced Search box to filter the users whose last login time was
within a specific period, and then click Search. (Clicking Clear removes the
criteria you specified in the Search and Advanced Search boxes.) Filter users as
needed by selecting a type of the account status (Invited, Accept Invitation, or
Deactivated).
The three types of account status:
o Invited: The user has received your invitation but has not accepted it
yet.
o Accept Invitation: The user has accepted your invitation and you can
assign a product license to the user. See also License Management.
o Deactivated: The user has been deactivated and has no access to Foxit
products.
• Click the Deactivate icon in the Actions column to remove the license from
the user. Once the license is deactivated, the user becomes unable to activate
products by logging in with their accounts until they are assigned licenses
again, the Deactivate icon in the Actions column changes to the Activate
icon, and the status changes from Accept Invitation to Deactivated. Click
the Activate icon to assign a license to the user again.
• Click the Details icon in the Actions column to view the details of the user
and then do any of the following:
o Click Edit to assign licenses, or change/delete the user’s existing license
information. If the user belongs to a group, clicking the group name
switches to the Groups page where you can remove the user from his
group or move the user to another group.
o Click Reset Password to send the user a password reset email to
inform the user that he needs to change his password.
o Click Deactivate/Activate to disable/enable the user to log in to access
Foxit applications. See also Disable/enable users.
Groups
You can manage multiple users in groups, such as departments and project teams,