
11.1
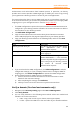

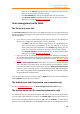
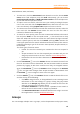

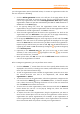

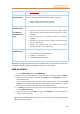

Table Of Contents
- Contents
- Foxit Admin Console Overview
- Set up and activate
- Home
- User ID Management
- License Management
- Internal Update Configuration (On-premise environments only)
- Internal Update Configuration (On-premise environments only)
- Products
- Reports
- Settings
- Support (On-cloud environments only)
- Content Logs
- Contact Us

Foxit Admin Console
Administrator Guide
12
4. After uploading the HTML file or adding the TXT record, click Verify Domain.
5. In the pop-up dialog box, select TXT Record or HTTPS correspondingly, enter the
domain you want to verify in the Domain field, and click Verify domain.
6. Then the domain will be added to the Verified Domains List and you can view
the verification status. The status of a domain may show Unverified. For example,
verifying domains using DNS may take up to 72 hours for your domain to verify
and DNS changes to take effect. Then you can click Verify in the Actions column
to verify again.
7. (Optional) To remove a domain from the list, click Remove in the Actions column.
When a verified domain is removed, the users with that domain are no longer
managed and won't appear on your managed account page.
Users
After you have successfully connected Foxit Admin Console to your account system by
configuring SSO, you can add, search, and manage user accounts on the Users page.
These user accounts entitle the end users in your organization to Foxit applications.
The Users page contains two tabs in both environments:
• Directory users and Added users (in an on-premise environment)
• Directory users and Invited users (in an on-cloud environment)
User management with LDAP (On-premise
environments only)
The Directory users tab
All users listed in this tab are from the LDAP directories you configured. On the left
side, the hierarchical structures of the LDAP directories in your enterprise are
displayed in a tree view. Select a group in the LDAP directory, and all the users in that
group are listed on the right side.
The LDAP user directories are synchronized regularly to ensure the user data in the
Admin Console is most up-to-date. After synchronization, the unsynchronized users
who may have left your organization will be listed on the Unsynced users page. To
view the page, click Unsynced users under the directory tree. To delete a user,
navigate to the user in the list and click the Delete icon in the Actions column.
You can search for a directory user (not including the Unsynced users) by entering the
user’s name or email address in the Search box and press Enter.
You can view and edit the details of each user. By clicking the View Details icon in
the Action column or by clicking on a user’s email address in the user list, the User
info dialog box appears on the right side, allowing you to do the following: