
11.1
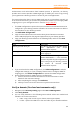
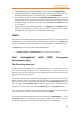

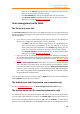
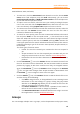

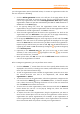

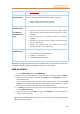

Table Of Contents
- Contents
- Foxit Admin Console Overview
- Set up and activate
- Home
- User ID Management
- License Management
- Internal Update Configuration (On-premise environments only)
- Internal Update Configuration (On-premise environments only)
- Products
- Reports
- Settings
- Support (On-cloud environments only)
- Content Logs
- Contact Us

Foxit Admin Console
Administrator Guide
11
authentication and authorization data between parties, in particular, an identity
provider and a service provider. SAML single sign-on allows your users to log in using
your organization's identity provider to access all your Foxit applications.
This section describes how to set up SAML single sign-on in Foxit Admin Console. (In
an on-cloud environment, you need to verify domains first before you can apply SAML
single sign-on to your managed accounts. See also Verify a domain.)
1. The SAML configuration requires the user’s username and email attributes to be
configured in your identity provider. Follow the on-screen instructions to add the
user attributes to your identity provider.
2. Click Add SAML configuration.
3. Copy the values (about Service Provider’s Entity ID and Assertion Consumer
Service URL) displayed on the page and paste them to your identity provider.
4. Copy your identity provider details to the following fields, and then click Save
configuration.
Field
Description
Identity provider Entity ID
The URL for your identity provider where
Foxit applications will accept
authentication requests.
Identity provider SSO URL
The URL your users will be redirected to
when logging in.
Public x509 certificate
The value for this field begins with '-----
BEGIN CERTIFICATE-----'. The certificate
contains the public key Foxit applications
use to verify that your identity provider
has issued all received SAML
authentication requests.
5. If you need to edit the SAML configuration, click Edit Configuration to edit the
configuration settings, or if your company doesn’t want to configure SAML for
single sign-on, click Delete Configuration to remove the SAML configuration.
6. Do the following steps for SAML user Sync Configuration.
1) Select a connector and then follow the on-screen instructions to enter
details for the connector settings.
2) After completing the settings, click Authorize.
3) Click Sync Users next to the connector to synchronize user data.
Verify a domain (On-cloud environments only)
1. Navigate to the Directory setting page under User ID Management.
2. Click Verify domain.
3. You can verify domains in the following two methods. Select one method and
follow the on-screen instructions.
• DNS – Copy a TXT record to your domain name system (DNS).
• HTTPS – Upload an HTML file to the root folder of your domain’s website.