
Assembly Instructions


57
Hardware Installation
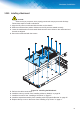
3.18.2. Installing a Heat Sink
CAUTION:
'RQRWDSSO\DQH[FHVVLYHDPRXQWRIWKHUPDOFRPSRXQGWRSUHYHQWGDPDJHWRWKHPDLQERDUG
(6'SURWHFWLRQPXVWEHZRUQGXULQJSURFHGXUHWRDYRLGGDPDJLQJFRPSRQHQWV
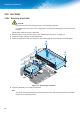
Follow these steps to install a heat sink:
1. For this step make sure to grasp the heat sink to prevent damage to the modules or the heat
pipes. Align the heat sink over the mainboard. There are screw posts to be used as guides
matching the location of the captive screws on the heat sink.
2. $WDVOLJKWDQJOH¿UVWVHDWWKH0221PRGXOHRYHUWKHVHUYHUWUD\0DNHVXUHWKHVFUHZVDUH
seated over the screw posts on the sever tray.
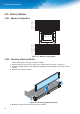
3. Gently lower the raised heat sink over the main processor until it is correctly seated in place.
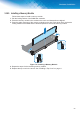
4. Tighten the eight retaining screws clockwise, in the order shown, to secure the heat sink.
1
3
5
4
2
)LJXUH ,QVWDOOLQJD+HDW6LQN
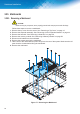
5. Replace the top cover on the server. See “Installing a Top Cover” on page 11.