
Installation & Assembly


Page: ‐3‐/4
2. Makepre‐installation
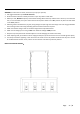
StepA1:Bymeasuring,determinethecorrectlengthoflinksneeded.Usethechainpliers,openanddiscardthe
remainingchain.
StepA2:Threadthetubes(H)ontothetopoffixture(I)tilltight
StepA3:Openthequicklink(E)toconnectthechianandtheloop(D)atthetopoftube(H),closethequicklink(E)
Openthequicklink(E)toconnectthechianandtheloop(D)atthebottomofcanopy,closethequicklink(E)
Repeatthestepstofinishtheanotherchain(G)assembled
StepA4:Carefullylacethewiresthroughthechain(G)(everyotherlink)andstopjustbeforeyoureachthetopofcanopy
Gentlypullthewirestillsnug.
3. Turnoffpower.
Beforeyoustarttomakeinstallation,NEVERattemptanyworkwithoutshuttingofftheelectricityuntiltheworkisdone.
A).Gotothemainfuse,orcircuitbreaker,boxinyourhome.Placethemainpowerswitchinthe“OFF”position.B).
Placethewallswitchinthe“OFF”position.
4. Makemountingplateinstallation
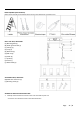
1) Carefullypassthewiresfromoutletboxthroughthemountingplate(A)
Thesideofmountingplate(A)marked"GND"mustfaceout
2)Securemountingplate(A)tooutletboxwith
outletboxscrews(L).
5.Makewireconnections
Connectwiresasbelowwiresconnectingshown.TAKENOTEOFYOURCOLOROFFIXTURE,NEVERCONNECT
WIRESTOGROUNDWIRES
ConnectgroundwireaccordingtobelowchartConnectwiresaccordingtobelowchart
Twistplasticwireconnector(N)untilwiresaretightlyjoinedtogether,wrapeachconnectorwithapprovedelectrical