USER'S MANUAL FOR BUILT-IN OVEN cod. 9606801 KS 60 gas, cod. 7191 061 Foster spa via M.S. Ottone, 18/20 42041 Brescello (RE) - Italy tel. +39.0522.687425 - tel. Servizio Assistenza +39.0522.684450 fax +39.0522.686019 - fax Servizio Ricambi +39.0522.962166 e-mail: service@fosterspa.com www.fosterspa.
1 A A A A
EN The symbol on the product or on its packaging indicates that this product may not be treated as household waste. Instead it shall be handed over to the applicable collection point for the recycling of electrical and electronic equipment. By ensuring this product is disposed of correctly, you will help prevent potential negative consequences for the environment and human health, which could otherwise be caused by inappropriate waste handling of this product.
! "! , !!# $ $ " # % " & ' ; compliance is also with the European Directive 2009/142/CE concerning gas appliances.
6 * $ $ ( ) ( $ / } ( * ( ( 1 $ ( ( $ $ ( ~
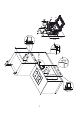
INSTALLATION ATTENTION: This appliance can be installed and operated only in rooms that are continuously ventilated according to UNI 7129/UNI 7131. IMPORTANT: The installation must be carried out by professionally qualified personnel following the manufacturer's instructions. Any maintenance on the appliance must be performed with the appliance disconnected from the electrical power supply and with the gas supply tap closed.
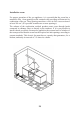
Installation room For proper operation of the gas appliance, it is essential that the room has a natural air flow from openings on the external walls providing sufficient air for combustion of the gas. These openings must have a free air -flow cross-section of at least 100 cm² (it is possible to make one or more openings). The exhaust of the combustion residual products must occur through hoods connected to chimney flues or directly to the outdoors.
CONNECTION TO THE GAS SUPPLY The supply system must be compliant with the current local standards in the country of use. The type of gas for which the oven has been regulated is indicated on the serial number plate located on one of the side edges of the cavity (visible with the door open) and on the packaging. Before carrying out the connection, the oven must be adapted to the type of gas that will be used.
Adaptation to the gas in use Other types of gas can be used by changing the burner s etting as follows: 1) Make sure that the oven is not connected to the electrical mains. 2) Open the oven door completely. 3) Extract the bottom of the oven after having removed the retaining screws 4) Take off the burner by unscrewing the screw. 5) Unscrew the injector and replace it according to the injector table provided separately.
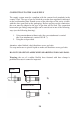
Setting of the minimum The oven thermostat is equipped with a by-pass for the minimum; when changing the type of gas it is also necessary to adjust the setting in the following manner: Remove the thermostat knob; If the front panel is in glass, remove it by unscrewing the two locking ring nuts located under the other two knobs (fig. 1); If the control panel is in metal, the adjustment can be made through the opening located on the left side of the thermostat knob housing (fig.
BEFORE USING THE OVEN PRECAUTIONS AND GENERAL SUGGESTIONS Unplug the appliances before performing any maintenance and/or cleaning. Any repairs or other work on the appliances must be carried out by qualified technicians only. Make sure that the electrical cables of other appliances used near the cooktop or oven do not touch the hot parts or get stuck in the oven door. Use oven gloves to remove pots and accessories when the oven is hot. Do not cover the bottom of the oven with aluminium foil.
TURNING ON THE OVEN The oven is equipped with electric ignition. To turn on the oven, open the door completely. Press the thermostat knob slightly and turn it counter-clockwise to the maximum. Press the knob completely to trigger the electric ignition and keep the knob pressed for a few seconds. However, do not activate the device for more than 15 seconds. If the burner does not light in 15 seconds, keep the door completely open and wait at least 1 minute before trying again.
How to use the oven It allows to choose the preferred temperature of cooking. By turning the knob anticlockwise the temperature can be selected between 150°C and Max. Pilot light The light turns on when the selector knob is in any position different from 0. Selector knob It allows to choose between the different cooking functions. Use of the selector and symbols : Oven light To turn the oven light on.
INSTRUCTIONS FOR INSTALLING KNOB GUARD OPEN OVEN DOOR INSTALL KNOB GUARD IN SLOTS OF FRONT FASTEN KNOB GUARD ONTO FRONT BY MOVING IT TO THE RIGHT MAKE SURE THE KNOB GUARD IS ATTACHED BY PULLING IT OUTWARDS CLOSE OVEN DOOR ATTENTION: During operation the knob guard gets very hot. Use kitchen gloves.
Panettone or focaccia Real focaccia ‘Sublime’ cake 175 175 175 2 3 3 55-65 60-70 60-70 Pie crust Pie crust with soft cheese Pie crust with fruit 200 200 200 3 3 3 8-10 25-35 25-35 Pie crust White bread – 1Kg of flour 180 200 3 3 30-45 25-35 Short pastries Cream puff pastries Biscuit pastries 200 200 200 225 3 2 3 2 10-15 35-45 15-20 40-50 Long-cooking roasts (e.g. roast veal) Short-cooking roasts (e.g.
CLEANING AND MAINTENANCE OF THE OVEN Important: Before performing any maintenance, you must either unplug the oven or disconnect the power supply via the omni -polar switch of the electrical system. Cleaning the oven: Let the oven cool after each use and clean it to keep burnt on residues from being repeatedly heated. For tough dirt, use a product specifically for oven cleaning. Follow the instructions on the container of the product. Clean the outside with a sponge dampened with warm water.
How to remove the oven door To make it easier to clean the oven, it is possible to remove the door from the hinges as follows: The hinges A are equipped with 2 mobile U -bolts B. When the U-bolts B are lifted, the hinges are disconnected from their housing. After this, lift the door up and pull it outwards, holding the door on both sides near the hinges. To re-install the door: Slide the hinges into the grooves and open the door all the way.
Cleaning the side racks The side racks has to be hooked onto the wall of the oven. Slide the racks and tray provided into the side rails. To remove the side racks press on part A as shown . Replacing the oven bulb Disconnect the oven from the electrical power supply Use a screwdriver to remove the light cover A Replace the lamp B Put the light cover back Restore the power supply N.B. : use only lamps that are 25W 220-240V~, type E -14, T 300°C.