USER'S MANUAL FOR BUILT-IN OVEN cod. 9606801 Compact, cod. 7170 052 - 7172 042 Foster spa via M.S. Ottone, 18/20 42041 Brescello (RE) - Italy tel. +39.0522.687425 - tel. Servizio Assistenza +39.0522.684450 fax +39.0522.686019 - fax Servizio Ricambi +39.0522.962166 e-mail: service@fosterspa.com www.fosterspa.
CONTENTS INSTRUCTIONS FOR THE USER 1. 2. 3. 4. WARNINGS FOR SAFE USE ..............................................................21 DESCRIPTION OF THE OVEN............................................................23 MODELS AND FEATURES..................................................................24 DESCRIPTION OF CONTROLS..........................................................25 4.1 FUNCTION KNOB...................................................................................................
1. WARNINGS FOR SAFE USE This manual is an integral part of the appliance and must be kept in its entirety and for the full life time of the oven. It must be read carefully before using and installing the appliance. This oven was designed for use only as a household appliance for cooking and heating food. All other uses (for example, heating rooms) is to be considered improper, and therefore dangerous. The manufacturer declines all responsibility for different uses.
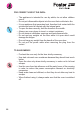
FOR CORRECT USE OF THE OVEN: • The appliance is intended for use by adults; do not allow children near it. • Do not put inflammable objects into the oven that could start a fire. • It is an appliance that generates heat, therefore limit contact with the outside and avoid all contact with the internal parts. • To open the door correctly, hold the handle in the middle. • Always use oven gloves to insert or extract containers. • Do not obstruct ventilation openings and heat dispersal slits.
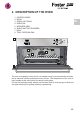
2. DESCRIPTION OF THE OVEN 1. 2. 3. 4. 5. 6. 7. 8. CONTROL PANEL DOOR OVEN LIGHT BULB OVEN FAN INFRARED GRILL SHELF AND TRAY RUNNERS RACK TRAY / DRIPPING-PAN GB 1 5 3 4 7 6 8 2 The oven is heated by hot air which is circulated evenly by a motorised fan and heated by electrical resistor positioned around the fan. The temperature of the oven is kept constant at the value set for the whole cooking time.
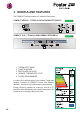
3. MODELS AND FEATURES The COMPACT series consists of 2 models of fan ovens. COMPACT KRISTAL - 7170052 (CLASS A ENERGY EFFICIENCY) 3 5 4 2 COMPACT 1810 - 7172042 (CLASS A ENERGY EFFICIENCY) 3 4 2 1 5 1. 2. 3. 4. 5. THERMOSTAT KNOB FUNCTION KNOB RED POWER ON LIGHT ORANGE THERMOSTAT LIGHT DIGITAL PROGRAMMER In order to fit in with the style of your kitchen, Foster has created 2 models of COMPACT ovens, with different aesthetic, functional and performance characteristics.
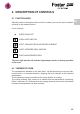
4. DESCRIPTION OF CONTROLS 4.1 FUNCTION KNOB Selecting various cooking functions couldn’t be easier; just turn the knob clockwise and stop on the desired position. List of functions: EVERYTHING OFF OVEN LIGHT AND FAN LIGHT, FAN AND CIRCULAR HEATING ELEMENT LIGHT, INFRARED GRILL AND FAN LIGHT AND INFRARED GRILL The oven light and the red indicator light always remain on during operation of the oven. 4.
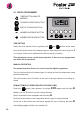
4.3 DIGITAL PROGRAMMER TIMER BUTTON (MINUTE MINDER) COOKING DURATION BUTTON END OF COOKING BUTTON NUMBER INCREASE BUTTON NUMBER DECREASE BUTTON TIME SETTING Select the clock function clock by pressing the and buttons at the same time; the dot at the centre of the display begins to flash. Adjust the clock using the + or - buttons; at the end of adjustment the dot remains lit constantly. This adjustment can be carried out at any time; if there are any programmes set, these will be cancelled.
Turn the two knobs to the off position and press the and buttons at the same time in order to stop the buzzer and to cancel the program in use. GB SEMI-AUTOMATIC OPERATION (WITH COOKING END TIME) Press the button, then release it; the time remains displayed and the letter A flashes; use the + button to set the cooking end time. After 5 seconds the current time reappears with the letter A. Position the two knobs on the temperature and the type of cooking desired.
TIMER (MINUTE MINDER) Press the button and then release it; the digits 0.00 appear; set the minutes using the + button. After 5 seconds, the time reappears with the symbol . At the end of the minutes set, the buzzer signals that the time is up, the symbol starts flashing again; use the + or - buttons to stop the buzzer. This function can be used either for manual cooking or whenever a warning is required during cooking activities. To cancel this function, push the button using the button -.
5. USING THE OVEN FIRST TIME USE Clean the oven carefully with water and activate the oven at the maximum temperature for approximately 30 minutes, in order to get rid of any manufacturing grease residues that could give off unpleasant smells during cooking. During cooking, do not place any pans or trays on the bottom of the oven as this could damage the enamel. If using baking paper, position it in such a way that it does not obstruct the circulation of air inside the oven.
5.2 COOKING ON THE RACK Turn the function knob to the position, set the desired temperature and pre-heat the oven until it reaches the selected temperature. Then insert the rack 1 with the food to be cooked resting on top of it, lightly oiled. Then slide in the drip tray 2 immediately under the rack. The warm air immediately surrounds the food to be cooked at all points and causes it to brown all over. 5.3 GRILLING Turn the function knob to the position and the thermostat knob to the max position.
5.5 COOKING TABLES GRILL FAN-ASSISTED COOKING FOODS Temp. (° C) Cooking time (minutes) 100 150 100 20 50 30 150 45 175 25 FIRST COURSES Stuffed cannelloni Lasagne Macaroni au gratin Baked macaroni or cappelletti Egg flan MEATS Roast veal (kg.1) Roast lamb Roast pork Roast pheasant Chicken Fish (kg.1) Temp.
6. OVEN MAINTENANCE Before any maintenance operation, disconnect the appliance from the electrical power supply by removing the plug from the socket. Never disconnect the plug by pulling on the power supply lead. 6.1 GENERAL CLEANING The external parts made of glass and stainless steel and rubber seals can be cleaned using a sponge dampened with lukewarm water, and neutral soap. Rinse and dry with a soft cloth after cleaning. Do not use abrasive powders or corrosive substances.
To replace the door after cleaning: 5. hold the door at the two outside edges and keep it in a slanting position; C 6 5 GB 6. using your index fingers, keep the lower levers B held up and insert them, together with the levers C into their slots; B 7. when all 4 levers B and C are perfectly inserted into the slots, open the door fully; 8 8. in doing this, the levers A return to an upright position and the door is mounted. 7 A 6.3 CLEANING THE GLASS PANELS To clean the glass panels of the door: 1.
6.4 DOOR SEAL Periodically check the condition of the seal. If it appears damaged, contact the Foster Technical Assistance Centre. You are advised not to use the oven until it has been repaired. 6.5 CHANGING THE LIGHT BULB To replace the oven lighting light bulb: 1. unscrew the protective cover A; 2. unscrew the bulb B and replace it with the same type: power 25 W, connection E 14, T 300°C; 3. replace the cover. 6.
A. FITTING 353 The appliance is suitable for fitting into furniture of any material (wood, laminated plastic, metal and masonry) as long as it is heat resistant. To embed it into the furniture, the dimensions specified in the diagram must be respected. 560 595 360 560 mm 40 540 Whether it is positioned under a worktop or on a pedestal, airing channels must be provided as shown in the figure. To guarantee proper airing the rear wall of the oven compartment must be removed.
B. ELECTRICAL CONNECTION Before carrying out the electrical connection make sure, referring to the data on the identification plate, that: • the supply voltage corresponds to the voltage specified for the appliance; • the household system and the power outlet can support the power of the appliance. The rating plate is affixed on the door stop. • Connection to the electrical mains supply must be carried out by qualified personnel in accordance with current regulations.