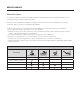
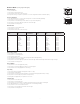
MISCELLANEOUS Water Resistance See caseback for water resistance rating for traditional watches and Hybrid Smartwatches. For Display Smartwatches visit fossilgroup.com/water for water resistance information. The water resistance rating provides guidelines for appropriate water-related exposure to avoid damage to internal watch components. Please see chart for recommended usage guidelines.
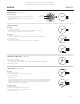
For older movements, please contact Customer Care in your market. Contact information is located on the Customer Care page of the website. ANALOG ENGLISH 2 Hand Movement 762.3 / 762.4 Time and Date Setting 1. Pull crown out to position 2 and turn to set hour and minute hands. 2. Return crown to position 1. NOTE: Large indicator shows hours; minutes are indicated by black arrow on disc. HOUR HAND MINUTE HAND 1 762.4 1 2 2 762.3 3 Hand / 3 Hand Date Date Setting 1. Pull the crown out to position 2.
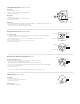
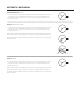
Hand with Alarm Function ISA 8176-1990 Time Setting 1. Pull crown out to position 3. 2. Turn crown clockwise to advance hour and minute hands. 3. Return crown to position 1. A Alarm Setting 1. Pull crown out to position 2. 2. Turn crown counter-clockwise to set alarm hand position. 3. Return crown to position 1. 3 2 1 ALARM HAND Alarm Function 1. Press A to toggle alarm on/off. Alarm will beep twice to indicate alarm “on,” and will beep once to indicate alarm “off.” 2.
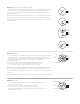
Dual Time VX01 Setting Time A 1. Pull crown A out to position 2 when the second hand is at the 12 o’clock position. 2. Turn crown to set desired time. 3. Return crown to position 1. TIME A TIME B Setting Time B 1. Pull crown B out to position 2 when the second hand is at the 12 o’clock position. 2. Turn crown to set desired time. 3. Return crown to position 1. NOTE: When setting the minute hand, advance it 4 to 5 minutes ahead of the desired time and then turn it back to the exact time.
ANALOG - DIGITAL Ana-Digi FL1331A Normal Time Display 1. Press A or B for EL. 2. Press and hold A or B for 2 seconds to turn digital display off. Press any pusher to turn on the display when it is off. 3. Press C to toggle 12/24-hour format. Display will show “AM” or “PM” for 12hour format. 4. Press D to change mode. Mode sequence is time, date, chronograph, alarm.
Ana-Digi QFL133 Normal Time Display 1. Press A to change mode. Mode sequence is normal time display, alarm, chronograph, and time/calendar setting. 2. Press B for EL. 3. Press C to toggle 12/24-hour time. NOTE: In any setting mode, if no pusher is operated for 2 minutes, all changes will be saved and the setting will automatically return to normal time display. Time and Calendar Setting 1. Press A to change to time/calendar setting mode; seconds will begin flashing. 2. Press C to set seconds to zero. 3.
World Time Module (Analog-Digital and Digital) Normal Time Display 1. Press pusher B for EL. 2. Press pusher C for hourly chime on/off. 3. Press pusher D for DST on/off for the selected city. 4. In any mode or setting, if no pusher is operated for 60 seconds, setting will be returned to normal time display. Time and Calendar Mode 1. Press and hold pusher B for 2 seconds to enter setting mode. 12/24 hour time will begin flashing. 2. Press pusher C to select 12/24 hour time. 3.
Digital QFO-020 Time and Calendar Setting A 1. Press and hold A for 2 seconds to enter the setting mode. 2. Press B to toggle through the following sequence: Light – Chime – 12/24-hour – Hour – Minute – Second – Year – Mo-Day – Month – Day 3. Press C or D to adjust the item displayed. B 4. Press and hold C or D for fast advance. 5. Press A to exit from setting mode. 6. AEL displayed on the home screen signals the light is turned on. Press any pusher to activate light. 7.
AUTOMATIC / MECHANICAL Hand Wound Mechanical 6T33 1. To start time-keeping, if watch has completely stopped, rotate crown clockwise approximately 20 times (or until you feel resistance) in position 1. When fully wound, the timepiece has a power reserve of approximately 40 hours. 2. Pull crown out to position 2 and rotate clockwise or counter-clockwise to set time after watch has been wound. 3. Return crown to position 1. 1 2 Automatic 8N24 / 82S0 / 82S7 1.
Automatic TY2809 / TY2723 / TY2542 / NH38 1. To start time-keeping, if watch has completely stopped, rotate crown clockwise approximately 50 times (or until you feel resistance) in position 1. When fully wound, the timepiece has a power reserve of approximately 36 hours. 2. Pull crown out to position 2 and rotate clockwise or counter-clockwise to set time after watch has been wound. 3. Return crown to position 1.
MULTIFUNCTION Multifunction 6P28 Time Setting 1. Pull crown out to position 2. 2. Turn crown clockwise to set desired time. 3. Return crown to position 1. 1 2 24-Hour Setting 1. Pull crown out to position 2. 2. Turn crown clockwise to make a full 12 hour rotation to set either AM or PM. AM is set between 0 and 12; PM is set between 13 and 24. 3. Return crown to position 1. 24-HOUR HAND Multifunction 6P25 DATE Date Setting 1. Pull crown out to position 2. 2. Turn counter-clockwise to select date.
DAY Multifunction 6P27 / 6P29 / 6P77 / 6P79 / VX3NE / VX7J DATE Date Setting 1. Pull crown out to position 2. 2. Turn clockwise to advance the date hand. 3. Push crown back to position 1. 1 2 3 24-HOUR 6P27 / 6P77 Day and Time Setting 1. Pull crown out to position 3. 2. Turn clockwise to advance hour and minute hands. The hand showing days of the week will also move with the hour and minute hands. Keep turning until you have reached the desired day.
Multifunction with Alarm 8176-1990 SECOND HAND A Time and Date Setting ALARM HAND 1. Pull crown out to position 2 and turn clockwise to set date to the previous day. 2. Pull crown out to position 3 and turn clockwise until the present date is displayed. Continue turning crown to set the correct AM/PM time. DATE 3. Return crown to position 1. NOTE: To ensure accuracy, do not set the date between 9:00 PM and 12:30 AM. Second Time Zone Setting 1. Pull crown out to position 2. 2.
Multifunction JP11 24 HOUR HAND A Date and Time Setting 1. Pull crown out to position 2. 2. Turn crown to set date in date window. 3. Pull crown out to position 3. 4. Turn crown to set the hour and minute hands. 5. Push crown in to position 1. NOTE: To ensure accuracy, do not set the date between 9:00 PM and 12:30 AM. DATE 1 2 3 B 24 HOUR HAND (DUAL TIME) Dual Time Setting 1. Press A to set the dual time hand forward in units of 15 minutes. 2.
CHRONOGRAPH Chronograph OS11 CHRONOGRAPH MINUTE HAND Date Setting 1. Pull crown out to position 2. 2. Turn crown counter-clockwise until the correct date is shown in the date window. 3. Return crown to position 1. A DATE 1 2 3 B SECOND HAND Time Setting 1. Pull crown out to position 3. 2. Turn crown clockwise to advance hour and minute hands. 3. Return crown to position 1. Chronograph Operation 1. Press A to start/stop the chronograph. 2. Press B for reset. Adjusting the Chronograph 1.
Chronograph 6S20 Setting the Date 1. Pull crown out to position 2. 2. Turn crown clockwise to advance the date hand. 3. Push crown back to position 1. NOTE: If the date is set between the hours of around 9:00 PM and 3:00 AM, the date may not change on the following day. CHRONOGRAPH SECOND HAND CHRONOGRAPH MINUTE HAND SECOND HAND CHRONOGRAPH 1/20 SECOND HAND A 1 2 3 B DATE Setting the Time 1. Pull crown out to position 3. 2. Turn the crown clockwise to advance hour and minute hands. 3.
Chronograph VK61 / VK64 CHRONOGRAPH MINUTE HAND Time and Date Setting 1. Pull crown out to position 2 and turn clockwise to set date to the previous day. 2. Pull crown out to position 3 and turn clockwise until the present date is displayed. Continue turning crown to set the correct AM/PM time. NOTE: 24-hour hand (VK64 model only) moves in conjunction with minute/hour hands and indicates AM/PM time. 3. Return crown to position 1.
Chronograph Stopwatch OS10 (no date - OS30) CHRONOGRAPH MINUTE HAND Time Setting 1. Pull crown out to position 3. 2. Turn crown to set the desired time. 3. Return crown to position 1. CHRONOGRAPH HOUR HAND SECOND HAND Date Setting 1. Pull crown out to position 2. 2. Turn crown counter-clockwise until the correct date is shown in the date window. 3. Return crown to position 1. A 1 2 3 B CHRONOGRAPH SECOND HAND Chronograph Operation 1. Press A to start/stop the chronograph. 2. Press B for reset.
Chronograph Stopwatch VD54 (with date - VD53) Time and Date Setting 1. Before setting the time, make sure the chronograph is stopped and set to zero (12:00) position. 2. Pull crown out to position 2. 3. Turn crown clockwise until the previous day’s date is displayed. 4. Pull crown out to position 3 when the second hand is at the 12:00 position. 5. Turn crown to set time. NOTE: 24-hour hand moves correspondingly with the hour and minute hands.
Chronograph Stopwatch YM91 CHRONOGRAPH SECOND HAND Time and Date Setting 1. Pull crown out to position 2. 2. Turn the crown to set desired time. 3. Return crown to position 1. A 2 1 B MINUTE HAND HOUR HAND Using the Stopwatch 1. Press A to start/stop the chronograph. 2. Press B to reset. CHRONOGRAPH MINUTE HAND SECOND HAND Stopwatch Hand Adjustment 1. Pull crown out to position 2. 2. Press left pusher for 2 seconds to turn stopwatch minute hand fully around and be able to set in correct position.
DIGITAL Digital MLL-004 Normal Time Display 1. Press A to display month/date for 3 seconds. 2. Press A twice (or once if date is displayed) to display seconds. Press A again to return to Normal Time Display. A Time and Date Setting 1. From Normal Time Display, press B twice to enter setting mode; month will be displayed. 2. Press A to increase value. 3. Press B to set and advance to next setting. 4. Setting sequence is: month, date, hour, minute. 5. Press B to exit setting mode; press A to activate watch.
Digital MLG-017 Normal Time Display 1. Press A to change mode. Mode sequence is normal time, alarm, time zone 2, timer, and chronograph. 2. Press B for EL. NOTE: At any point in any setting mode, press D to exit setting mode. NOTE: In any setting mode, if no pusher is operated for 2 minutes, all changes will be saved and the setting will automatically return to display mode. Time and Calendar Setting 1. In normal time display, press D; seconds will begin flashing. 2. Press C to set seconds to zero. 3.
Digital BJ2635 Normal Time Display 1. Press A to change mode. Mode sequence is normal time, world time, alarm, chronograph, recall mode, and timer. 2. Press B for EL. 3. Press C to toggle chime on/off. 4. Press D to toggle DST on/off. NOTE: In any mode, if no pusher/button is operated for 60 seconds, the setting will automatically return to normal time display. NOTE: At any point in any setting mode, press B to exit setting mode and return to normal time display. Time and Calendar Setting 1.
Ten Half Digit Digital FL145 / FL186 Normal Time Display 1. Press A to change mode. 2. Press B for EL. 3. Press C to toggle 12/24 hour format. 4. Press D to stop alarm sound. B C A D Time/Calendar Setting 1. From normal time display, press A three times to enter setting mode. Seconds will begin flashing. 2. Press C to reset seconds to zero. 3. Press D to set and advance to next setting value. 4. Press C to increase digit; press and hold C for fast advance. Press D to set each setting value. 5.
LED QFL558FA Hour/Minute Display 1. Press A to toggle display on/off. NOTE: Hour/Minute Display is the default display when turning the display on. 2. Press B to toggle hour/minute display and seconds display. A Seconds Display Press A or B to return to hour/minute display. B Time Setting 1. In Hour/Minute Display, press and hold B to enter setting mode; hour will flash once. 2. Press A to increase digits. 3. Press B to advance to minutes. 4. Press A to increase digits. 5.