
Product Info
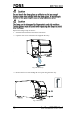
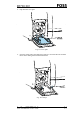
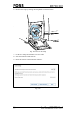
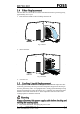
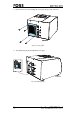


Table Of Contents
- 1 Safety
- 2 Introduction
- 3 Installation
- 4 Operating Instructions
- 4.1 Start-up
- 4.2 Analysis Procedure
- 4.3 Care - Default Features
- 4.4 Care View - Advanced Settings
- 4.4.1 Instrument Diagnostics
- 4.4.2 Advanced Diagnostics
- 4.4.3 Instrument Information
- 4.4.4 User Manual
- 4.4.5 FossConnect Synchronisation
- 4.4.6 Settings
- 4.4.7 Local Configurator
- 4.4.8 Data Maintenance
- 4.4.9 Instrument Calibration
- 4.4.10 Remote Support
- 4.4.11 Export Logs
- 4.4.12 Change PIN Code
- 4.4.13 Manual Sample Transfer
- 4.4.14 Lamp Change
- 4.4.15 Automate Sample Transfer
- 4.4.16 Help
- 4.5 Check Samples
- 4.6 Instrument Calibration
- 5 Maintenance
- 6 Troubleshooting
- 7 Parts, Accessories and Consumables
- 8 Technical Specifications

4. Remove the cap of the cooling liquid pump by turning it counterclockwise and
pull.
Fig. 119 Cap
5. Check the liquid level and refill if needed. Fig. 120 shows the correct level.
Fig. 120 Liquid levels
6. Assemble the instrument in reverse order.
7. Plug in the power cable and push the power button.
8. The instrument is now ready for analysis again. If the procedure took a long
time, the instrument might have got cold and failed the diagnostics. If so, leave
the instrument on for approximately two hours and try again.
1
3
2