
Product Info
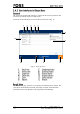
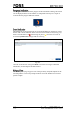
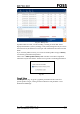
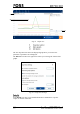

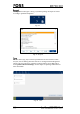

Table Of Contents
- 1 Safety
- 2 Introduction
- 3 Installation
- 4 Operating Instructions
- 4.1 Start-up
- 4.2 Analysis Procedure
- 4.3 Care - Default Features
- 4.4 Care View - Advanced Settings
- 4.4.1 Instrument Diagnostics
- 4.4.2 Advanced Diagnostics
- 4.4.3 Instrument Information
- 4.4.4 User Manual
- 4.4.5 FossConnect Synchronisation
- 4.4.6 Settings
- 4.4.7 Local Configurator
- 4.4.8 Data Maintenance
- 4.4.9 Instrument Calibration
- 4.4.10 Remote Support
- 4.4.11 Export Logs
- 4.4.12 Change PIN Code
- 4.4.13 Manual Sample Transfer
- 4.4.14 Lamp Change
- 4.4.15 Automate Sample Transfer
- 4.4.16 Help
- 4.5 Check Samples
- 4.6 Instrument Calibration
- 5 Maintenance
- 6 Troubleshooting
- 7 Parts, Accessories and Consumables
- 8 Technical Specifications

The analyser is supplied with software to support all the necessary functions and
features to operate the system on a daily basis.
At start-up of the instrument you will see the screen shown in Fig. 12.
Fig. 12 Start-up screen
The Result view (Fig. 13) is the view normally used during routine analysis. The
view shows the information about the last sample analysed. The information
presented on the screen depends on the setup made in FossManager.
1
2
3
4
5
11
10
9
8
12
6
7