FOS Pictor 350W RGBALC LED profile spot with zoom USER MANUAL
Table of contents Caution!������������������������������������������������������������������������������������������������������������������������������������������������ 3 Introduction ������������������������������������������������������������������������������������������������������������������������������������������ 3 Safety instructions ������������������������������������������������������������������������������������������������������������������������������� 3 Overview ��������������������������
Caution! Be careful with your operations. With a dangerous voltage you can suffer a dangerous electric shock when touching the wires! Avoid looking directly into the light source! Wear protective glasses and other PPE (personal protective equipment) when working on or near the fixture. Always make sure you are connecting this product to the proper voltage in accordance with the specifications in this manual or on the product’s specification label.
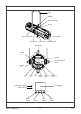
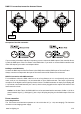
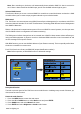
Overview Yoke Shutters Gobo holder slot Iris slot Yoke locking knob Color frame Focus knob Zoom knob Color frame clip LCD display Power in Handle Rotary and Enter button Power out Dmx in Dmx out Fuse On/off switch DMX in 5-pin DMX out 5-pin Dmx signal indicator LCD display Power indicator Menu button www.fos-lighting.eu Up button Down button 4 Enter button V1.
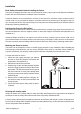
Installation Read ‘Safety information’ before installing the fixture. The fixture is designed for indoor use only and must be used in a dry location with adequate ventilation. Ensure that none of the fixture’s ventilation slots are blocked. Fasten the fixture to a secure structure or surface. Do not stand it on a surface or leave it where it can be moved or fall over.
DMX-512 connection/connection between fixtures DMX/RDM controller Occupation of the XLR-connection: If you are using controllers with this occupation, you can connect the DMX-output of the controller directly with the DMX-input of the first fixture in the DMX-chain. If you wish to connect DMX-controllers with other XLR-outputs, you need to use adapter-cables. Building a serial DMX-chain: Connect the DMX-output of the first fixture in the DMX-chain with the DMX-input of the next fixture.
Power linking between fixtures: The fixture with powercon in and out socket. Connect the power out to the power in socket in the next fixture till all are connected. Caution: maximum power linking - 6 units. Connection with the mains: Connect the device to the mains with the enclosed power supply cable.
Custom Dimmer Advance Mode Fade in Custom dimmer curve (150 ms~2230 ms) Fade out (150 ms~2230 ms) Advanced settings/calibration(Only qualified technicians should perform this function. Inqure your local dealer for password.) Authorization On/Off Signal Hold On/Off Run if signal cut RDM On/Off RDM function on/off Screen Timeout 30S Display shut off time Never Screen Brightness 30-100% Display brightness Dimmer Freq 1.20K - 24.0KHz Dimmer frequency setting Software version V1.
Main Menu Press the MENU button to enter the Main Menu interface. Menu DMX Mode Dimmer Advance Addressing All fixtures should be given a DMX starting address when using a DMX signal, so that the correct fixture responds to the correct control signals. This digital starting address is the channel number from which the fixture starts to listen to the digital control information sent out from the DMX controller.
Note: After switching on, the device will automatically detect whether DMX 512 data is received or not. If there is data received at the DMX input, you will see the DMX indicator light in green. Universal DMX Control This function allows you to use a universal DMX-512 controller to control the dimmer and strobe. A DMX controller allows you to create unique programs tailored to your individual needs.
5. Rotate the rotary knob to control the dimmer(right stop = maximum output, left stop = zero output), or strobe(right stop = maximum strobe, left stop = no strobe). Note: Rotary dimmer or strobe function works in information Menu and Mode-Manual menu. Up, Down, Enter function: The knob can also act as up, down and enter function. 1. Press the MENU button to enter the main menu interface. 2. Right rotation = Down, left rotation = Up, press = Enter function.
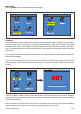
3. Press DOWN menu and select Mode sub menu. 4. Press the UP or DOWN button to select Custom menu and press ENTER. 5. Adjust fade in and fade out time to customize yout dimmer curves. Time vary from 150 ms to 2230 ms. Zoom This function allows you to adjust the beam width of the fixture. Step 1: Loosen the zoom buttons on the side of the device. Step 2: Adjust the zoom by sliding the back lenshousing forward or backward. Step 3: Tighten the zoom buttons. www.fos-lighting.eu 12 V1.
DMX Protocol 2 Channel Mode Function CH1 Dimmer Function Control 000-255: 0-100% dimmer 000-005: No function 006-025: 2700K 026-046: 3000K 047-067: 3200K 068-088: 3500K 089-109: 4000K CH2 Color temperature 110-130: 4200K 131-151: 4500K 152-172: 5600K 173-193: 6000K 194-214: 6500K 215-235: 7200K 236-255: 8000K 8 Channels Mode Function CH1 Dimmer CH2 Strobe CH3 Red CH4 Green CH5 Blue CH6 Amber CH7 Lime 000-255: Lime dimmer 0-100% CH8 Cyan 000-255: Cyan dimmer 0-100% 12 Channels Mod
12 Channels Mode Function Function Control 000-005: No function 006-025: 2700K 026-046: 3000K 047-067: 3200K 068-088: 3500K 089-109: 4000K CH9 Color temperature 110-130: 4200K 131-151: 4500K 152-172: 5600K 173-193: 6000K 194-214: 6500K 215-235: 7200K 236-255: 8000K CH10 000-004: No function Color fading 005-255: Color fading 000-004: No function CH11 005-130: Color jump, speed increasing Color marco 131-255: Color fading, speed increasing 005-005: No function 006-047: Dimmer mode, Standard 048-
Fuse Replacement This fuse is located in a fuseholder next to the MAINS OUT socket on the connections panel. To replace a fuse: 1. Disconnect the fixture from power and allow it to cool for at least 10 minutes. 2. Unscrew the cap of the fuseholder and remove the fuse. Replace with a fuse of the same size and rating only. 3. Reinstall the fuseholder cap before reapplying power. Troubleshooting Listed below are a few common problems that you may encounter, with solutions.
www.fos-lighting.eu 16 V1.