
User's Manual
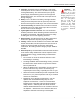


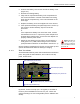


Table Of Contents

ES210 Hardware Guide: Installation
10
2.3.1 Magnetic Mounting
If you will be mounting the ES210 magnetically, first attach the
magnets to the feet on the bracket.
Figure 2.3. Attaching Magnets to the Mounting Bracket
1 Identify four, each, of the magnets, bolts and nuts included
in the mounting kit (pictured above).
2 Position a magnet with its flat side against the outer face of
one of the feet on the mounting bracket and the bolt holes
in the magnet and bracket foot aligned. When tightened,
the head of the bolt should fit into the depression on one
side of the magnet.
3 Thread a bolt through the magnet and bracket foot and
secure the magnet to the bracket with a nut, tightening the
nut firmly with a 11/32" hex driver and a #2 Phillips driver.
4 Repeat steps 2 and 3 for the remaining three magnets and
bracket feet.
5 Attach the ES210 to the mounting bracket:
With two (of the four included) mounting screws
partially screwed into the top corners of the chassis,
hang the ES210 by the shafts of these screws on the
upper ES210 mounting slots in the bracket.
Install the remaining two mounting screws through the
lower mounting slots in the bracket and into the bottom
corners of the ES210 chassis.
Tighten all four mounting screws with a ¼" hex driver or
flat screwdriver.
6 Mount the ES210-bracket assembly by placing the
magnetized feet of the bracket against a steel or iron
surface.