
User Guide


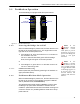
Table Of Contents

ES210 Hardware Guide: Installation
12
2 Position the bracket where you want to mount it, with the
bracket feet flat against the mounting surface, and mark the
position of the holes in all four feet.
3 If necessary, prepare the mounting surface by drilling holes
and, if appropriate, installing wall anchors at the mounting
positions you have marked.
4 Align the holes in the feet of the mounting bracket with the
prepared mounting positions and secure the bracket to the
surface with the four #10 fasteners.
5 Attach the ES210 to the mounting bracket:
With two (of the four included) mounting screws
partially screwed into the top corners of the chassis,
hang the ES210 by the shafts of these screws on the
upper ES210 mounting slots in the bracket.
Install the remaining two mounting screws through the
lower mounting slots in the bracket and into the bottom
corners of the ES210 chassis.
Tighten all four mounting screws with a ¼" hex driver or
flat screwdriver.