
User Guide


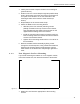
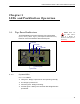
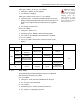
Table Of Contents

ES210 Hardware Guide: Installation
9
If you are powering the Bridge only through the DC Power
input, connect it to the power adapter that shipped with the
Bridge, and connect the adapter to a properly rated AC
power outlet.
NOTE: Third par-
ty antennas are
subject to local regulato-
ry requirements. For
outdoor installations,
they must be water-
proof.
2 If the Bridge’s internal radio will be used, connect an
omnidirectional antenna with a maximum gain of 5 dBi to
the Wi-Fi antenna port.
3 If the Bridge’s GPS function will be used, connect an
antenna to the GPS antenna port.
4 If the Bridge will be connected over Ethernet to a wired LAN
or to a remote device, connect the clear (by default)
Ethernet port to a switch on the wired LAN or to the remote
device.
2.3 Mounting the ES210
The ES210 Bridge can be worn or carried by a person on foot,
or it can be mounted on a vehicle or in a fixed position.
An ES210 Universal Mounting Kit for the ES210 Bridge is
optionally available from Fortress Technologies. The same kit
permits you to mount the ES210 on a mast, fix it to a flat
surface, or attach it magnetically to a smooth metal surface.
Mount the Bridge only where it will operate only within its safe
temperature range: 14º–140º F (
–
10º–60º C).
Regardless of how the ES210 will be mounted, you must
prepare the mounting bracket before attaching the ES210 to
the bracket. Follow the instructions appropriate for your
deployment.
2.3.1 Magnetic Mounting
If you will be mounting the ES210 magnetically, first attach the
magnets to the feet on the bracket.
Figure 2.3. Attaching Magnets to the Mounting Bracket