
Sol-Ark Integration Guide


communication cables and running as independent master batteries.
2) When paralleling multiple batteries, one battery may get "stuck" by not opening its relay contactors and flowing
amperage in or out of the battery. Toggle the battery between master and slave modes until it clicks on, and then leave in
the appropriate master or slave mode. After the battery unsticks, power down and then power back up the battery banks
using the push button if convenient.
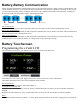
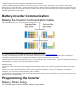
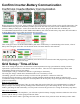
Battery-Inverter Communication
Making the Inverter Communication Cable
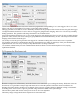
The eVault RJ45 pins 3+5+6 correspond to SolArk pins 6+7+8.
To create your own modified cable, you can use a variety of strategies:
1) A limited number of our vendors distribute a pre-made cable such as can be found here.
2) Crimp a custom RJ45 connector or use an RJ45 ethernet keystone or cut and strip an ethernet cable, twisting the
appropriate communication wires together with small wire nuts or electrical tape if necessary.
3) Most ethernet cabling is B-format cable, but it is also common to fine A-format cable. Take the ethernet jacket back up
when finished. You may use any ethernet cable for this task.
Additional notes:
1) It matters which side of the cable is plugged into the battery and inverter respectively (follow the labels on the cable
itself).
2) The yellow cable included with the Sol-Ark is fine stranded and difficult to crimp. If crimping a custom RJ45
connector, you may want to find an alternate cable to modify.
3) If providing your own RJ485 cable and routing alongside the battery power conductors, it is best (but not required by
Fortress) to use a shielded cable.
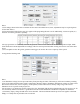
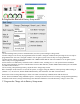
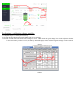
Programming the Inverter
Battery Menu Setup
A. Click the gear icon to find the battery setup menu.