
Schneider Electric Integration Guide
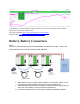

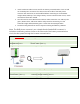
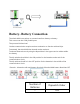
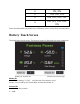
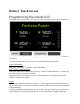
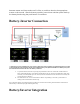
Table Of Contents
- Unpack Batteries + Check Voltage
- 1. Unpack the batteries and turn each battery on by itself.
- 2. Note the voltage of each battery and serial number. The serial numbers are useful during warranty submittal.
- 3. The batteries must be within +/-0.5V of each other before commissioning. Groups of 4 batteries or more may require a narrower voltage range to commission properly.
- 4. Turn off the batteries and install them in parallel. Notes
- If the battery voltages are significantly different, one technique is to finish battery installation and only turn on the lowest voltage battery using the pushbutton. Charge the battery, and when the charging voltage is ~0.2V above the resting voltage...
- If the batteries are slightly more than +/-0.5V from each other, turning on the highest voltage batteries only will reduce their voltages, and turning on the lowest voltage batteries only will lower the highest voltage. Likewise, turning on the lowest...
- Use of the Fortress firmware update tool can help speed up commissioning times. Fortress installers should request a firmware update tool by filling out a support ticket at https://support.fortresspower.com
- Schneider Monitoring w/Fortress
- Battery-Battery Connection
- Running on 1 eFlex
- Battery-Inverter Connection
- Battery- Battery Connection
- Battery Touch Screen
- Battery -Inverter Connection
- Battery-Battery Connection
- Battery Touch Screen
- Battery-Inverter Connection
- Battery/Inverter Integration
- Universal Parameter Settings (Closed Loop)
- Universal Parameters Settings (Open Loop)
- Important Note
- Off-Grid
- AC Coupling, Back Up
- Grid-Tied Export
- Self-Consumption (Zero Grid Export)
- Generator Settings
- Firmware Updates
- Voltage to % Chart

Battery Touch Screen
Programming the eVault LCD
The eVault has a touch screen. The bottom corners of the eVault are touch interactive.
The bottom left corner of the LCD toggles between the "master" and "slave" status of
the battery.
The bottom right hand corner of the screen establishes battery number.
One eVault battery:
Designate the battery as "master" with Parallel Num "1"
Two or More eVault batteries:
Designate either end of the battery circuit as "master" with Parallel Num "X" where X is
the total number of batteries installed.
Designate the other batteries as "slave" with Parallel Num "X" where X is the total
number of batteries installed.
Notes:
1) If running multiple batteries in "Master - 1" mode, please charge all batteries to the
same voltage prior to removing the communication cables and running as independent
master batteries.
2) When paralleling multiple batteries, one battery may get "stuck" by not opening its
relay contactors and flowing amperage in or out of the battery. Toggle the battery