
Installation Guide

Enter
22
Register animals to allow feeding
automatically
automatic
Enter
animal management
register
This is automatically displayed after switching on the machine
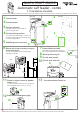
QUICK START GUIDE
Automatic calf feeder combi - 1.1 Installation checklist
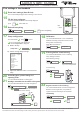
First settings at the Handheld
or
Fill the heat exchanger
15
Fault message HE not lled is automatically displayed
press
Reinstall everything
16
device data
conrm everything
new installation
Enter
HE is lled now
ESC
= back
ENTER
= conrm
Auto
i
C
Esc
Enter
1
2
3
6
5
4
7
8
9
0
Enter basic settings (date & time)
14
Setup conguration
17
Read in ID-chip
read?ID-chip
Check / change Setup settings
Setup
language:
time/date
machine
equipment
identication
ID-chip
calibration scale
stations
terminal
communication
SD card
service
Adjust the calibration scale if available then exit
setup
a)
b)
c)
[ English]
Attention: detergent quan-
tity is set to 0ml by default
Keep pressed
Turn on the feeder and hold button
until the setup menu is displayed.
Turn of the feeder
[ setup menu ]
Calibration
18
Calibrate all existing components at least 3 times
during initial commissioning.
calibration
components
Water, MP, milk, additives
TIP: check QuickStartGuide 1.3 & 1.4 Calibration
TIP: check QuickStartGuide 1.6 & 1.7 Cleaning
TIP: check QuickStartGuide 1.2 feeding plan
Besides a manual registration, it is possible to
register calves automatically to the calf feeder.
TIP: check QuickStartGuide 1.8 animal management
TIP: check QuickStartGuide 1.8 animal management
Cleaning before commissioning
19
Fill up detergent & clean
Check cleaning settings
cleaning
circuit cleaning
start?
cleaning
settings
Circuit cleaning
Reading in transmitters to store them in the system
Set feeding plans, portion settings and
operating mode
21
20
animal management
transmitter
new
Hold a transmitter next to the an-
tenna in the raceway.
Create new no. X for animal X?
Enter
This checklist refers to the basic equipment of the calf feeder. Not all available functions of the automatic feeder or the extensions can be shown.
For detailed information and valid warnings as well as safety instructions, please refer to the instructions manual. (Status 21/07)