EN User Manual Washing Machine WE9567
CONTENTS Safety information Safety instructions Product description Control panel Programmes Consumption values Options Settings 2 3 5 6 9 14 15 16 Before first use Daily use Hints and tips Care and cleaning Troubleshooting Emergency door opening Technical Data Guarantee Conditions 17 17 21 22 26 28 29 29 Subject to change without notice. SAFETY INFORMATION Before the installation and use of the appliance, carefully read the supplied instructions.
General Safety • • • • • • • • • • Do not change the specification of this appliance. Do not exceed the maximum load of 9 kg (refer to the "Programme chart" chapter). The operating water pressure at the water entry point from the outlet connection must be between 0.5 bar (0.05 MPa) and 8 bar (0.8 MPa). The ventilation opening in the base must not be covered by a carpet, mat, or any floor covering.
• Do not install the appliance where the appliance door cannot be fully opened. • Do not put a container to collect possible water leakage under the appliance. Contact the Authorised Service Centre to ensure which accessories can be used. Electrical connection service centre for the replacement of the inlet hose. • You can extend the drain hose to maximum 400 cm. Contact the service centre for the other drain hose and the extension.
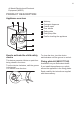
of Waste Electrical and Electronic Equipment (WEEE). PRODUCT DESCRIPTION Appliance overview 1 2 3 4 1 2 3 4 5 6 7 Worktop Detergent dispenser Control panel Door handle Rating plate Drain pump filter Feet for levelling the appliance 5 6 7 How to activate the child safety device To close the door, turn the device anticlockwise until the groove is vertical. This device prevents children or pets from being closed in the drum.
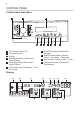
CONTROL PANEL Control panel description On/Off button (Auto Off) Programme knob Display Start/Pause button (Start/Pause Départ/Pause) 5 Delay Start button (Zeitvorwahl Départ Différé ) 6 Time Save button (Zeit Sparen - Gain de Temps) 1 2 3 4 7 Extra Rinse button (Extra Spülen Rinçage +) 8 Stains/Prewash button (Flecken Taches / Vorwäsche - Prélavage) 9 Spin reduction button (U./Min. - T/min.
The display shows: Temperature of the set programme A Cold water Spin speed of the set programme B No Spin symbol1) Rinse hold symbol 1) Only available for SPIN/DRAIN programme. The phase symbols When a programme is set, all the symbols of the phases related to the programme come on. When the programme starts, only the symbol of the phase in operation flashes. When the programme is completed, the symbol of the last phase is on.
Programme time When the programme starts, the programme time decreases with steps of 1 minute. Delay start When you press the delay start button, the display shows the delay start time Alarm codes If the appliance has a malfunction, the display shows alarm codes. Re‐ fer to «Troubleshooting». H The display shows this message for some seconds when: • you cannot set a function with the washing programme • you try to change the washing programme while it operates. When the programme is completed.
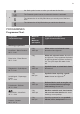
the Stain symbol comes on when you activate the function. The Prewash symbol comes on when this function is activated. L The indicator bar is not fully filled when you set only one of the func‐ tions. The indicator bar is fully filled when you set the two functions. PROGRAMMES Programme Chart Programme Temperature range Maximum load Maximum spin speed Programme description (Type of load and soil level) 9 kg 1600 rpm White cotton and coloured cotton. Normal soil and light soil.
Programme Temperature range Maximum load Maximum spin speed Programme description (Type of load and soil level) 9 kg 1600 rpm White cotton items. This programme removes micro-organisms thanks to the washing by 60°C and adds one rinse. In this way the wash is more effective. 9 kg 1600 rpm To spin the laundry and to drain the wa‐ ter in the drum. All fabrics, except woollens and delicate fabrics. 9 kg 1600 rpm To rinse and spin the laundry. All fab‐ rics, except woollens and very delicate fabrics.
Programme Temperature range Maximum load Maximum spin speed Programme description (Type of load and soil level) 1.5 kg Steam programme for cotton and syn‐ thetic items. This cycle removes odours Auffrischen - Rafraîchir from the laundry6). 1.5 kg Glätten - Défroissage Steam programme for synthetic items. This cycle helps to dewrinkle the laun‐ dry. 1) To reduce creasing, this cycle regulates the water temperature and performs a soft wash and spin phase. The appliance adds some rinses.
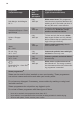
Programme options compatibility ■ Extra Leise - Extra Silence Pflegeleicht - Synthétiques Leichtbügeln - Repassage Facile Feinwäsche - Délicats Wolle/Seide - Laine/Soie Daunen - Couette Anti-Allergie - Anti-Allergies Schleudern/Pumpen - Es‐ sorage/Vidange5) ■ ■ ■ ■ ■ ■ ■ ■ Zeitvorwahl - Départ Différé Zeit Sparen - Gain de Temps 3) ■ Extra Spülen - Rinçage + 2) Koch/Bunt - Blanc/Couleurs Flecken - Taches / Vorwäsche - Prélavage1) U./Min. - T/min.
Spülen - Rinçage Cold Jeans ■ ■ ■ ■ 20 min.-3 kg ■ Super Eco 30° ■ ■ ■ ■ Baumwolle Eco - Coton Eco ■ ■ 4) ■ Zeitvorwahl - Départ Différé Zeit Sparen - Gain de Temps 3) Extra Spülen - Rinçage + 2) U./Min. - T/min. Flecken - Taches / Vorwäsche - Prélavage1) Programme ■ ■ ■ ■ ■ ■ ■ ■ ■6) ■ 1) If you use liquid detergent, set a programme without Prewash. The Stain option is not available with a temper‐ ature lower than 40°C.
Woolmark Apparel Care - Green Company for the washing of wool garments labelled as «hand wash» provided that the garments are washed according to the instructions issued by the manufacturer of this washing machine. Follow the garment care label for drying and other laundry instructions. M1361 In UK, Eire, Hong Kong and India the Woolmark symbol is a certification trademark.
Programmes Load (kg) Energy consump‐ tion (kWh) Water consump‐ tion (litre) Approxi‐ mate pro‐ gramme duration (minutes) Remain‐ ing mois‐ ture (%)1) Pflegeleicht - Syn‐ thétiques 40°C 4 0,72 55 155 35 Feinwäsche - Déli‐ cats 40°C 4 0,60 59 89 35 2 0,35 58 60 30 9 0,640 57 226 44 4.5 0,349 41 185 44 4.
Extra Spülen - Rinçage + With this option you can add some rinses to a washing programme. Use this option for persons allergic to detergents and in areas where the water is soft. We recommend that you use this option when you have laundry with a high level of soil. The set of this option increases the programme duration. The related indicator comes on. U./Min. - T/min. Flecken - Taches / Vorwäsche Prélavage Press this button to: • Decrease the maximum speed of the spin phase of the programme.
Permanent Extra Rinse With this option you can permanently have an extra rinse when you set a new programme. Zeitvorwahl - Départ Différé at the same time until the relevant indicator comes on/goes off. • To activate/deactivate this option press Zeit Sparen - Gain de Temps and BEFORE FIRST USE 1. Connect the mains plug to the mains socket. 2. Open the water tap. 3. Put a small quantity of detergent in the compartment for washing phase. 4.
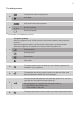
Compartment for prewash phase an soak programme. Compartment for washing phase. Compartment for liquid additives (fabric conditioner, starch). Maximum level for quantity of liquid additives. Compartment for stain remover. 4. To use liquid detergent, turn the flap down. B Flap for powder or liquid detergent. Always follow the instructions that you find on the packaging of the detergent products. Check the position of the flap 1. Pull out the detergent dispenser until it stops. 2.
The relevant indicator stops to flash and stays on. On the display the indicator of the phase is operation starts to flash. The programme starts, the door is locked. The display show the indicator . The drain pump can operate for a short time when the appliance fills water. Starting a programme with the delay start 1. Press button Zeitvorwahl - Départ Différé again and again until the display shows the number of minutes or hours of delay. The related indicator comes on. 2.
Opening the door If the temperature and level of the water in the drum are too high and/or the drum still rotates you cannot open the door. While a programme or the delay start operates, the appliance door is locked. 1. Press button Start/Pause - Départ/ Pause. In the display the related door lock indicator goes off. 2. Open the appliance door. 3. Close the door and press button Start/ Pause - Départ/Pause. The programme or the delay start continues.
HINTS AND TIPS WARNING! Refer to Safety chapters. The laundry load • Divide the laundry in: white, coloured, synthetics, delicates and wool. • Obey the washing instructions that are on the laundry care labels. • Do not wash white and coloured items together. • Some coloured items can discolour with the first wash. We recommend that you wash them separately for the first times. • Button up pillowcases, close zippers, hooks and poppers. Tie up belts. • Empty the pockets and unfold the items.
Use the correct quantity of the water softener. Obey the instructions that you find on the packaging of the product. CARE AND CLEANING WARNING! Refer to Safety chapters. • Remove all laundry from the drum. Door seal External cleaning Clean the appliance with soap and warm water only. Fully dry all the surfaces. CAUTION! Do not use alcohol, solvents or chemical products.
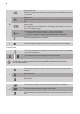
Cleaning the detergent dispenser 1. 2. 1 2 3. 4. Cleaning the drain filter Do not clean the drain filter if the water in the appliance is hot. Regularly check the drain pump filter and make sure that it is clean. Repeat the steps 2 and 3 until the water stops to flowing out.
1. 2. 2 180° 1 3. 4. 1 2 2 1 5. 6. 7. 8.
Always keep a rag nearby to dry up any water spillage. Cleaning the inlet hose and the valve filter 1. 2. 1 2 3 3. 4. 45° 20° Emergency drain Frost precautions Because of a malfunction, the appliance cannot drain the water. If the appliance is installed in an area where the temperature can be less than 0° C, remove the remaining water from the inlet hose and the drain pump. If this occurs, do steps (1) through (8) of 'Cleaning the drain filter'. If necessary, clean the pump.
WARNING! Make sure that the temperature is higher than 0 °C before you use the appliance again. The manufacturer is not responsible for damages caused by low temperatures. TROUBLESHOOTING WARNING! Refer to Safety chapters. Introduction The appliance does not start or it stops during operation. First try to find a solution to the problem (refer to the table). If the problem persists, contact the Authorised Service Centre.
Problem Possible solution • • The appliance does not fill with water properly. • • • • • The appliance does not fill with water and drain immediately. The appliance does not drain the water. • Make sure that the drain hose is in the correct position. The hose may be too low. Refer to 'Installation instruction'. • • • • Make sure that the sink spigot is not clogged. Make sure that the drain hose has no kinks or bends. Make sure that the connection of the drain hose is correct.
Problem You cannot open the ap‐ pliance door. The appliance makes an unusual noise. Possible solution • • • • • • • • Make sure that the washing programme is finished. Set the drain or the spin option if there is water in the drum. Do the emergency drain procedure. See "Frost precautions" (in "Care and Cleaning" chapter). Make sure that the appliance receives electrical power. This problem may be caused by a failure of the appliance. Contact the Authorised Service Centre.
Make sure that the water level inside the drum is not too high. If necessary, proceed with an emergency drain (refer to «Emergency drain» in «Care and cleaning» chapter). To open the door, proceed as follows: 1. Press the Auto Off button to switch the appliance off. 2. Disconnect the mains plug from the mains socket. 3. Open the filter flap. 4. Keep the emergency unlock trigger pulled downward and, at the same time, open the appliance door. 5. Take out the laundry and then close the appliance door. 6.
of this appliance insofar as we guarantee that the appliance is free from material defects and manufacturing defects. During the two-year warranty period, from the day on which the appliance is first installed onwards, from 01.01.2004 at the earliest, we will replace faulty parts free of charge to the owner in line with the following provisions. The new warranty period of two years applies only to those appliances which come with this warranty brochure.
FORS AG/SA Schaftenholzweg 8 2557 Studen Tel. 032 374 26 26 Fax. 032 374 26 70 info@fors.ch www.fors.