EN User Manual Washing Machine WE9567
CONTENTS Safety information Safety instructions Product description Control panel Programmes Consumption values Options Settings 2 3 5 6 9 14 15 16 Before first use Daily use Hints and tips Care and cleaning Troubleshooting Emergency door opening Technical Data Guarantee Conditions 17 17 20 21 26 28 29 29 Subject to change without notice. SAFETY INFORMATION Before the installation and use of the appliance, carefully read the supplied instructions.
General Safety • • • • • • • • • Do not change the specification of this appliance. Obey the maximum load volume of 9 kg (refer to the “Programme chart” chapter). The operating water pressure (minimum and maximum) must be between 0,5 bar (0,05 MPa) and 8 bar (0,8 MPa). The ventilation openings in the base (if applicable) must not be obstructed by a carpet. The appliance is to be connected to the water mains using the new supplied hose-sets. Old hose sets must not be reused.
• Make sure not to cause damage to the mains plug and to the mains cable. Should the mains cable need to be replaced, this must be carried out by our Authorised Service Centre. • Connect the mains plug to the mains socket only at the end of the installation. Make sure that there is access to the mains plug after the installation. • Do not touch the mains cable or the mains plug with wet hands. • Do not pull the mains cable to disconnect the appliance. Always pull the mains plug.
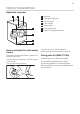
PRODUCT DESCRIPTION Appliance overview 1 2 3 4 1 2 3 4 5 6 7 Worktop Detergent dispenser Control panel Door handle Rating plate Drain pump filter Feet for the appliance level 5 6 7 How to activate the child safety device To close the door, turn the device anticlockwise until the groove is vertical. This device prevents children or pets to be closed in the drum. Fixing plate kit (4055171146) Turn the device clockwise, until the groove is horizontal. You cannot close the door.
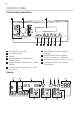
CONTROL PANEL Control panel description On/Off button (Auto Off) Programme knob Display Start/Pause button (Start/Pause Départ/Pause) 5 Delay Start button (Zeitvorwahl - Départ Différé ) 6 Time Save button (Zeit Sparen - Gain de Temps) 1 2 3 4 7 Extra Rinse button (Extra Spülen Rinçage +) 8 Stains/Prewash button (Flecken Taches / Vorwäsche - Prélavage) 9 Spin reduction button (U./Min. - T/min.
The display shows: Temperature of the set programme A Cold water Spin speed of the set programme B No Spin symbol1) Rinse hold symbol 1) Only available for SPIN/DRAIN programme. The phase symbols When a programme is set, all the symbols of the phases related to the programme come on. When the programme starts, only the symbol of the phase in operation flashes. When the programme is completed, the symbol of the last phase is on.
Programme time When the programme starts, the programme time decreases with steps of 1 minute. Delay start When you press the delay start button, the display shows the delay start time Alarm codes If the appliance has a malfunction, the display shows alarm codes. Refer to «Troubleshooting». H The display shows this message for some seconds when: • you cannot set a function with the washing programme • you try to change the washing programme while it operates. When the programme is completed.
the Stain symbol comes on when you activate the function. The Prewash symbol comes on when this function is activated. L The indicator bar is not fully filled when you set only one of the functions. The indicator bar is fully filled when you set the two functions. PROGRAMMES Programme Chart Programme Temperature range Maximum load Maximum spin speed Programme description (Type of load and soil level) 9 kg 1600 rpm White cotton and coloured cotton. Normal soil and light soil.
Programme Temperature range Maximum load Maximum spin speed Programme description (Type of load and soil level) 9 kg 1600 rpm White cotton items. This programme removes micro-organisms thanks to the washing by 60°C and adds one rinse. In this way the wash is more effective. 9 kg 1600 rpm To spin the laundry and to drain the water in the drum. All fabrics. 9 kg 1600 rpm To rinse and spin the laundry. All fabrics. 9 kg 1200 rpm Items in denim and jersey. Also for dark coloured items. 20 min.
Programme Temperature range Glätten - Défroissage 40° C Maximum load Maximum spin speed Programme description (Type of load and soil level) 1.5 kg Steam programme for synthetic items. This cycle helps to dewrinkle the laundry. 1) To reduce the creases of the laundry, this cycle regulates the water temperature and performs a soft wash and spin phase. The appliance adds some rinses. 2) During this cycle the drum rotates slowly to ensure a gentle washing.
Programme options compatibility ■ Extra Leise - Extra Silence Pflegeleicht - Synthétiques Leichtbügeln - Repassage Facile Feinwäsche - Délicats Wolle/Seide - Laine/Soie Daunen - Couette Anti-Allergie - Anti-Allergies Schleudern/Pumpen - Essorage/Vidange5) ■ ■ ■ ■ ■ ■ ■ ■ Zeitvorwahl - Départ Différé Zeit Sparen - Gain de Temps 3) ■ Extra Spülen - Rinçage + 2) Koch/Bunt - Blanc/Couleurs Flecken - Taches / Vorwäsche - Prélavage1) U./Min. - T/min.
Spülen - Rinçage Cold Jeans ■ ■ ■ ■ 20 min.-3 kg ■ Super Eco 30° ■ ■ ■ ■ Baumwolle Eco - Coton Eco ■ ■ 4) ■ Zeitvorwahl - Départ Différé Zeit Sparen - Gain de Temps 3) Extra Spülen - Rinçage + 2) U./Min. - T/min. Flecken - Taches / Vorwäsche - Prélavage1) Programme ■ ■ ■ ■ ■ ■ ■ ■ ■6) ■ 1) If you use liquid detergent, set a programme without Prewash. The Stain option is not available with a temperature lower than 40°C.
Woolmark Apparel Care - Green The wool wash cycle of this machine has been approved by The Woolmark Company for the washing of wool garments labelled as «hand wash» provided that the garments are washed according to the instructions issued by the manufacturer of this washing machine. Follow the garment care label for drying and other laundry instructions. M1361 In UK, Eire, Hong Kong and India the Woolmark symbol is a certification trademark. CONSUMPTION VALUES The data of this table are approximate.
Programmes Load (kg) Wolle/Seide - Energy consumption (kWh) Water consumption (litre) Approximate programme duration (minutes) 0,35 58 60 30 2 Laine/Soie 30 °C 2) Remaining moisture (%)1) Standard cotton programmes Standard 60 °C cotton 9 0,640 57 226 44 Standard 60 °C cotton 4.5 0,349 41 185 44 Standard 40 °C cotton 4.5 0,347 40 199 44 1) At the end of spin phase. 2) Not available for some models.
symbol and the indicator bar comes on in the display. • Flecken - Taches: Use this option for laundry with hard stains to remove. When you set this option, put the stain remover into compartment . This function increases the programme duration. This option is not available with a temperature lower than 40° C. • Vorwäsche - Prélavage: Use this option to add a prewash phase before the washing phase. We recommend that you use this option when you have laundry with a high level of soil.
BEFORE FIRST USE 1. Put a small quantity of detergent in the compartment for washing phase. 2. Set and start a programme for cotton at the highest temperature without laundry. This removes all possible dirt from the drum and the tub. DAILY USE WARNING! Refer to Safety chapters. Filling the detergent and additives Activating the appliance 1. Open the water tap. 2. Connect the mains plug to the mains socket. 3. Press button Auto Off to activate the appliance. A short tune sounds.
Check the position of the flap 1. Pull out the detergent dispenser until it stops. 2. Press the lever down to remove the dispenser. 1 2 3. To use powder detergent, turn the flap up. A 4. To use liquid detergent, turn the flap down. B With the flap in the position DOWN: • Do not use gelatinous or thick liquid detergents. • Do not put more liquid detergent than the limit showed in the flap. • Do not set the prewash phase. • Do not set the delay start function. 5.
shows the number of minutes or hours of delay. The related indicator comes on. 2. Press button Start/Pause - Départ/ Pause. The appliance starts the countdown of the delay start. When the countdown is completed, the programme starts automatically. Before you press button Start/ Pause - Départ/Pause to start the appliance, you can cancel or change the set of the delay start. Cancelling the delay start To cancel the delay start: 1. Press button Start/Pause - Départ/ Pause to set the appliance to pause.
The indicator of Start/Pause - Départ/Pause button goes off. 1. Press button Auto Off to deactivate the appliance. After five minutes from the end of the programme, the energy saving function automatically deactivates the appliance. When you activate the appliance again, the display show the end of the last set programme. Turn the programme knob to set a new cycle. 2. Remove the laundry from the appliance. 3. Make sure that the drum is empty. 4.
• Be careful with the curtains. Remove the hooks or put the curtains in a washing bag or pillowcase. • Do not wash in the appliance laundry without hems or with cuts. Use a washing bag to wash small and/or delicate items (e.g. underwired bras, belts, tights, etc. ). • A very small load can cause balance problems with the spin phase. If this occurs, adjust manually the items in the tub and start the spin phase again. Stubborn stains For some stains, water and detergent is not sufficient.
Regularly examine the drum to prevent limescale and rust particles. Regularly examine the seal and remove all objects from the inner part. To remove rust particles use only special products for washing machine. Do this separately from the laundry wash. Cleaning the drum Always obey the instructions that you find on the packaging of the product. Maintenance wash Regularly examine the drum to prevent limescale and rust particles. Only use special products to remove rust particles from the drum.
3. 4. Cleaning the drain filter Do not clean the drain filter if the water in the appliance is hot. 1. 2. 2 1 1 2 1 3. 4.
5. 6. 1 2 7. 8. 1 2 9.
Cleaning the inlet hose and the valve filter 1. 2. 1 2 3 3. 4. 45° 20° Emergency drain Because of a malfunction, the appliance cannot drain the water. If this occurs, do steps (1) through (9) of 'Cleaning the drain filter'. If necessary, clean the pump. When you drain the water with the emergency drain procedure, you must activate again the drain system: 1.
TROUBLESHOOTING WARNING! Refer to Safety chapters. Introduction The start of the appliance does not occur or it stops during operation. First try to find a solution to the problem (refer to the table). If not, contact the Authorised Service Centre. With some problems, the acoustic signals operate and the display shows an alarm code: • - The appliance does not fill with water properly. • - The appliance does not drain the water. • - The appliance door is open or not closed correctly.
Problem Possible solution The appliance does not fill with water and drain immediately. Make sure that the drain hose is in the correct position. The hose may be too low. The appliance does not drain the water. Make sure that the sink spigot is not clogged. Make sure that the drain hose has no kinks or bends. Make sure that the drain filter is not clogged. Clean the filter, if necessary. Refer to 'Care and cleaning'. Make sure that the connection of the drain hose is correct.
Problem Possible solution Add more laundry in the drum. The load may be too small. The cycle is shorter than the time displayed. The appliance calculates a new time according to the laundry load. See the ‘Consumption Values’ chapter. The cycle is longer than the time displayed. An unbalanced laundry load increases the duration time. This is a normal behaviour of the appliance. The washing results are not satisfactory. Increase the detergent quantity or use a different detergent.
5. Take out the laundry and then close the appliance door. 6. Close the filter flap.
inspection carried out by FORS AG locates a defect that is without doubt covered by these warranty provisions. should a service technician be unable to reach an appliance by car are also excluded. 4. The warranty obligation shall expire if repairs or modifications are made or individual parts are replaced by a party other than an authorised FORS AG customer service point. 5. If repairs or customer service work are requested due to reasons not covered by this warranty, they are to be paid by the client.
FORS AG/SA Schaftenholzweg 8 2557 Studen Tel. 032 374 26 26 Fax. 032 374 26 70 info@fors.ch www.fors.