User manual Washing Machine WE 8565
Contents Safety information Environment concerns Technical information Product description Accessories Control panel Programmes Before the first Use Using the appliance Activating the appliance and setting a programme 2 3 4 4 5 5 9 12 12 Loading the laundry Filling detergent and additives Setting the delay start Starting a programme At the end of programme Helpful hints and tips Care and cleaning Troubleshooting Installation 12 13 14 14 15 16 17 20 22 12 Subject to change without notice.
• Do not touch the glass of the door while a programme operates. The glass can be hot (only for front-loading appliances). Care and cleaning • Deactivate the appliance and disconnect the mains plug from the mains socket. • Do not use the appliance without the filters. Make sure that the installation of the filters is correct. An incorrect installation causes water leakages. Installation • The appliance is heavy, be careful when you move it.
Put the packaging in applicable containers to recycle it. Ecological hints To help the environment, use less water and energy, obey these instructions: • Set a programme without the prewash phase to wash laundry with normal soil. • Always start a washing programme with the maximum load of laundry. • If necessary, use a stain remover when you set a programme with a low temperature.
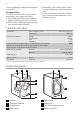
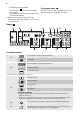
9 Water inlet valve 10 Mains cable 11 Transit bolts 12 Feet for the appliance level Accessories Accessories 1 2 4 3 1 Spanner To remove the transit bolts. 2 Plastic caps To close the holes on the rear side of the cabinet after the removal of the transit bolts. 3 Anti-flood inlet hose To prevent possible leakage 4 Plastic hose guide To connect the drain hose on the edge of a sink. Control panel 1 2 Anticrease 3 Cottons Refresh Extra Silent Economy Synthetics Super Eco Easy Iron 20 Min.
– All settings are cancelled. – Press button 1 to activate the appliance again. – Set again the washing programme and all possible options. • After 5 minutes from the end of the washing programme. Refer to 'At the end of programme'. Programme knob 2 Turn this knob to set a programme. The related programme indicator comes on.
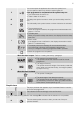
You cannot open the appliance door when the symbol is on. You can open the door only when the symbol goes off. F If the programme is completed but the symbol stays on: • The 'Rinse Hold' function is on. • There is water in the drum. G The delay start symbol comes on when you set the delay start function. H The child safety lock symbol comes on when this device is activated. • The programme time When the programme starts, the programme time decreases with steps of 1 minute.
• Shortened time • Extra Quick The extra rinse symbol comes on when this function is activated. L The value shows the total number of the rinses. The indicator bar is fully filled when you set the maximum number of rinses. The Stain symbol comes on when you activate the function. The Prewash symbol comes on when this function is activated. M The indicator bar is not fully filled when you set only one of the functions. The indicator bar is fully filled when you set the two functions.
Temperature button 10 Press button 10 to change the default tem- -, perature. When the display shows the appliance does not heat the water. Acoustic signals function You can hear the acoustic signals when: • You activate the appliance. • You deactivate the appliance. • You press the buttons. • The programme is completed. • The appliance has a malfunction. To deactivate/activate the acoustic signals, press button 8 and button 7 at the same time for 6 seconds.
Programme Temperature Type of load Max. weight of load Cycle description Functions Leichtbügeln Repassage Facile4) Easy iron 60° - Cold Synthetic fabrics with normal soil. max. load 4 kg Wash Rinses Short spin SPIN REDUCTION RINSE HOLD PREWASH EXTRA RINSE TIME SAVING Feinwäsche Délicats Delicates 40° - Cold Delicate fabrics as acrylics, viscose, polyester items with normal soil. max.
Programme Temperature Energiesparen Economique8) 60° - 40° STANDARD PROGRAMMES for the Energy Label consumption values Type of load Max. weight of load Cycle description White and fast coloured cotton with normal soil. max. load 8 kg Wash Rinses Long spin Functions SPIN REDUCTION RINSE HOLD PREWASH1) STAINS2) EXTRA RINSE TIME SAVING) 1) If you use liquid detergent, set a programme without PREWASH. 2) The Stain function is not available with a temperature lower than 40°C.
Programme1) Energy consumption (KWh)2) Water consumption (litre)2) Synthetics 40 °C 0.60 48 Delicates 40 °C 0.70 58 Wool/ Handwash 30 °C 0.35 57 1) Refer to the display for the programme time. 2) The consumption information shown in this chart is indicative. It can vary depending on the quantity and the type of laundry, on the temperature of the water supply and on the ambient temperature.
is indicative and changes with the type of the laundry. If you put in the drum more laundry than the maximum load, the symbols MAX and the value 0.0 start to flash. You can wash your laundry but the water and energy consumption increase. To have the best consumption and washing performance remove some items until the symbols stop to flash. The overload indication is available only for programmes with a maximum load lower than the appliance maximum load. 5. Close the door. The value 0.
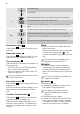
Check the position of the flap 1. Pull out the detergent dispenser until it stops. 2. Press the lever down to remove the dispenser. 3. To use powder detergent, turn the flap up. 4. To use liquid detergent, turn the flap down. 5. Measure out the detergent and the fabric conditioner. 6. Carefully close the detergent dispenser. Make sure that the flap does not cause a blockage when you close the drawer. With the flap in the position DOWN: – Do not use gelatinous or thick liquid detergents.
The appliance adjust automatically the cycle time to the laundry you have put in the drum to have perfect washing results in the minimum necessary time. After approximately 15 minutes from the start of the programme, the display shows the new time value. Interrupt a programme 1. Press button 4 . The indicator flashes. 2. Press button 4 again. The washing programme continues. Cancel a programme 1. Press button 1 to cancel the programme and to deactivate the appliance. 2.
Helpful hints and tips The laundry load • Divide the laundry in: white, coloured, synthetics, delicates and wool. • Obey the washing instructions that are on the laundry care labels. • Do not wash together white and coloured items. • Some coloured items can discolour with the first wash. We recommend that you wash them separately for the first times. • Button up pillowcases, close zippers, hooks and poppers. Tie up belts. • Empty the pockets and unfold the items.
Care and cleaning Warning! Disconnect the appliance from the mains supply before you clean it. Descaling The water we use contains limescale. If it becomes necessary, use a water softener to remove limescales. Use a special product made for washing machines. Obey the instructions that you find on the packaging of the manufacturer. Do this separately from the laundry wash. • Clean the drum with special product for stainless steel.
Clean the pump if: • The appliance does not drain the water. • The drum cannot turn. • The appliance makes an unusual noise because of the blockage of the drain pump. • The display shows an alarm code because of the problem with water drain. Warning! • Disconnect the mains plug from the mains socket. • Do not remove the filter while the appliance operates. Do not clean the drain pump if the water in the appliance is hot. The water must be cold before you clean the drain pump.
The inlet hose filter and the valve filter It could be necessary to clean the filters when: • The appliance does not fill with water. • The appliance fills with the water for a long time. • The indicator of button 4 flashes and the display shows the related alarm. Refer to 'Troubleshooting'. Warning! Disconnect the mains plug from the mains socket. Cleaning the water inlet filters: 1. Close the water tap. 2. Remove the water inlet hose from the water tap. 3.
Troubleshooting The start of the appliance does not occur or it stops during operation. First try to find a solution to the problem (refer to the table). If not, contact the service centre. • - The appliance does not drain the water. • - The appliance door is open or not closed correctly. • - The anti-flood device is on. With some problems, the acoustic signals operate and the display shows an alarm code: • - The appliance does not fill with water. Problem The appliance does not fill with water.
Problem There is water on the floor. You cannot open the appliance door. The appliance makes an unusual noise. Possible cause Possible solution You did not press button 4 . Press button 4 . The delay start is set. To start immediately the programme, cancel the delay start. The Child Lock function is activated. Deactivate the Child Lock function. Leakages from the couplings of the water hoses. Make sure that the couplings are tight. Leakages from the drain pump.
Refer to the information supplied with this appliance for guarantee condition and point of contact. The information to give to the service is on the rating plate. We recommend that you write the information here: Model (MOD.) .................. Product number (PNC) .................. Serial number (S.N.) .................. Installation Unpacking 1. Use the gloves. Remove the external film. If necessary, use a cutter. 2. Remove the cardboard top. 3. Remove the polystyrene packaging materials. 4.
8. Pull up the appliance in vertical position. 9. Remove the power supply cable and the drain hose from the hose holders. 10. Remove the three bolts. Use the key supplied with the appliance. 11. Pull out the plastic spacers. 12. Put the plastic caps in the holes. You can find these caps in the user manual bag. Warning! Remove all the packaging and the transit bolts before you install the appliance. We recommend that you keep the packaging and the transit bolts for when you move the appliance.
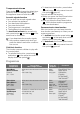
A 20 O 45 O Water drainage There are different procedures to connect the drain hose: With the plastic hose guide. • Connect the water inlet hose to the cold water tap with 3/4 thread. • On the edge of a sink. Caution! Make sure that there are no leaks from the couplings. Do not use an extension hose if the inlet hose is too short. Contact the service centre for the replacement of the inlet hose. Water-stop device The inlet hose has a water stop device.
clip. Make sure that the drain hose makes a loop to prevent that remaining particles go in the appliance from the sink. • Directly to a built-in drain pipe in the room wall and tighten it with a clip. Refer to the illustration. Directly into a drain pipe at a height of not less than 60 cm and not more than 100 cm. The end of the drain hose must always be ventilated , i.e. the inner diameter of the drainpipe must be larger than the external diameter of the drain hose. Without the plastic hose guide.
132930110-B-502011