User manual Benutzerinformation Washing Machine WE 8565 Waschmaschine
Contents Safety information Environment concerns Technical information Product description Accessories Control panel Programmes Before the first Use Using the appliance Activating the appliance and setting a programme 2 3 4 4 5 5 9 12 12 Loading the laundry Filling detergent and additives Setting the delay start Starting a programme At the end of programme Helpful hints and tips Care and cleaning Troubleshooting Installation 12 13 14 14 15 16 17 20 22 12 Subject to change without notice.
• Do not touch the glass of the door while a programme operates. The glass can be hot (only for front-loading appliances). Care and cleaning • Deactivate the appliance and disconnect the mains plug from the mains socket. • Do not use the appliance without the filters. Make sure that the installation of the filters is correct. An incorrect installation causes water leakages. Installation • The appliance is heavy, be careful when you move it.
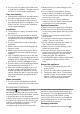
Put the packaging in applicable containers to recycle it. Ecological hints To help the environment, use less water and energy, obey these instructions: • Set a programme without the prewash phase to wash laundry with normal soil. • Always start a washing programme with the maximum load of laundry. • If necessary, use a stain remover when you set a programme with a low temperature.
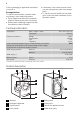
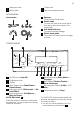
9 Water inlet valve 10 Mains cable 11 Transit bolts 12 Feet for the appliance level Accessories Accessories 1 2 4 3 1 Spanner To remove the transit bolts. 2 Plastic caps To close the holes on the rear side of the cabinet after the removal of the transit bolts. 3 Anti-flood inlet hose To prevent possible leakage 4 Plastic hose guide To connect the drain hose on the edge of a sink. Control panel 1 2 Anticrease 3 Cottons Refresh Extra Silent Economy Synthetics Super Eco Easy Iron 20 Min.
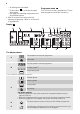
– All settings are cancelled. – Press button 1 to activate the appliance again. – Set again the washing programme and all possible options. • After 5 minutes from the end of the washing programme. Refer to 'At the end of programme'. Programme knob 2 Turn this knob to set a programme. The related programme indicator comes on.
You cannot open the appliance door when the symbol is on. You can open the door only when the symbol goes off. F If the programme is completed but the symbol stays on: • The 'Rinse Hold' function is on. • There is water in the drum. G The delay start symbol comes on when you set the delay start function. H The child safety lock symbol comes on when this device is activated. • The programme time When the programme starts, the programme time decreases with steps of 1 minute.
• Shortened time • Extra Quick The extra rinse symbol comes on when this function is activated. L The value shows the total number of the rinses. The indicator bar is fully filled when you set the maximum number of rinses. The Stain symbol comes on when you activate the function. The Prewash symbol comes on when this function is activated. M The indicator bar is not fully filled when you set only one of the functions. The indicator bar is fully filled when you set the two functions.
Temperature button 10 Press button 10 to change the default tem- -, perature. When the display shows the appliance does not heat the water. Acoustic signals function You can hear the acoustic signals when: • You activate the appliance. • You deactivate the appliance. • You press the buttons. • The programme is completed. • The appliance has a malfunction. To deactivate/activate the acoustic signals, press button 8 and button 7 at the same time for 6 seconds.
Programme Temperature Type of load Max. weight of load Cycle description Functions Leichtbügeln Repassage Facile4) Easy iron 60° - Cold Synthetic fabrics with normal soil. max. load 4 kg Wash Rinses Short spin SPIN REDUCTION RINSE HOLD PREWASH EXTRA RINSE TIME SAVING Feinwäsche Délicats Delicates 40° - Cold Delicate fabrics as acrylics, viscose, polyester items with normal soil. max.
Programme Temperature Energiesparen Economique8) 60° - 40° STANDARD PROGRAMMES for the Energy Label consumption values Type of load Max. weight of load Cycle description White and fast coloured cotton with normal soil. max. load 8 kg Wash Rinses Long spin Functions SPIN REDUCTION RINSE HOLD PREWASH1) STAINS2) EXTRA RINSE TIME SAVING 1) If you use liquid detergent, set a programme without PREWASH. 2) The Stain function is not available with a temperature lower than 40°C.
Programme1) Energy consumption (KWh)2) Water consumption (litre)2) Synthetics 40 °C 0.60 48 Delicates 40 °C 0.70 58 Wool/ Handwash 30 °C 0.35 57 1) Refer to the display for the programme time. 2) The consumption information shown in this chart is indicative. It can vary depending on the quantity and the type of laundry, on the temperature of the water supply and on the ambient temperature.
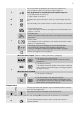
is indicative and changes with the type of the laundry. If you put in the drum more laundry than the maximum load, the symbols MAX and the value 0.0 start to flash. You can wash your laundry but the water and energy consumption increase. To have the best consumption and washing performance remove some items until the symbols stop to flash. The overload indication is available only for programmes with a maximum load lower than the appliance maximum load. 5. Close the door. The value 0.
Check the position of the flap 1. Pull out the detergent dispenser until it stops. 2. Press the lever down to remove the dispenser. 3. To use powder detergent, turn the flap up. 4. To use liquid detergent, turn the flap down. 5. Measure out the detergent and the fabric conditioner. 6. Carefully close the detergent dispenser. Make sure that the flap does not cause a blockage when you close the drawer. With the flap in the position DOWN: – Do not use gelatinous or thick liquid detergents.
The appliance adjust automatically the cycle time to the laundry you have put in the drum to have perfect washing results in the minimum necessary time. After approximately 15 minutes from the start of the programme, the display shows the new time value. Interrupt a programme 1. Press button 4 . The indicator flashes. 2. Press button 4 again. The washing programme continues. Cancel a programme 1. Press button 1 to cancel the programme and to deactivate the appliance. 2.
Helpful hints and tips The laundry load • Divide the laundry in: white, coloured, synthetics, delicates and wool. • Obey the washing instructions that are on the laundry care labels. • Do not wash together white and coloured items. • Some coloured items can discolour with the first wash. We recommend that you wash them separately for the first times. • Button up pillowcases, close zippers, hooks and poppers. Tie up belts. • Empty the pockets and unfold the items.
Care and cleaning Warning! Disconnect the appliance from the mains supply before you clean it. Descaling The water we use contains limescale. If it becomes necessary, use a water softener to remove limescales. Use a special product made for washing machines. Obey the instructions that you find on the packaging of the manufacturer. Do this separately from the laundry wash. • Clean the drum with special product for stainless steel.
Clean the pump if: • The appliance does not drain the water. • The drum cannot turn. • The appliance makes an unusual noise because of the blockage of the drain pump. • The display shows an alarm code because of the problem with water drain. Warning! • Disconnect the mains plug from the mains socket. • Do not remove the filter while the appliance operates. Do not clean the drain pump if the water in the appliance is hot. The water must be cold before you clean the drain pump.
The inlet hose filter and the valve filter It could be necessary to clean the filters when: • The appliance does not fill with water. • The appliance fills with the water for a long time. • The indicator of button 4 flashes and the display shows the related alarm. Refer to 'Troubleshooting'. Warning! Disconnect the mains plug from the mains socket. Cleaning the water inlet filters: 1. Close the water tap. 2. Remove the water inlet hose from the water tap. 3.
Troubleshooting The start of the appliance does not occur or it stops during operation. First try to find a solution to the problem (refer to the table). If not, contact the service centre. • - The appliance does not drain the water. • - The appliance door is open or not closed correctly. • - The anti-flood device is on. With some problems, the acoustic signals operate and the display shows an alarm code: • - The appliance does not fill with water. Problem The appliance does not fill with water.
Problem There is water on the floor. You cannot open the appliance door. The appliance makes an unusual noise. Possible cause Possible solution You did not press button 4 . Press button 4 . The delay start is set. To start immediately the programme, cancel the delay start. The Child Lock function is activated. Deactivate the Child Lock function. Leakages from the couplings of the water hoses. Make sure that the couplings are tight. Leakages from the drain pump.
Refer to the information supplied with this appliance for guarantee condition and point of contact. The information to give to the service is on the rating plate. We recommend that you write the information here: Model (MOD.) .................. Product number (PNC) .................. Serial number (S.N.) .................. Installation Unpacking 1. Use the gloves. Remove the external film. If necessary, use a cutter. 2. Remove the cardboard top. 3. Remove the polystyrene packaging materials. 4.
8. Pull up the appliance in vertical position. 9. Remove the power supply cable and the drain hose from the hose holders. 10. Remove the three bolts. Use the key supplied with the appliance. 11. Pull out the plastic spacers. 12. Put the plastic caps in the holes. You can find these caps in the user manual bag. Warning! Remove all the packaging and the transit bolts before you install the appliance. We recommend that you keep the packaging and the transit bolts for when you move the appliance.
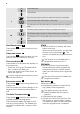
A 20 O 45 O Water drainage There are different procedures to connect the drain hose: With the plastic hose guide. • Connect the water inlet hose to the cold water tap with 3/4 thread. • On the edge of a sink. Caution! Make sure that there are no leaks from the couplings. Do not use an extension hose if the inlet hose is too short. Contact the service centre for the replacement of the inlet hose. Water-stop device The inlet hose has a water stop device.
clip. Make sure that the drain hose makes a loop to prevent that remaining particles go in the appliance from the sink. • Directly to a built-in drain pipe in the room wall and tighten it with a clip. Refer to the illustration. Directly into a drain pipe at a height of not less than 60 cm and not more than 100 cm. The end of the drain hose must always be ventilated , i.e. the inner diameter of the drainpipe must be larger than the external diameter of the drain hose. Without the plastic hose guide.
Inhalt Sicherheitshinweise 26 Umwelttipps 28 Technische Daten 28 Gerätebeschreibung 29 Zubehör 29 Bedienfeld 30 Programme 34 Vor der ersten Inbetriebnahme 37 Gebrauch des Geräts 38 Einschalten des Geräts und Einstellen eines Programms 38 Einfüllen der Wäsche 38 Einfüllen von Waschmittel und Pflegemitteln 39 Einstellen der Zeitvorwahl 40 Starten eines Programms 40 Am Programmende 41 Praktische Tipps und Hinweise 41 Reinigung und Pflege 42 Fehlersuche 46 Montage 48 Änderungen vorbehalten.
des Geräts. Es besteht Explosions- und Brandgefahr. • Beachten Sie die Sicherheitsanweisungen auf der Waschmittelpackung, um Verätzungen an Augen, Mund oder im Hals zu vermeiden. • Achten Sie darauf, dass alle Metallobjekte aus der Wäsche entfernt wurden. Harte und scharfe Gegenstände können das Gerät beschädigen. • Berühren Sie während des Betriebs nicht das Türglas. Das Glas kann heiß sein (dies gilt nur für Frontlader).
3. Entsorgen Sie die Türverriegelung, damit Kinder oder Haustiere nicht in dem Gerät eingeschlossen werden können. Es besteht Erstickungsgefahr (dies gilt nur für Frontlader). Umwelttipps Das Symbol auf dem Produkt oder seiner Verpackung weist darauf hin, dass dieses Produkt nicht als normaler Haushaltsabfall zu behandeln ist, sondern an einem Sammelpunkt für das Recycling von elektrischen und elektronischen Geräten abgegeben werden muss.
Gerätebeschreibung 1 2 3 8 9 10 4 5 11 6 12 7 1 2 3 4 5 6 7 Arbeitsplatte Waschmittelschublade Bedienfeld Türgriff Typenschild Ablaufpumpe Schraubfüße zum Ausrichten des Geräts 8 9 10 11 12 Wasserablaufschlauch Wassereinlassventil Netzkabel Transportschrauben Schraubfüße zum Ausrichten des Geräts Zubehör Zubehör 1 2 4 3 1 Schraubenschlüssel Zum Lösen der Transportschrauben.
Bedienfeld 1 2 Anticrease 3 Cottons Refresh Extra Silent Economy Synthetics Super Eco Easy Iron 20 Min. - 3 kg Delicates Jeans Wool/Silk Rinse Duvet Spin/Drain Auto Off Anti-Allergy Temp. 10 Ein/Aus-Taste (Auto Off) Programmwahlschalter Display Start/Pause-Taste (Start/Pause — Départ/Pause) 5 Zeitvorwahl-Taste (Zeitvorwahl — Départ Différé) 6 Zeitsparen-Taste (Zeit Sparen — Gain de Temps) AUTO Off-Taste 1 Drücken Sie diese Taste, um das Gerät einoder auszuschalten.
Display 3 A B C D M E L F G H K I J Im Display erscheint: Die Temperatur des eingestellten Programms A Kaltes Wasser Die Schleuderdrehzahl des eingestellten Programms B Symbol Kein Schleudergang1) Symbol Spülstopp 1) Nur verfügbar für das Programm Schleudern/Abpumpen. Vorwaschgang Hauptwaschgang Spülgänge C Schleudergang Symbole für die Waschgänge • Wenn ein Programm eingestellt ist, leuchten alle Symbole für die Phasen des Programms auf.
Sie können die Tür des Geräts nicht öffnen, solange dieses Symbol erscheint. Sie können die Tür erst öffnen, wenn das Symbol erlischt. F Wenn das Symbol nicht erlischt, obwohl das Programm beendet ist: • Die Spülstopp-Funktion ist eingeschaltet. • Es befindet sich Wasser in der Trommel. G Das Zeitvorwahlsymbol leuchtet auf, wenn Sie die Funktion Zeitvorwahl eingestellt haben. H Das Symbol für die Kindersicherung erscheint, wenn diese Funktion aktiviert ist.
• Verkürzte Programmdauer • Extra Kurz Das Symbol Extra Spülen erscheint, wenn diese Funktion eingeschaltet ist. L Die Zahl steht für die Gesamtzahl der Spülgänge. Der Anzeigebalken ist komplett gefüllt, wenn Sie die maximale Anzahl an Spülgängen einstellen. Das Fleckensymbol leuchtet beim Aktivieren der Funktion auf. Das Symbol Vorwäsche erscheint, wenn diese Funktion aktiviert ist. M Der Anzeigebalken ist nicht ganz gefüllt, wenn Sie nur eine der Funktionen einstellen.
• Verringern der maximalen Schleuderdrehzahl des Programms. Das Display zeigt nur die Schleuderdrehzahlen an, die mit dem eingestellten Programm verfügbar sind. • Schalten Sie den Schleudergang aus. • Aktivieren Sie die Spülstopp-Funktion. Stellen Sie diese Funktion ein, um Knitterfalten zu vermeiden. Das Gerät pumpt das Wasser am Ende des Programms nicht ab. Temperatur-Taste 10 Drücken Sie die Taste 10 zum Ändern der Standardtemperatur.
Programm Temperatur Beladung Max. Beladung Programmbeschreibung Funktionen Pflegeleicht Synthétiques Pflegeleicht 60 °C - Kalt Synthetik- oder Mischgewebe, normal verschmutzt. Max. Beladung 4 kg Hauptwaschgang Spülgänge Kurzer Schleudergang DREHZAHLREDUZIERUNG SPÜLSTOPP VORWÄSCHE1) FLECKEN2) EXTRA SPÜLEN ZEITSPAREN Leichtbügeln Repassage Facile4) Leichtbügeln 60 °C - Kalt Synthetikfasern, normal verschmutzt. Max.
Programm Temperatur Beladung Max. Beladung Programmbeschreibung Funktionen Spülen Rinçage Alle Gewebe. Max. Beladung 8 kg Ein Spülgang mit Pflegemittel Schleudergang DREHZAHLREDUZIERUNG SPÜLSTOPP EXTRA SPÜLEN6) Outdoor Blousons Outdoor 40 °C - Kalt Imprägnierte Kleidungsstücke, Sportund Outdoor-Kleidung. Keinen Weichspüler verwenden! Max. Beladung 2.5 kg Hauptwaschgang Spülgänge Kurzer Schleudergang DREHZAHLREDUZIERUNG SPÜLSTOPP EXTRA SPÜLEN 20 Min.
Opfrissen - Rafraîchir Dampf-Auffrischen Dieses Programm beseitigt Gerüche aus der Wäsche. Baumwolle und Synthetik. bis zu 1.5 kg Baumwolle und Synthetik. bis zu 1.5 kg Dampf beseitigt keine Tiergerüche. Ontkreuk - Défroissage Dampf-Knitterschutz Dieses Programm hilft bei der Beseitigung von Falten in der Wäsche. Dampf kann für getrocknete, gewaschene oder einmal getragene Wäsche benutzt werden. Diese Programme können Falten und Gerüche reduzieren und machen Ihre Wäsche glatter.
Temperatur ein und starten Sie das Programm mit leerer Trommel. So wer- den alle eventuellen Verunreinigungen aus Trommel und Bottich entfernt. Gebrauch des Geräts 1. Drehen Sie den Wasserhahn auf. 2. Stecken Sie den Netzstecker in die Steckdose. Einschalten des Geräts und Einstellen eines Programms Damit der Gewichtssensor korrekt funktioniert, muss das Gerät eingeschaltet und ein Programm ausgewählt werden, BEVOR Sie Wäsche in die Trommel füllen. 1.
Einfüllen von Waschmittel und Pflegemitteln Waschmittelfach für die Vorwaschphase und das Einweichprogramm. Füllen Sie das Waschmittel für den Vorwaschgang und das Einweichen vor dem Start des Programms ein. Waschmittelfach für den Hauptwaschgang. Wenn Sie Flüssigwaschmittel verwenden, muss dieses direkt vor dem Start des Programms eingefüllt werden. Fach für flüssige Pflegemittel (Weichspüler, Stärke). Füllen Sie das Pflegemittel in das Fach ein, bevor Sie das Programm starten.
die Klappe beim Schließen der Waschmittelschublade nicht blockiert. 5. Messen Sie Waschmittel und Weichspüler ab. 6. Schließen Sie die Waschmittelschublade vorsichtig. Achten Sie darauf, dass Klappe in der unteren Position: – Verwenden Sie keine Gelwaschmittel oder Flüssigwaschmittel mit dicker Konsistenz. – Füllen Sie nicht mehr Flüssigwaschmittel ein als bis zur Markierungslinie auf der Klappe. – Stellen Sie nicht den Vorwaschgang ein. – Stellen Sie nicht die Zeitvorwahl ein.
2. Ändern Sie die eingestellte Funktion. Wenn die Temperatur und der Wasserstand in der Trommel zu hoch sind, leuchtet das Türverriegelungssymbol weiterhin und die Tür lässt sich nicht öffnen. Gehen Sie zum Öffnen der Tür wie folgt vor: 1. Schalten Sie das Gerät aus. 2. Warten Sie einige Minuten. 3. Vergewissern Sie sich, dass kein Wasser in der Trommel steht. Öffnen der Tür Während ein Programm oder die Zeitvorwahl aktiv ist, ist die Tür verriegelt. So öffnen Sie die Gerätetür: 1.
• Waschen Sie stark verschmutzte Bereiche mit einem speziellen Waschmittel. • Seien Sie vorsichtig mit Gardinen. Entfernen Sie die Haken, oder stecken Sie die Gardinen in einen Beutel oder Kopfkissenbezug. • Nicht im Gerät waschen: – Ungesäumte Wäschestücke und Wäschestücke mit Schnitten im Stoff – Bügel-BHs – Verwenden Sie einen Beutel zum Waschen von kleinen Textilien. • Eine sehr geringe Beladung kann in der Schleuderphase Probleme verursachen.
Verwenden Sie ein Produkt, das speziell für Waschmaschinen hergestellt wird. Halten Sie sich an die Herstelleranweisungen auf der Verpackung. Führen Sie die Entkalkung nicht gleichzeitig mit einer Wäsche durch. Reinigen der Außenseiten Reinigen Sie das Gerät nur mit warmem Wasser und mit etwas Spülmittel. Reiben Sie alle Oberflächen sorgfältig trocken. Vorsicht! Verwenden Sie keinen Alkohol, keine Lösungsmittel und keine Chemikalien.
Ablaufpumpe Kontrollieren Sie regelmäßig die Ablaufpumpe und sorgen Sie dafür, dass sie sauber ist. Reinigen Sie die Pumpe in folgenden Fällen: • Das Gerät pumpt das Wasser nicht ab. • Die Trommel dreht sich nicht. • Das Gerät macht ein ungewöhnliches Geräusch, weil die Ablaufpumpe blockiert ist. • Im Display wird ein Alarmcode angezeigt, weil es Probleme beim Abpumpen des Wassers gibt. Warnung! • Ziehen Sie den Netzstecker aus der Netzsteckdose.
dafür vorgesehenen Führungen in der Pumpe ein. 10. Vergewissern Sie sich, dass der Filter richtig festgedreht ist, damit kein Wasser austreten kann. 11. Bringen Sie die Ablaufpumpenklappe wieder an und schließen Sie diese. 2 6. Bringen Sie den Zulaufschlauch wieder an. Vergewissern Sie sich, dass alle Anschlüsse vollkommen dicht sind, damit kein Wasser austreten kann. 1 Zulaufschlauchfilter und Ventilfilter Die Filter müssen in folgenden Fällen gereinigt werden: • Es läuft kein Wasser in das Gerät.
4. Stecken Sie die beiden Enden des Zulaufschlauchs in einen Behälter und lassen Sie das Wasser aus dem Schlauch fließen. 5. Leeren Sie die Ablaufpumpe. Siehe Notentleerungsverfahren. 6. Befestigen Sie den Zulaufschlauch wieder, wenn die Ablaufpumpe entleert ist. Warnung! Vergewissern Sie sich vor einer erneuten Benutzung des Geräts, dass die Temperatur mehr als 0 °C beträgt. Der Hersteller ist nicht verantwortlich für Schäden, die durch niedrige Temperaturen entstanden sind.
Problem Mögliche Ursache Die Aquasafe-Einrichtung ist aktiv. Das Gerät schleudert nicht. Mögliche Abhilfe • Schalten Sie das Gerät aus. • Schließen Sie den Wasserhahn. • Wenden Sie sich hierzu an den Kundendienst. Die Schleuderphase ist ausgeschaltet. Stellen Sie das Schleuderprogramm ein. Der Filter der Ablaufpumpe ist zugesetzt. Reinigen Sie den Filter der Ablaufpumpe. Siehe unter „Reinigung und Pflege“. Unwuchtprobleme durch die Beladung.
Problem Mögliche Ursache Mögliche Abhilfe Sie haben hartnäckige Flecken nicht vor dem Waschgang entfernt. Verwenden Sie zur Entfernung hartnäckiger Flecken Spezialprodukte. Es wurde eine falsche Temperatur eingestellt. Achten Sie darauf, die richtige Temperatur einzustellen. Es befindet sich zu viel Wäsche in der Trommel. Verringern Sie die Beladung. Die Trommel ist leer und im Display wird angezeigt, dass sich Wäsche darin befindet (J). Das Leergewicht muss eingestellt werden.
4. Entfernen Sie die innere Folie. 7. Entfernen Sie den Styroporschutz von der Geräteunterseite. 1 5. Öffnen Sie die Tür. Entfernen Sie das Styroporteil aus der Türdichtung und alle Teile aus der Trommel. 6. Legen Sie das vordere Styroporteil hinter dem Gerät auf den Boden. Legen Sie das Gerät vorsichtig mit der Rückseite darauf ab. Achten Sie darauf, nicht die Schläuche zu beschädigen. 2 8. Ziehen Sie das Gerät nach oben, sodass es wieder aufrecht steht. 9.
• Schrauben Sie die Füße zum Ausrichten des Geräts weiter heraus oder hinein. Durch eine korrekte waagrechte Ausrichtung des Geräts werden Vibrationen, Geräusche und ein „Wandern“ des Geräts während des Betriebs vermieden. 12. Ersetzen Sie die Kunststoff-Abstandshalter durch die Kunststoffkappen. Diese Kappen finden Sie im Beutel mit der Gebrauchsanleitung. x4 • Das Gerät muss einen waagerechten und festen Stand haben.
A 20 O 45 O Wasserablauf Es gibt mehrere Möglichkeiten, den Ablaufschlauch anzuschließen: Mit der Kunststoff-Schlauchführung. • Schließen Sie den Wasserzulaufschlauch an einen Kaltwasserhahn mit einem 3/4"Außengewinde an. • Über eine Waschbeckenkante. Vorsicht! Achten Sie darauf, dass die Anschlüsse dicht sind. Verwenden Sie keinen Verlängerungsschlauch, falls der Zulaufschlauch zu kurz ist. Wenden Sie sich an den Kundendienst, um einen anderen Zulaufschlauch zu erhalten.
Siphon und befestigen Sie ihn mit einer Schlauchschelle. Stellen Sie sicher, dass der Schlauch einen Bogen beschreibt, damit kein Schmutz aus dem Siphon in das Gerät gelangen kann. • Direkte Einleitung in ein Abflussrohr in der Zimmerwand. Mit einer Schlauchschelle befestigen. Orientieren Sie sich an der Abbildung. Direkte Einleitung in ein Ablaufrohr auf einer Höhe nicht unter 60 cm und nicht über 100 cm. Das Ende des Ablaufschlauchs muss immer belüftet sein, d.h.
132932060-B-512011