User manual Condenser Dryer TKE 7600 Premium
Dear customer, Please read these operating instructions carefully and pay particular attention to the safety notes indicated in the first pages. We recommend that you keep this instruction booklet for future reference and pass it on to any future owners. Transport damages After unpacking the machine please check it is not damaged. If in doubt, do not start it but contact your local Service Centre.
Important safety information Important! In the interest of your safety and to ensure the correct use, before installing and first using the appliance, read this user manu al carefully, including its hints and warnings. To avoid unnecessary mistake s and acci dents, it is important to ensure that all people using the appliance are thoroughly familiar with its operation and safety features.
• • • • • • tion in the user manual. The final part of a tumble dryer cycle occurs without heat ( cool down cycle ) to ensure that the items are left at a temperature that ensures that items will not be damaged. Any electrical work required to install this appliance should be carried out by a qualified electrician or competent person. Care must be taken to ensure that the appliance does not stand on the electrical supply cable.
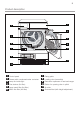
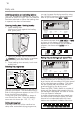
Product description 1 2 4 3 5 6 8 7 10 9 11 12 1 2 3 4 5 6 Control panel Drawer with condensed water container Lamp for inside light Fine strainer (lint filter) Large mesh filter (lint filter) Micro-fine filter (lint filter) 7 8 9 10 11 12 Rating plate Loading door (reversible) Base door upstream of heat exchanger Button for opening door in plinth Air slots Screwed feet (with height adjustment)
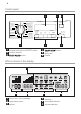
Control panel 6 5 4 4 Aus Arrêt Zeitvorwahl Départ différé Beleuchtung / Eclairage Wollpflege / Laine Baumwolle / Coton Extratrocken / Três sec Leichtbügeln Plus / Facile à repasser Starktrocken / Sec Schranktrocken / Prêt à ranger Hemden / Chemises Sport Leichttrocken / Legerement humide Bügeltrocken / Prêt à repasser Jeans Viskose / Viscose Bettwäsche / Draps Extratrocken / Três sec Mix - programm / Textiles mélangés Schranktrocken / Prêt à ranger Bügeltrocken / Prêt à repasser Mischgewe
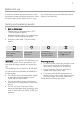
Before first use In order to remove any residues which may have been produced during production, wipe the dryer drum with a damp cloth or carry out a brief drying cycle (30 MIN) with damp cloths in the machine. Sorting and preparing laundry • • Sort by fabric type: Cotton/linen for programmes in COTTONS programme group. Mixtures and synthetics for programmes in EASY CARE programme group. Sorting by care label.
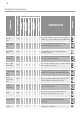
LONG ANTI-CREASE SENSITIVE1) BUZZER TIME DELAY START 7 kg • • • • • • - • Thorough drying of thick or multi- layered fabrics, e.g. terry towelling items, bathrobes. COTTONS INTENSIVE DRY 7 kg • • • • • • - • Thorough drying of thick fabrics, e.g. terry towelling items, towels. COTTONS STORAGE DRY 7 kg • • • • • • - • Thorough drying of fabrics of even thicknesses, e.g. terry towelling items, knitwear, towels.
DELICATE1) SENSITIVE1) BUZZER TIME DELAY START MIXED 3 kg • • •3) • - • - • For drying cotton and synthetic fabrics, uses low temperature. BED LINEN 3 kg • • • • - • - • Bed linen (single and double sheet, pillowcase, bedspread, duvet cover). VISCOSE 1 kg • • •3) • - • - • JEANS 7 kg • • • • • • - • SPORTS LIGHT 2 kg • • •3) • - • - • SHIRTS 1.
Daily use Switching machine on / switching light on Turn the programme selector to any programme or turn it to LIGHT ON. The machine has been switched on. When the loading door is opened, the drum is illuminated. Opening loading door / loading laundry 1. Open loading door: Use force to push against the loading door (push point) you can increase the drying result by using the DRYNESS function. Laundry becomes drier as you move from MIN to MAX.
Selecting additional options The additional options available for the drying programmes are DELICATE, LONG ANTICREASE, SENSITIVE and BUZZER 1. By turning the knob choose a drying programme. 2. To set the option press OPTION button. You will see available options shown as icons on the screen: DELICATE, LONG ANTICREASE, SENSITIVE, BUZZER DELICATE icon flashes. Flashing icon means: selected but not active. To activate selected OPTION press OK button.
The buzzer sounds or plays a tune during: - cycle end - anti-crease phase and when phase starts or ends - cycle interruption by a warning - alarm TIME Zeitvorwahl Départ différé Trockengrad Degrés de séchage U/Min T/min Option OK Zeitwahl Minuterie Start / Pause Départ / Pause To select the programme duration after setting the TIME programme. You can select a programme duration from 10 mins to 3 hrs in 10-minute steps. 1. Turn the programme knob to the TIME programme.
Changing programme To change a programme which has been selected by mistake once the programme has started, first turn the programme selector to OFF and then reset the programme. The programme can no longer be changed directly once the programme has started. If nevertheless there is an attempt to change the programme on the programme knob, the programme progress display and the maintenance indicators flash. If an option button (excluding the BUZZER button) is pressed, Err appears in the multidisplay.
Care and cleaning Cleaning fluff filter The filters collect all the fluff which accumulates during drying. To ensure that the dryer works perfectly, the fluff filters (micro-fine filter and fine strainer) must be cleaned after every drying cycle. The warning icon is on to remind you this operation. Large mesh filter jumps up. 5. Take out fine strainer. Caution! Never operate the dryer without fluff filters or with damaged or blocked fluff filters. 1. Open loading door 6.
If the fine strainer is not fitted, the large mesh filter will not snap into place and the loading door cannot be closed. Cleaning the door seal Wipe the door seal with a damp cloth immediately after the drying cycle has finished. Emptying the condensate tank Empty condensate tank after every drying cycle. If the condensate tank is full, an active programme will break off automatically and the empty container icon on the display will light up.
the heat exchanger front chamber. Wipe the door seal with a damp cloth. 4. Turn both lock washers inwards. 5. Use the handle to pull the heat exchanger out of the base and carry it horizontally to prevent any remaining water from spilling. 6. To empty the heat exchanger, hold vertically over a washing-up bowl. Caution! Do not use sharp objects to clean. The heat exchanger could develop leaks. 7. Clean heat exchanger. It is best to use a brush or to rinse thoroughly with a hand-held shower. 8.
What to do if ... Troubleshooting by yourself If, during operation, the error code E... plus number or letter) appears on the LCD: Switch the machine off and on again. Reset Problem Dryer does not work. programme. Press the START PAUSE button If the error is still displayed, please inform your local Service Force Centre and quote the error code. Possible cause Remedy Mains plug is not plugged in or fuse is not working correctly. Plug in at mains socket.
Problem Drum light does not work. Displayed programme time changes erratically or stays unchanged for a long time. Possible cause Turn programme selector to Programme selector in OFF posiDRUM LIGHT or to any protion. gramme. Defective light bulb. Replace light bulb (see next section). Programme time is corrected automatically depending on type and volume of laundry and level of dampness. Automatic process; this is not a machine fault. Programme inactive, empty water Condensate tank is full.
Machine settings Setting Implementation 1. Turn the programme selector to any programme. 2. Press simultaneously the DRYNESS and SPIN SPEED BUZZER permanent off buttons and hold down for approx. 5 seconds. 3. The buzzer is by default always off. You can use BUZZER button to activate or deactivate sound but machine does not memorize your selection. Water hardness 1. Turn the programme selector to any programme. Water contains, a variable quantity of 2.
Technical data This appliance conforms with the following EU Directives: – 73/23/EEC dated 19.02.1973 Low Voltage Directive – 89/336/EEC dated 03.05.1989 EMC Directive inclusive of Amending Directive 92/31/EEC – 93/68/EEC dated 22.07.1993 CE Marking Directive Height x width x depth 85 x 60 x 58 cm Depth with loading door open 109 cm Height can be adjusted by 1.5 cm Weight when empty approx. 40 kg Loading volume (depends on programme) max.
Installation Appliance positioning • It is recommended that, for your convenience, the machine is positioned close to your washing machine. • The tumble dryer must be installed in a clean place, where dirt does not build up. • Air must be able to circulate freely all round the appliance. Do not obstruct the front ventilation grille or the air intake grilles at the back of the machine. • To keep vibration and noise to a minimum when the dryer is in use, it should be placed on a firm, level surface.
Warning! The power supply cable must be accessible after installing the machine. Changing door stop Warning! Before changing the door stop, disconnect the mains plug. 1. Open loading door. 2. Unscrew hinge A from the front of the machine and take off the loading door. 3. Remove cover plates B. To do this, insert a thin screwdriver into the slots as shown in the illustration, press downwards slightly and pry out the cover plates. 4.
Installation kit for external condensate drain Attached to your product Installation kit 12512251/. for direct draining of condensate into a basin, siphon, gully, etc. The condensate tank then no longer has to be drained, it must however remain in its intended position in the machine. Refer to the “Programme options” section for how to deactivate the empty water tank alert. Max. displacement height: 1 m from the base of the dryer; max. displacement length: 2.
Guarantee Conditions 2 year warranty covering household appliances. We would like to congratulate you on your purchase of a FORS product. You have made a good choice and selected a product of extremely high quality, which also rates excellently in the area of ecobalance. We provide a two-year warranty covering the operating ability and operational safety of this appliance insofar as we guarantee that the appliance is free from material defects and manufacturing defects.
Customer Service Centre FORS AG/SA Schaftenholzweg 10 2557 STUDEN Telefon: 032 374 26 26 Telefax: 032 374 26 70 www.fors.ch Customer service (FORS-Service-Hotline): 0800 55 46 50 Service In the event of technical faults, please first check whether you can remedy the problem yourself with the help of the operating instructions (section “What to do if…”). If you were not able to remedy the problem yourself, please contact the Customer Care Department or one of our service partners.
136905730-01-14042008