
User manual
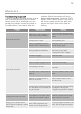


20
W
W
a
a
r
r
n
n
i
i
n
n
g
g
!
!
T
T
h
h
e
e
p
p
o
o
w
w
e
e
r
r
s
s
u
u
p
p
p
p
l
l
y
y
c
c
a
a
b
b
l
l
e
e
m
m
u
u
s
s
t
t
b
b
e
e
a
a
c
c
c
c
e
e
s
s
s
s
i
i
b
b
l
l
e
e
a
a
f
f
t
t
e
e
r
r
i
i
n
n
s
s
t
t
a
a
l
l
l
l
i
i
n
n
g
g
t
t
h
h
e
e
m
m
a
a
c
c
h
h
i
i
n
n
e
e
.
.
C
C
h
h
a
a
n
n
g
g
i
i
n
n
g
g
d
d
o
o
o
o
r
r
s
s
t
t
o
o
p
p
W
W
a
a
r
r
n
n
i
i
n
n
g
g
!
!
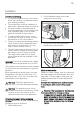
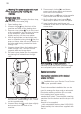
Before changing the door stop,
disconnect the mains plug.
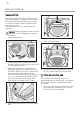
1.
Open loading door.
2. Unscrew hinge
A
A
from the front of the
machine and take of
f the loading door.
3. Remove cover plates
B
B
. To do this, insert
a thin scr
ewdriver into the slots as shown
in the illustration, press downwards
slightly and pry out the cover plates.
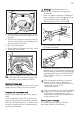
4. Use an appropriate tool and exert pres-
sure to unfasten locking block
C
C
from the
snap-on fixtur
e, take out and re-insert on
the other side having rotated the block
through 180°.
5. Unscrew hinge A from the loading door,
rotate through 180°, re-insert on the
opposite side and screw down.
6. Re-insert cover plates Bon the opposite
site having first rotated them through
180°.
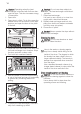
7. Unscrew cover plates
D
D
from the front of
the machine, r
otate through 180°, screw
on the opposite side.
8. Unscrew door lock
E
E
,
,
push down slightly
and remove from the front of the
machine.
A
C
A
B
B
9. Press snap-in button
F
F
in and down,
press cover down slightly and remove
from front of the machine.
10. Change door lock
E
E
over to the opposite
side, scr
ew down the door interlock.
11. On the other side, insert cover
F
F
and
allow snap-in button to lock into place.
12.
Insert loading door and hinges into
recesses on the front of the machine and
screw down.
N
N
o
o
t
t
e
e
r
r
e
e
g
g
a
a
r
r
d
d
i
i
n
n
g
g
c
c
o
o
n
n
t
t
a
a
c
c
t
t
p
p
r
r
o
o
t
t
e
e
c
c
t
t
i
i
o
o
n
n
:
:
The
machine is only secur
e for operations again
once all plastic parts have been inserted.
S
S
p
p
e
e
c
c
i
i
a
a
l
l
a
a
c
c
c
c
e
e
s
s
s
s
o
o
r
r
i
i
e
e
s
s
I
I
n
n
t
t
e
e
r
r
m
m
e
e
d
d
i
i
a
a
t
t
e
e
i
i
n
n
s
s
t
t
a
a
l
l
l
l
a
a
t
t
i
i
o
o
n
n
k
k
i
i
t
t
f
f
o
o
r
r
s
s
t
t
a
a
c
c
k
k
e
e
d
d
w
w
a
a
s
s
h
h
e
e
r
r
a
a
n
n
d
d
d
d
r
r
y
y
e
e
r
r
:
:
Available from your Service Force Centre
or your specialist dealer
These intermediate installation kits can be
used to arrange the dryer and an automatic
Electrolux washing machine (60 cm wide,
fr
ont loading) as a space-saving
washer/dryer stack. The automatic washing
machine is at the bottom and the dryer is at
the top.
Version to be supplied:
– with extractable stacker plate 916018903
Read carefully the instructions supplied with
the kit.
D
D
E
E
F
F