
User manual


11
D
D
E
E
L
L
A
A
Y
Y
(
(
Z
Z
E
E
I
I
T
T
V
V
O
O
R
R
W
W
A
A
H
H
L
L
)
)
f
f
u
u
n
n
c
c
t
t
i
i
o
o
n
n
W
W
i
i
t
t
h
h
t
t
h
h
e
e
D
D
E
E
L
L
A
A
Y
Y
Z
Z
E
E
I
I
T
T
V
V
O
O
R
R
W
W
A
A
H
H
L
L
b
b
u
u
t
t
t
t
o
o
n
n
,
,
y
y
o
o
u
u
c
c
a
a
n
n
d
d
e
e
l
l
a
a
y
y
t
t
h
h
e
e
s
s
t
t
a
a
r
r
t
t
o
o
f
f
a
a
p
p
r
r
o
o
g
g
r
r
a
a
m
m
m
m
e
e
b
b
y
y
3
3
,
,
6
6
o
o
r
r
9
9
h
h
o
o
u
u
r
r
s
s
.
.
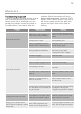
1. Select the programme and additional
functions if necessary
.
2. Press the DELAY ZEITVORWAHL button
as many times as necessary until the
required delay time is chosen.
Corresponding led is lighting.
-
9
9
h
h
display for programme to start
in 9 hours.
-
6
6
h
h
display for programme to start
in 6 hours.
-
3
3
h
h
display for programme to start
in 3 hours.
By pr
essing the DELAY START
ZEITVORWAHL button again, the time
delay is cancelled. The led is off.
3. To activate the delay timer, press the
START PAUSE START PAUZE button. If a
time delay of 9 hours is selected, the led
9h is lighting. After 3 hours, the 9h led is
off and 6h led is lighting; after another 3
hours, 3h led is lighting. After a total of 9
hours, the programme will start.
S
S
t
t
a
a
r
r
t
t
i
i
n
n
g
g
t
t
h
h
e
e
p
p
r
r
o
o
g
g
r
r
a
a
m
m
m
m
e
e
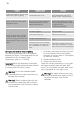
Press the START PAUSE ST
ART PAUZE but-
ton. Led above stops flashing, becomes
steady. The programme is started. Display
shows elapsing cycle time or delay time if
activated.
C
C
h
h
a
a
n
n
g
g
i
i
n
n
g
g
p
p
r
r
o
o
g
g
r
r
a
a
m
m
m
m
e
e
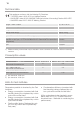
To change a programme which has been
selected by mistake once the pr
ogramme
has started, first turn the programme selec-
tor to OFF AUS position. The programme is
cancelled.
The programme can no longer be
changed directly once the programme
has started. If nevertheless there is an
attempt to change the programme on
the programme knob or if an function
button (excluding the BUZZER SIGNAL
button) is pressed, led above START
PAUSE START PAUZE button starts
flashing temporarily in yellow. The drying
programme is not however affected by
this (laundry protection).
P
P
u
u
t
t
t
t
i
i
n
n
g
g
i
i
n
n
e
e
x
x
t
t
r
r
a
a
i
i
t
t
e
e
m
m
s
s
o
o
r
r
t
t
a
a
k
k
i
i
n
n
g
g
i
i
t
t
e
e
m
m
s
s
o
o
u
u
t
t
b
b
e
e
f
f
o
o
r
r
e
e
e
e
n
n
d
d
o
o
f
f
p
p
r
r
o
o
g
g
r
r
a
a
m
m
m
m
e
e
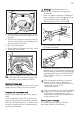
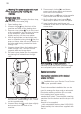
1. Open loading door.
W
W
a
a
r
r
n
n
i
i
n
n
g
g
!
!
Laundry and drum can
become hot.
R
R
i
i
s
s
k
k
o
o
f
f
b
b
u
u
r
r
n
n
s
s
!
!
2. Load or remove laundry items.
3.
Close loading securely. Lock must audi-
bly lock.
4. Press the START PAUSE START PAUZE
button to continue the drying cycle.
D
D
r
r
y
y
i
i
n
n
g
g
c
c
y
y
c
c
l
l
e
e
c
c
o
o
m
m
p
p
l
l
e
e
t
t
e
e
/
/
r
r
e
e
m
m
o
o
v
v
i
i
n
n
g
g
l
l
a
a
u
u
n
n
d
d
r
r
y
y
Once the drying cycle is complete, END
ENDE status led is lighting. If the BUZZER
SIGNAL button has been pr
essed, an
acoustic signal sounds intermittently for
about one minute.
The drying cycles are automatically fol-
lowed by an anti-crease phase which
lasts around 30 minutes. The drum
rotates at intervals during this phase.
This keeps the laundry loose and free of
creases. The laundry can be removed at
any time during the anti-crease phase.
(The laundry should be taken out
towards the end of the anti-crease phase
at the latest to prevent creases from
forming.)
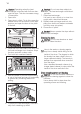
1. Open door.
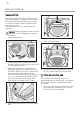
2. Before removing the laundry, remove fluff
from the micro-fine filter. It is best to use
a damp hand for this purpose. (See
“Care and cleaning” chapter.)
3. Remove laundry.
4. Turn the programme selector to OFF.AUS
I
I
m
m
p
p
o
o
r
r
t
t
a
a
n
n
t
t
!
!
After each drying cycle:
-
Clean the micro-fine filter and fine filter
- Drain the condensed water container
(See chapter “Care and cleaning”.)
5. Close the door.