
User's Manual


4
III. Installation of the MiniPCI Wireless Adapter under Windows XP
1. Insert the MiniPCI Wireless Adapter into the MiniPCI slot on your computer and start
Windows. Windows will auto-detect the MiniPCI Wireless Adapter and a “Found New
Hardware Wizard” window will show up.
2. Select “Install from a list or specific (Advanced)” and insert the Product CD-ROM into the
CD-ROM drive. Specify the location where the driver is placed. Click on Next to install
the driver.
3. The windows will find “MiniPCI Wireless Adapter”. Click on Next to continue.
4. Click Finish to complete the installation.
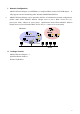
After installing the MiniPCI Wireless Adapter, the Windows XP will display a “Wireless Network
Connection # ” message.
Click on the message and the “Automatic Wireless Network Configuration” will then appear
automatically and allow users to connect a wireless infrastructure network (Access Point), shown as
follows:
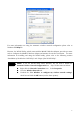
You may click the Advanced button to make advanced configuration for the MiniPCI Wireless
Adapter, shown as below.