
Installation Guide

creating better environments
Installing Marmoleum® Click CinchLOC™
Installing Marmoleum
®
Click CinchLOC™ v1.00 08/16 Page 2 of 3
• Marmoleum® Click is resistant to water, but it is not waterproof. It is important to minimize any opportunity for damage
by cleaning spills immediately. It is also very important to take measures during the installation that will prevent water or
moisture from getting underneath the Marmoleum® Click.
If a floor drain or sump pump is present, it is there for a reason. DO NOT INSTALL Marmoleum® Click on that level.
All expansion spaces located in wet areas, such as areas where sinks dishwashers, refrigerators, toilets, showers, bath
tubs are located should be sealed with 100% mildew-resistant silicone. To seal the area, apply a thin bead of silicone
where the bottom of the Marmoleum® Click and subfloor meet. DO NOT fill the entire expansion space with silicone.
Spills should not remain on the surface of Marmoleum® Click longer than 30 minutes.
• For additional information, contact Forbo’s Product Support and Education Services.
Installation
Marmoleum® Click is installed without any need for glue by placing the tongue into the
groove as well as the groove into the tongue; however it is easier to work so that you are
placing the tongue into the groove.
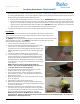
The GROOVE is the prominent visible locking piece on two sides of the material, shown on the
right and bottom in Figure 1. The TONGUE is semi-hidden on the other two sides of the
material, shown on the left and top in Figure 1.
1. Inspect each piece for damage prior to installation.
2. Start by measuring the room and determining the starting point
in the room. It is recommended to install the material
perpendicular to the incoming light from the main window. This
will help minimize the appearance of the seams throughout the
room.
3. Lay out several pieces with the groove side facing right.
4. To ensure that all pieces are clicked together at exact 90° angles,
install a temporary piece along the front wall (parallel with the
material). Click the tongue of the first piece into the groove of
the temporary piece, allowing the temporary piece to sit halfway
on the first piece. See Figure 2. The temporary piece in the figure
is the top piece.
NOTE: The pieces must be perfectly aligned with one
another. Any variation in alignment from piece to piece can
create gaps between one row and the next.
5. Place the tongue of the second piece into the groove of the
temporary board at a 45° angle. See Figure 3.
6. Slide it gently to the left. Lower it into the groove of the first
piece and press it into place. You should hear a clicking sound
when it locks into place.
7. Move the temporary board so it now sits halfway on the second
piece. See Figure 4.
8. Continue these steps until the end of the row.
9. Before laying the final piece, remove the temporary board and
place spacers that are 3/8” wide along the length of the front wall
as well as the left side wall.
10. Slide the entire first row so it is touching the spacers. Measure
the distance from the edge of the last piece to the wall. Subtract
3/8” and cut the final piece to fit. Be sure to cut the piece so that
the cut edge will be touching the wall when it’s installed.
NOTE: If using a hand saw, the Marmoleum® side must be
facing upwards. If using a power saw, the direction of the blade must cut into the Marmoleum® side of the board
(Marmoleum® side facing downwards).
Figure
2
Figure
3
Figure
4
Figure 1