
User Guide


FontLab 4
72
Additional Encodings
All encodings are stored in text files that can be edited in any text
processor. This is not recommended but may help if you find that our
standard encodings do not work for you.
If you want to define a non-standard encoding, save the file in a
FontLab directory:
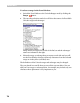
How to Create a Custom Encoding File
To create a custom encoding file:
1. Copy the .enc file located in the Encodings directory to use as the basis for your new encoding
file.
2. Open the copied file in any text editor (Windows Notepad will do) and then edit it, following the
same structure that you find in the original file.
3. Change the name of the encoding and the encoding index in the first line of the file. The first
line should have the following structure:
%%FONTLAB ENCODING: 7; Adobe Symbol Encoding
“%%FONTLAB ENCODING: ” is the prefix of the file used to detect properly made encoding
files and must not be changed. Note the space between ‘:’ and the encoding index.
‘7’ is the index of the encoding vector. You must not change the encoding vector indexes of any
of the encoding vectors or they will become unusable. If you make your own encodings the
indexes of your files should not be used in any of the other files. The actual value of the index is
not important, so you can assign indexes like 1001 or 10001.
The last part of the first line, “Adobe Symbol Encoding”, is the name of the encoding vector. It
starts at the first non-space character after ‘;’.
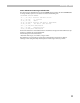
4. Save this encoding file with a different file name but be sure to use the .enc file extension. Put
this file into the directory where all the other .enc files are located.
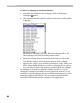
The new encoding will
appear in the Encoding selection combo box the next time FontLab
is used.
When you change the encoding you will see that the characters in the Font
Window are rearranged. Some characters will move below the “yellow”
zone. Remember that only characters that are in yellow cells are covered by
the currently selected encoding vector.