
User Guide


Making OpenType Fonts
659
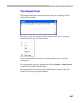
To the right of the list there are 3 fields: source text, source preview panel
and resulting preview panel.
You must enter the text you want to use to preview in the source text
field. Use FontLab notation to enter glyphs that are not directly accessible
from the keyboard: ‘/’ followed by the glyph name and a space or ‘\’
followed by the Unicode index.
You can also drag-drop glyphs from the Font window or from the
Collection or Classes panels into the source text field.
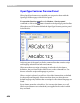
The Source preview shows the glyphs before OpenType features are
applied. The Resulting preview panel shows the glyphs after the
OpenType features do their work.
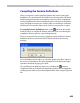
Interpretation of the features is based on the OpenType specification and is
carefully tested for compatibility with OS and Adobe InDesign
interpretation. However please be aware that feature interpretation is an
application-centric system so it may vary in different applications.
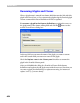
Use the buttons on the top of the panel to get access to options:
Click on this button to convert the OpenType kern feature into the plain pair
kerning table. This operation is described in the following section.
If this button is pressed, FontLab will preview the glyph metrics so you can
see how the positioning features work:
If this button is pressed both source and resulting preview windows work in
right-to-left mode. This is good for working with Arabic or Hebrew fonts.