
User Guide


FontLab 4
436
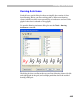
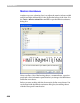
The idea of this dialog box is simple: use the check boxes in the left list to
select kerning classes that contain glyphs that may be on the left in the
kerning pair. Then check the kerning classes that contain glyphs that will
be on the right in the pair in the right list. For example, if you have a
kerning class that contains glyphs similar to ‘K’, it is unlikely that this
glyph will be on the right in a pair, but it definitely will be used as a left
glyph in pairs like “Ko”.
The actual kerning positioning and the exact kerning value come from the
kerning of the key glyphs of each of the kerning classes. This means that if
you have an “_A-class” and a “_V-class” which have ‘A’ and ‘V’ as key
glyphs in each class, respectively, you must define the kerning for the “AV”
pair using the Metrics window. If you then checked “_A-class” in the left
list and “_V-class” in the right list all glyphs in these classes would be
kerned by the same value as the “AV” pair.
A preview panel in the bottom of the dialog box can preview the result of
the class kerning. Left-drag to scroll the preview panel and see more
sample pairs.
When you select a class in the left or in the right list, you may see some
classes highlighted with the yellow background in the other list. This
means that key glyphs of these classes are actually kerned with the key
glyph of the class you have selected.
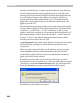
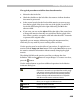
Sometimes you may need to convert class-based kerning into a plain
kerning table. To do so, check the boxes of the class names that you want to
“decompose” and click the Expand Kerning button. You will see the alert
dialog box that tells how many new kerning pairs will be created:
Click Yes to proceed or No to not convert.