
User Guide


FontLab 4
40
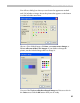
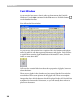
Glyph Window
To open a Glyph window for editing individual glyphs you need to
create one. Remember, we started with a new font that doesn’t have any
glyphs. To create a glyph, double-click on any cell in the Font window.
You will see that the gray cell (which means there is no glyph defined) is
replaced by a white one, which represents a glyph that is defined, but
contains no image. When you draw or paste something into it, the white
cell will show a small picture of the glyph.
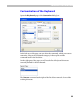
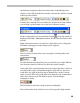
After the glyph cell is created we are ready to open the Glyph window.
Select the glyph cell (just click on it with the left button) and double-click it
to open the Glyph window. It will immediately appear on screen:
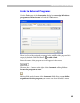
Instead of double-clicking, you can also use several other methods to
open the Glyph window:
1. Right-click the glyph cell and select the Edit command in the context
menu.
2. Select the glyph and choose New Edit window in the Window menu.
3. Select the glyph and press on the Panels toolbar
4. And finally, select the glyph cell and just press the ENTER key on the
keyboard.