
User Guide


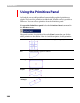

Glyph Window
381
Re a r r a ngi ng C o nt o u r s
Sometimes you need to change a contour’s sequence to simplify the
programming of hint substitution. You can do this by selecting the Make
contour command in the node popup menu, which sets contours above
each other; but an easier way is to use the Rearrange Contours
operation.
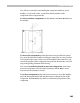
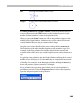
Select the Rearrange Contours operation in the Tools menu.
When you activate this operation you will see the yellow marks that show
the sequence number of each contour.
To change a contour’s startpoints just click on a new startpoint
position.
To change a contour’s sequence:
1. Place the mouse cursor on the contour whose sequence you want to
change.
2. Press the right mouse button. The selected contour will be highlighted.
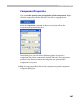
3. In the popup menu choose one of these commands:
Move contour up To move the contour one step up (contour #3 will be #2).
Move contour
down
To move the contour one step down (contour #3 will be
#4).
Make contour first To move the contour to the top of the sequence (contour
#3 will be #1).
Make contour last To move the contour to the bottom of the sequence
(contour #3 will be the last contour in the sequence).
Double-click to accept the changes (you can also press the RETURN or ENTER
key on the keyboard) or press the ESC key to reject the changes.