
User Guide


FontLab 4
374
To interpolate a glyph:
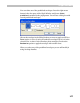
1. Activate an Interpolation operation. Select the Interpolation command
in the Operations submenu of the Tools menu or press the
button
on the Tools box.
2. You will see a standard tool panel with the usual OK and Cancel
buttons. You can press the OK button any time to finish your work with
the Interpolation operation or press the Cancel button to reject all
changes.
3. Position the mouse cursor on the reference point that you want to set;
press the left mouse button and drag the point to a new location.
Release the button when you are done. Note that the point will “stick”
to all guiding layers as well as to other glyph nodes. Hold the
SHIFT key
down to constrain the direction of movement to 15-degree increments.
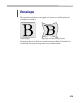
4. You may want to set a so-called base point – a reference point that
points to itself. A base point will remain in place during interpolation.
5. When you set the new position of the first reference point, you will see
the results of outline interpolation as a gray outline.
6. Click on a reference point with the right mouse button to remove
that reference point.
7. You can select several points using the usual point selection
procedure. If you add a reference point after selection all selected
points will move to the position of the same reference point. Use this
technique to “collapse” parts of the outline.
8. Press the right mouse button in the free space of the Glyph Window
and select the Remove all links command from the popup menu to
remove all reference links.