
User Guide


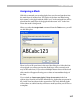


Glyph Window
317
Assigning a Mask
With this command you can take glyphs from one font and put them into
the mask layer of another font. The glyphs of the fonts are linked using
their names, so the glyph with the name “zero” in the assigned font will be
placed into the mask layer of the glyph with the name “zero” in the font
where the mask is being made.
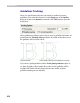
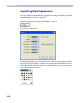
When you select the Assign Mask command from the Tools menu, you will
see the dialog box:
There is a list of all open fonts in the top of the dialog box. Select the font
whose glyphs you want to put into the mask layer of the current font (it
may be the same font). If you select a Multiple Master font scroll bars and
edit controls will appear allowing you to select an intermediate design of
the font.
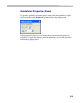
If you switch on Create new glyphs if they do not exist in the font
options, then FontLab will create definitions for glyphs that are present in
the “mask” font but absent in the current font. The newly defined glyphs
will not have an outline but they will have a mask layer that you can use as
a template.