
User Guide

Glyph Window
309
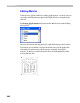
Editing Guidelines
Be sure that the Edit tool is active and the guidelines layer is visible –
use the View > Show layers menu to switch it on. Note that the Guidelines
layer will automatically switch on if you add a new guideline.
To add a new guideline:
1. Position the mouse cursor on the horizontal ruler bar (for a horizontal
guideline) or on the vertical bar (for a vertical guideline).
2. Press the left mouse button. The bar will appear “pressed” and the new
guideline will appear.
3. Holding the left mouse button down, drag the guideline to the desired
place and release the button.
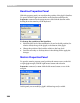
To move the guideline:
1. Move the mouse cursor onto the guideline that you want to move. Be
sure that no other objects (such as nodes or hints) are near the cursor.
2. Press the left mouse button and drag the guideline to the new place.
To slant the guideline:
1. Move the cursor onto the guideline near one of the sides of the editing
field of the Glyph Window.
2. Press the left mouse button. The mouse cursor will change to a pair of
curved arrows
that shows you the guideline slant direction.
3. Moving the mouse, slant the guideline to the angle that you want. Hold
down the
SHIFT key to constrain the slanting angle to 3-degree
increments.
To remove the guideline:
I.1. Start moving or slanting the guideline.
I.2. While holding down the left mouse button, click the right mouse
button.
II.1. Position the cursor on the guideline and click the right mouse button.
II.2. In the menu, select the Delete command.