
User Guide

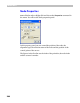


Glyph Window
267
To change the position of a node:
1. Select the origin point you want to use and set the coordinates of the
node. By default the origin is the glyph’s origin point. With the radio
buttons you can select the previous or next node as the origin point.
2. Modify the coordinates of the node in the edit boxes. You can use the
spin buttons to increase or decrease the coordinates. The new
coordinates will be applied to the node when you press the
ENTER key
on the keyboard or move the focus from one edit control to another or
when you close the property panel by clicking on a free space in the
edit field.
To change the connection mode for a node: select the new mode in
the combo box in the lower part of the panel.
To change the selection state of a node: modify the state in the
Selected check box.
To edit the position of the curve’s control vectors: switch on the
Control vectors check box (it will be gray if you are editing a node between
two vectors) and modify the relative position of the previous or next
control point that belongs to that node.
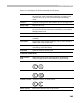
Use the buttons with arrows
to edit the previous or next
node.
Tip: when you are editing node positions in the Properties panel, press the
ENTER key to accept changes and move the focus to the editing field of the
Glyph Window. There you can use the keyboard to move the selected node
and the
PAGE DOWN/PAGE UP keys to select another node for modification.
You will see the node properties change in the Properties panel as you
move the node by keyboard or mouse. Click
ALT+ENTER to put the focus on
the Properties panel to set the node position more precisely.