
User Guide


FontLab 4
258
Inserting Nodes
To insert a new node on a vector or curve with the Edit tool:
1. Position the mouse cursor on the primitive where you want to insert
the node.
2. Press and hold the right mouse button. You will see a mark that shows
you the current position of the mouse cursor. This mark will stick to all
objects in the editing field, including nodes and glyph contours.
3. Position the mark on the point where you want to insert the node and
click the left mouse button. The new node will appear in that place.
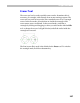
Using the Knife tool to insert nodes:
1. Activate the Knife tool
2.1. Click on the point on the contour where you want to insert a node.
2.2. Press the left mouse button anywhere on the empty area of the editing
field and drag the mouse to form a “knife line”. After you release the
mouse button new nodes will be inserted at all points where this line
crossed the outline. Hold down the
SHIFT key to constrain the direction
of the “knife line” to 15-degree increments.
If the “knife” line will cross two lines you may find a part of the glyph
to “cut off”. Hold the
ALT key to limit Knife tool to insert new nodes
only.
Using the Add Corner, Add Curve and Add Tangent tools:
1. Activate one of the tools.
2. Click on any outline point. The Corner tool will add a straight line, the
Curve tool will add a smooth connection and curve and the Tangent
tool a sharp connection and curve.
Note: You can insert nodes on the closing vector that automatically
connects the first and last nodes of a contour. If you insert nodes on the
first half of a closing vector (closer to the ending node of a contour), then
the new node will be added to the contour. If you insert the node on the
last half of the closing vector, then it will be inserted before the starting
point.