
User Guide


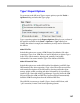

Editing Fonts
131
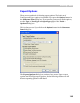
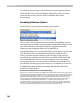
In the “Destination font:” combo box you can select the font in which to
store the blended glyphs. Choose “New font” to put the generated glyphs
into a new font.
Further down there are two options:
Select the second option if you want to blend only glyphs that are selected
in the destination font.
To the right there are controls to specify the blend amount:
Enter the blend percentage in the editing field. If you want to blend fonts
nonproportionally along the X and Y axes, uncheck the Uniform check box
and enter the blend amount for the two directions.
To not let FontLab add nodes to compatible contours leave the Do not
interpolate compatible outlines option switched on.
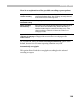
Click OK and wait while FontLab blends the fonts. After the process is
finished you will find the new glyphs in the new font or in the destination
font. The outlines of the two source glyphs will be stored in the Mask layer
of each glyph and the blending result in the outline layer.
Those glyphs that had compatible outlines and do not get additional nodes
during the blend operation will be marked with green color in the font
window.
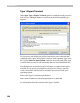
In some cases it is not possible to blend two outlines. This happens when
two source glyphs have different numbers of contours, like O and 8. If
some glyphs were not blended, FontLab will show a warning message and
those glyphs will have an empty outline layer.