
User Guide


FontLab 4
112
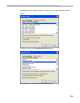
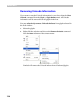
Select the codepage or encoding table to which you want to reencode the
glyphs and set the options necessary to control the reencoding process:
Codepages mode:
Move glyphs to the new
codepage
Removes currently assigned Unicode indexes and
assigns new ones. Visually this means that glyphs are
moved to their new places.
Copy glyphs
Add new Unicode indexes. Visually this means that
glyphs having more than one Unicode index assigned
are copied to their new places.
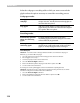
Encoding mode:
Automatically generate
names for conflicting
glyphs
If a glyph with the same name as one of the
reencoding glyphs needs to be changed a new name
will automatically be generated.
Exchange names of the
conflicting glyphs
If a glyph with the name that needs to be assigned
already exists, it will get the name of the reencoded
glyph, so visually the glyphs will be exchanged.
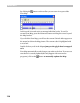
Some Examples
Situation 1: You want to make a TrueType font that will have a non-windows codepage in
Windows, say, one of the DOS codepages:
1. Select the desired new codepage in the Codepages mode of the Font window
2. Place all glyphs as necessary.
3. Save this “properly encoded” version of the font.
4. Select the Reencode Glyphs command.
5. Choose the Windows Symbol codepage and the “Move” option. Press OK.
6. See the results in the Font window.
Do not forget to set the Symbol glyph set in the Font Info before exporting this font.
Situation 2: You imported a Type 1 font with non-standard encoding and want to save it with
standard encoding to be sure that it will work in all Windows.
1. Select the Reencode Glyphs command.
2. Choose the Default Encoding and “Generate Names” options. Press OK.
3. See the results in the Font window.