FS-2/2E Studio DTE Disk Recorder User Guide MANL-0927-04
Symbols On the FS-2/2E Unit The lightning flash with arrowhead symbol, within an equilateral triangle, is intended to alert the user to the presence of an uninsulated Dangerous Voltage within the product’s enclosure that may be of sufficient magnitude to constitute a risk of electric shock to persons. Caution For continued protection against fire, replace only with fuses of correct rating, as listed on the rear panel. Caution TO PREVENT THE RISK OF ELECTRIC SHOCK, DO NOT REMOVE COVER (OR BACK).
Notices: Legal, Regulatory, and Safety LEGAL NOTICES THIS DOCUMENT CONTAINS CONFIDENTIAL AND TRADE SECRET INFORMATION OF FOCUS ENHANCEMENTS AND ITS RECEIPT OR POSSESSION DOES NOT CONVEY ANY RIGHTS TO REPRODUCE OR DISCLOSE ITS CONTENTS, OR TO MANUFACTURE, USE, OR SELL ANYTHING THAT IT MAY DESCRIBE. REPRODUCING, DISCLOSING, OR USING IN WHOLE OR IN PART WITHOUT THE SPECIFIC WRITTEN AUTHORIZATION OF FOCUS ENHANCEMENTS IS STRICTLY FORBIDDEN.
Contacting FOCUS ENHANCEMENTS USA Office Hours: Monday through Friday 8:00 AM to 5:00PM (Central Time) Email: support@focusinfo.com Telephone: +1 763-398-1658 Fax: +1 763-571-7688 Address: Focus Enhancements, Inc. 1370 Dell Avenue Campbell, CA. 95008 www.focusinfo.com EMEA (Europe, Middle East, Africa) Office Hours: Monday through Friday 9:00 AM to 5:00PM Email: techsupport@como.
Unauthorized Servicing Do not attempt to service this product yourself. Opening or removing covers may expose dangerous voltage or other hazards. Refer all servicing to qualified service personnel. Returning Materials End Users If the FS-2/2E was not purchased directly from Focus Enhancements, it is necessary to contact the seller and determine what procedure is needed for repairing the converter.
Regulatory and Safety Environmental Precaution Focus Enhancements, Inc. 1370 Dell Avenue Campbell, CA. 95008 Model Number: FS2-2E Date of Manufacture: Reference the Serial Number label attached to the unit. FCC Class A This product satisfies FCC regulations when shielded cables and connectors are used to connect the unit to other equipment. To prevent electromagnetic interference with electric appliances such as radios and televisions, use shielded cables and connectors.
Documentation This manual is written with the assumption that the user is familiar with analog and digital video/audio signals and hardware. Read, Retain, and Follow Instructions All the safety and operating instructions should be read before the product is operated. • Retain Documentation • Follow All Operating and Safety Instructions Place documentation in a secure place for future reference on operating and safety instructions.
Electrical Precautions Do Not Expose to Moisture Do not use this product near water or in an environment where it is exposed to dampness or there is the possibility of it getting wet. Do Not Remove Cover There are No User Serviceable Parts inside this unit. Servicing should be done by qualified service personnel. ON / OFF Switch in Stand-By Position The On/Off switch Does Not Separate the Unit From the Main Power when it is in the stand-by position.
Grounding or Polarization • • Polarized If this product is equipped with a polarized alternating current line plug (a plug having one blade wider than the other), it will fit into the outlet only one way. This is a safety feature. If you are unable to insert the plug fully into the outlet, try reversing the plug. If the plug should still fail to fit, contact your electrician to replace your obsolete outlet. Do not defeat the safety purpose of the polarized plug.
When installing an outside antenna system, extreme care should be taken to keep from touching such power lines or circuits as contact with them might be fatal. Optical Precaution The use of optical instruments with this device will increase hazards to the eyes hazard. Maintenance and Moving Cleaning Unplug this product from the wall outlet before cleaning. The product should be cleaned only with a polishing cloth or a soft dry cloth.
Safety Check Upon completion of any service or repairs to this product, ask the service technician to perform safety checks to determine that the product is in proper operating condition. Operating Environment Location Install this device on a sturdy, level surface, away from moisture and dust. • • Heat Locate this device away from heat sources such as radiators, heat registers, stoves or other electrical devices (including amplifiers) that generate heat.
WARRANTY For customers within the USA and Canada, FOCUS ENHANCEMENTS, Inc. warrants this product against defects in materials or workmanship as follows: For a period of TWO years from the date of purchase, FOCUS ENHANCEMENTS, Inc. will repair or replace the unit, at our option, without charge for parts or labor. After the period of TWO years, you must pay all parts and labor charges. The limited warranty is extended only to the original purchaser.
FS-2/2E Studio DTE Disk Recorder User Guide xiii
FS-2/2E Studio DTE Disk Recorder User Guide xiv
Table of Contents Chapter 1 Introduction 1 What is a DTE Disk Recorder? What is the FS-2/2E? Basic Applications Receiving, Unpacking, and Inspecting Package Contents Installation and Site Requirements Mounting in a 19” Electronics Rack Connecting Hard Drives Inserting the Internal 3.
SDI Serial Digital Video Source Input Key DV Video Source Input Key LCD Menu Soft Keys Transport Control Keys MENU Back Index Forward Index Stop Play lRecord Key SHIFT Back Search Forward Search LCD Display FS-2/2E Menus and Functions Menu Items Sub-Menu Available Soft Keys Record Menu Normal Record Retro Disk Retro Cache Loop Record Still Time Lapse Control Mode Menu Local Remote AV/C Syncro Slave Play Mode Menu Play Clip Loop Clip Loop All Play All Play From Mode Menu Track List Play List Folder List Play
Setup Menu Set Date & Time OS Version # OS Upgrade Copy Software to FS-2/2E Internal Drive Load Software from External Drive Restoring the Factory Default Operating System PAL/NTSC RS422 Remote Audio Input Audio In Levels TC Mode TC Set TC Preset UB Preset TC Delay (FS-2E only) Drop/Non Drop On Screen Display FF/RW Hi Res GPI Port Backlight Stop Output Audio Correct Preferences Folder Pref Analog Out Network Setup IP SETTINGS USER/PASSWORD VIEW IP INFO SERVICES GENLOCK Video Out Adj Compnt Level Utilities M
Chapter 3 Using the FS-2/2E85 How to Make a Recording How to Playback How to Put Recorded Clips on a Computer System Mounting FireWire Disk Drives (Windows XP, 2000, 98SE and ME) Using FS-2/2E Recorded Avid OMF Clips on Avid Editing Systems Dismounting FireWire Disk Drives (Windows XP, 2000, 98SE and ME) Mounting FireWire Disk Drives (Macintosh) Dismounting FireWire Disk Drives (Macintosh) How to Create a Playlist How to Mark Scenes Marking Scenes Connecting the FS-2/2E to a Network Chapter 4FS-2E Web Inter
Chapter 1 Introduction Thank you for purchasing the Focus Enhancements FS-2/2E DTE DV Studio Disk Recorder. The FS-2/2E is designed for use as a record or playback device in studios, mobile vans and other installations. The purpose of this User Guide is to explain the features and operation of the FS-2/ 2E. Study the contents of this User Guide before attempting to use your FS-2/2E. Check the Focus Enhancements website regularly for updates to FS-2/2E software and documentation: www.focusinfo.com/support.
Introduction 1.1 What is a DTE Disk Recorder? A DTE Disk Recorder is a device that allows you to record or playback DV video directly to/from a removable IDE disk drive or removable FireWire disk drives. The FS-2/2E features analog and digital inputs and outputs including DV25, SDI, composite, component, S-Video, AES/EBU digital audio and balanced analog audio. Audio and video are recorded to disk as a DV25 data stream in NLE native file formats. 1.
Introduction • • • • • Record and recall a single frame of DV video and record user definable timelapse sequences. Use trick playback modes up to 30X/-30X fast-forward and rewind speeds, reverse play, loop clip and loop entire disk. Control the FS-2/2E remotely using industry standard RS422 (Sony 9-pin), FireWire (for starting record/pause or AV/C) from a DV based camcorder 1394 port. You can also control the FS-2/2E using RS-232C (using the optional wired remote control available as an accessory).
Introduction 1.4.1 Package Contents 1 2 3 7 4 6 5 Please take a moment to study the contents of your FS-2/2E package. You should have the following contents: 1. One (1) FS-2/2E unit with attached rack mounting ears 2. One (1) 120GB IDE disk drive in caddy 3. One (1) User Guide 4. One (1) 6-pin to 6-pin FireWire cable (for External Drive connection) 5. One (1) 6-pin to 6-pin FireWire cable (for front panel port loop) 6. One (1) Focus Enhancement's DV Conversion Suite Demo Disk 7. One Power Cord 8.
Introduction 1.5 Installation and Site Requirements Focus Enhancements recommends that FS-2/2E units be installed in a restricted access area, such as an equipment room or closet and the installation be performed by trained installers. The units are designed and tested to operate reliably between +5 - +40C (41 - 104 F). To maintain this range, consider the following: • • Air temperature surrounding the equipment must remain within the specified range.
Introduction 1.6 Mounting in a 19 inch Electronics Rack The FS-2/2E measures 15.89” high x 17.36” wide by 3.47” deep. It is an 2RU chassis featuring front rack mount ears to be installed into a standard 19” audio/visual rack. There must be room behind the unit for the attachment of cables. To mount the FS-2/2E in a standard 19” audio/visual rack, do the following: 1. Determine the desired location. The FS-2/2E requires 3.47 vertical inches of rack space.
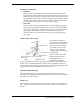
Introduction 1.7 Connecting Hard Drives 1.7.1 Inserting the Internal 3.5 inch IDE Drive Insert the internal 3.5 inch IDE drive as follows: 1. Remove the drive from its packaging. 2. Slide the drive carefully into the bay until it is seated firmly. Lock Handle Release Lever Drive Bay 3. Press the Lock Handle flush with the chassis face to lock the drive in place. To remove the drive, slide the Release Lever to the right. The Lock Handle disengages. Pull the drive toward you to remove it.
Introduction 1.8 Physical Features The FS-2/2E features two main surfaces, the front control panel and the rear connector panel. Disk Drive Bay Power Switch and LED Edit / Utility / Input Keys Jack Volume Control Headphone Headphone LCD Display Transport Keys Soft Keys 1.8.1 Front Control Panel The front control panel contains the seven control areas, as shown in the illustration below and described in this section: • Power Switch and Power LED This is the FS-2/2E's main power switch.
Introduction Input selections are either Composite, Y/C (S-Video), Component, SDI or DV. An audio source must be selected for each input using the SETUP > AUDIO INPUT menu, the Timecode mode in the SETUP > TC MODE menu, and the reference video source in the SETUP > GENLOCK > SOURCE menu. For component inputs/outputs you must select the video standard when used in NTSC mode only. Refer to Compnt Level on page 76 for more details.
Introduction 1.8.2 Rear Connection Panel The FS-2/2E rear panel, shown below, contains control and audio/video input/output areas described in this section. You can select any of the available inputs as a source. When selected, that source is what is recorded to disk. If the unit is in E-E mode or recording, all outputs are live with the incoming signal. For any particular video input, there is an associated audio input selected as a default.
Introduction 8. Pr Input - For connecting the Pr signal from component input sources. Pr Output - For output of the Pr signal to component devices 9. Sync Input - For connecting the Sync signal on non sync on green component sources. Sync Output - For connecting the Sync signal to non sync on green component devices. 10. Timecode Input - For connecting external analog VITC timecode sources. Timecode Output - For connection to external analog VITC timecode devices. 11.
Introduction 1.9 Setting Up the FS-2/2E This section explains how to set up the FS-2/2E for use. Refer to the illustration below and perform the steps on the following page.
Introduction To set up the FS-2/2E, do the following: 1. Plug in the power cord. 2. Connect a Video input device. 3. Connect an Audio source (if desired). 4. Connect a Monitor if desired. 5. Connect Speakers or Headset (to monitor the audio) if desired. 6. Connect a Tape Drive if desired. 7. Connect a Time Code Generator if desired. 8. Connect an External Control Device (RS422) if desired. 9. Connect a Reference Video signal if desired. 1.9.
Introduction 1.9.2 Setting the Time and Date Before using the FS-2/2E, use this procedure to set the time and date. 1. Select the Setup Menu. 2. Select SET DATE & TIME. The following screen appears. SET DATE SET TIME EXIT SEL 3. Select SET DATE or SET TIME and press SEL to open the sub menu as shown below. SYSTEM DATE 10/01/07 MM/DD/YY | & | MOVES CURSOR EXIT SYSTEM TIME 16:21:13 Hh:Mm:Ss | & | MOVES CURSOR EXIT 4. Scroll from value to value using the FORWARD and BACK index buttons. 5.
Introduction 1.10 Replacing the Power Module Fuse The power module of the FS-2/2E contains a protective fuse. To replace the fuse do the following: 1. Turn off the FS-2/2E. 2. Locate the power module on the rear of the unit. It is indicated as AC In. 3. Detach the power cord from the power module. 4. Locate the small recess on the top of the power module above the power 5. 6. 7. 8. 9. 10. switch. Use a small tipped standard screwdriver to pop open the fuse door.
FS-2/2E Studio DTE Disk Recorder User Guide 16
Chapter 2 FS-2/2E Functions This chapter contains the following sections: Edit/Utility/Input Buttons page 17 LCD Menu Soft Keys page 22 Transport Control Keys page 23 LCD Display page 26 FS-2/2E Menus and Functions page 30 2.1 Edit/Utility/Input Buttons To the right of the hard disk drive is a bank of 15 buttons as shown below. Edit Function Keys Utility Function Keys Input Source Selection Keys • • • The first row contains five buttons that are Edit functions keys.
FS-2/2E Functions 2.1.1 Edit Function Keys 2.1.1.1 MARK IN - Mark In Key Use the MARK IN key to mark a particular frame as a starting point when creating a clip for a playlist. Refer to Playlist Menu on page 44 of this user guide for more information about Playlists. It is only possible to mark In and Out Points during playback. 2.1.1.2 MARK OUT - Mark Out Key Use the MARK OUT key to mark a particular frame as an ending point when creating a clip for a playlist.
FS-2/2E Functions 2.1.1.5 FOLDER - Folder Key By pressing the Folder key during a recording, you can mark each clip into particular pre-named folders on disk (up to 10 folders can be prenamed). Default names for the folders are 0 through 9. Refer to How to Mark Scenes on page 95 of this user guide to set up Scene Marking folders). By repeatedly pressing the FOLDER key, you can scroll though the available folders.
FS-2/2E Functions 2.1.2 Utility Function Keys 2.1.2.1 OSD - (On Screen Display) Press this key to enable on screen display on the monitor output (composite). When off, the key will not light. 2.1.2.2 HDD – Hard Disk Drive Bypass Key Press this key to immediately open the HDD Bypass confirm screen as described in the HDD Bypass section of the Menu. For more information, refer to HDD Bypass on page 50 2.1.2.3 LOCK – Keypad Lock Key This key turns lock on or off.
FS-2/2E Functions 2.1.3 Input Source Selection Keys In all cases, when selected, the key lights. When selecting CMPST, Y/C, or CMPNT and there is no video source available, this light flashes several times and then the FS-2/2E returns to the original input selection. Switching is not seamless. You cannot change inputs while in record mode. 2.1.3.1 CMPST – Composite Video Source Input Key Press this key to select composite video as the input source.
FS-2/2E Functions 2.1.3.4 SDI Serial Digital Video Source Input Key Press this key to select SDI video (SMPTE 259M) as the input source. The default audio link is embedded AES/EBU digital audio in the stream. You can also select either balanced analog audio or separate AES/EBU audio as the input link in the SETUP > AUDIO INPUT menu. The FS-2E provides the option to select either channels 1 and 2 or 3 and 4 of the embedded audio of the SDI stream.
FS-2/2E Functions 2.3 Transport Control Keys This set of buttons controls playback and record functions of the FS-2/2E. These functions include play, reverse play, fast forward, fast rewind, forward frame, back frame, next track, previous track, stop, and record. This area also features hot keys for changing, controlling, and navigating the FS-2/2E menu system. Each of these keys is described below as shown in order left to right, top to bottom.
FS-2/2E Functions 2.3.3 | Forward Index Press this key to skip forward to the next sequential clip for playback. • • 2.3.4 To skip ahead 10 clips per increment, holding down Forward Index. To select the next disk drive, press SHIFT and then Forward Index. Stop Press this key to Stop the selected mode and return the FS-/2E to Pause. Press it again to put the FS-2/2E into STOP (standby with menu screen).
FS-2/2E Functions 2.3.9 Forward Search Press the Forward Search key to play video at different speeds (both slower and faster than real-time). Change Search Speed with FF Search and Back Search Pressing the FF Search button multiple times results in increases in the search speed. This mode is bidirectional in forward X times normal search speed. Press the Back Search button to cause the FF speed to slow down by one step.
FS-2/2E Functions 2.4 LCD Display The FS-2/2E LCD screen displays different FS-2/2E modes and states. On boot up, the FS-2/2E displays the following screen: WELCOME TO FS-2E PLEASE WAIT Depending on the connected disk drive, the FS-2/2E may or may not display Please Wait during boot up.
FS-2/2E Functions Once ready for use, the FS-2/2E default menu screen appears as follows: 2 3 1 4 STOP 10 COUNTER 00:00:00:00 DISK 1 FOLDER 11 MENU 7 8 5 1-001 183 Min DISP 6 9 SHFT 13 12 1. Play/Record Status Symbol This symbol displays a graphical representation of the current FS-2/2E state as follows: - STOP , - Play or Reverse play - Fast Forward search and speed - Fast Back search and speed - Record and Record mode || - Pause Each symbol has multiple display modes.
FS-2/2E Functions 5. Track or Clip Number The track number is displayed in the top right corner of the LCD Display. This is the current clip or track number being recorded or played back. For example, a display value of 2-014 identifies a track as being clip 14 on volume 2. 6. Timecode/User Bit Display Mode This identifies the display mode for timecode or user bit values. Selections are: • COUNTER - Counts frames during record or playback of the current clip only.
FS-2/2E Functions 8. Current Disk Volume Displays the current disk volume in relation to available space. 9. Available Space on Volume Displays the space in time available on the current volume, for example, • DISK 1 183min - Current Disk time remaining is 183 minutes • NO DISK - No attached Disk 10. Folder Display In record or playback, this displays the particular folder a clip is in (if applicable).
FS-2/2E Functions 2.5 FS-2/2E Menus and Functions The FS-2/2E features a comprehensive menu system which allows a number of features to be initiated and setup.
FS-2/2E Functions • • • AVID OMF PINNACLE • • 24P AVI TYPE 2 (for FS-2E, or FS-2 with 2.0 upgrade only) 24P QUICKTIME (for FS-2E, or FS-2 with 2.
FS-2/2E Functions • NETWORK SETUP • IP SETTINGS (selections include DHCP, CUSTOM IP) • USER/PASSWORD • VIEW IP INFO • SERVICES (selections include FTP [ENABLE/DISABLE], TELNET [ENABLE/DISABLE], WEB [ENABLE/DISABLE]) • GENLOCK (selections include SOURCE [REF VIDEO/FREERUN], SC PHASE, H PHASE) • • VIDEO OUT ADJ COMPOSITE Y/C (selections include HUE, SATURATION, BRIGHT- • COMPONENT (selections include Y, U, V) NESS, CONTRAST, BLACKLEVEL, [0/7.
FS-2/2E Functions 2.5.2 Sub-Menu Available The symbol at the end of a line indicates a menu item that has a submenu available. Press the SEL soft key, to display the sub-menu. 2.5.3 Soft Keys • • • EXIT -- Press EXIT to return to the FS-2/2E main menu screen. SEL -- Press SEL to select the current menu item. If a sub-menu is available, it will open. Scroll Arrow -- The or symbol allows you to scroll up or down through menu items. 2.5.
FS-2/2E Functions Press STOP once to pause your recording. To stop the recording session entirely, press STOP once again. Use the REC button to restart the recording. 2.5.4.2 Retro Disk RETRO DISK HDD AVAIL: 183 Min RETRO TIME: 15 Min EXIT RETRO DISK Record constantly buffers video in a loop to a determined amount of space on the hard-disk drive so that when record is triggered, a retro time period can be added to the beginning of any clip.
FS-2/2E Functions Due to larger files sizes, the maximum amount of drive space available is decreased to accommodate the last recording in a session. For instance, if you have 90 minutes of disk space remaining, after you set RETRO record to less than 60 minutes, the available space changes to 88 minutes of available disk space. If you set RETRO time to 88 minutes, the recording will be made up of about nine and a half 9 minute, 13 second clips.
FS-2/2E Functions 2.5.4.3 Retro Cache RETRO CACHE CACHE: 10 sec EXIT RETRO CACHE Record constantly caches your video in a loop up to a 10 second data buffer. In this way, when the record is begun, a retro time period is added to the beginning of any clip. Pressing the REC key when in RETRO CACHE mode puts the FS2/2E into a RETRO CACHE state (the tally light on the FS-2/2E flashes as if in PAUSE state).
FS-2/2E Functions When the disk capacity’s record time is reached, an additional one-minute (or 2GB) segment is created. After this clip is complete, the oldest one-minute clip (or 2GB segment) is recorded over, followed by each sequential oldest clip. When you press STOP during a record session, recording stops and clips in the current LOOP RECORD session are saved to disk. They are also saved in a single folder. Loop Record Only Works with One Disk Drive. 2.5.4.
FS-2/2E Functions 2.5.5 Control Mode Menu LOCAL REMOTE AV/C SYNCRO SLAVE EXIT SEL 1. Select the Control mode. The highlighted mode is the current mode after exit. 2. Press EXIT to return to the menu screen. Control Mode has the following functions: • • • LOCAL REMOTE AV/C • SYNCRO SLAVE 2.5.5.1 Local NORMAL INDEX AT TC INDEX AT SCENE EXIT Select these options to control the FS-2/2E from the front panel buttons only.
FS-2/2E Functions • Index at Scene - In this mode, recordings are continuous until a scene break is detected in the incoming video stream, or the nine minute file size limit is reached. At that time, a new file is automatically created within one second of the scene change. No frames are lost during the transition to a new clip.. The Index at Scene option watches the DV stream for an index marker that is recorded to tape when a new scene, or record session starts.
FS-2/2E Functions 2.5.5.3 AV/C NORMAL INDEX AT TC INDEX AT SCENE EXIT Use these settings in PLAYBACK and other situations where the FS-2/2E is controlled by an external FireWire device (such as a DV NLE system). There three options in this sub-menu: • • • Normal Mode - default - In this mode, recordings are captured to a single base file until STOP is triggered, or the nine minute file size limit is reached.
FS-2/2E Functions 2.5.5.4 Syncro Slave NEW FILE SAME FILE EXIT The FS-2E and the FS-2 (with the 2.0 upgrade), has two settings in Syncro Slave: • • NEW FILE - default - This setting, and the FS-2E is triggered to stop recording from the camcorder, the current file is closed and a new file is opened ready for the next recording. SAME FILE - This option appends the new recording onto the same file. This significantly cuts down on the number of files created and is ideal for many applications.
FS-2/2E Functions 2.5.6 Play Mode Menu PLAY CLIP LOOP CLIP LOOP ALL PLAY ALL EXIT 1. Select the mode. The highlighted mode is the current mode after exit. 2. Press EXIT to return to the menu screen. The default mode is PLAY CLIP. 2.5.6.1 Play Clip For this function, the FS-2/2E plays the selected clip from start to finish when you press the PLAY button. At the end of the selected clip, the FS-2/2E pauses. 2.5.6.2 Loop Clip For this function, the FS-2/2E plays the selected clip from start to finish.
FS-2/2E Functions 2.5.7 Play From Mode Menu TRACK LIST PLAY LIST FOLDER LIST EXIT This selection allows you to select the playback list used in play mode. There are three options available. 1. Select the mode. The highlighted mode is the current mode after exit. 2. Press SEL for the highlighted menu item to open the sub-menu. When you exit the menu, the last menu item is the current mode. 3. Scroll from value to value using the FORWARD and BACK INDEX buttons. 4.
FS-2/2E Functions 2.5.8 Playlist Menu OPEN SAVE NEW EDIT EXIT SEL The Playlist menu options are: • • • • • • OPEN SAVE NEW EDIT VIEW DELETE The FS-2/2E playlist feature allows you to playback clips in a custom, userdefined order. Playlists are created using the FS-2/2E front panel. You can mark in and out play points on clips. Multiple playlists can be opened, saved and edited at any time. Use the PLAY FROM menu to select the playlist to playback.
FS-2/2E Functions 2.5.8.1 Open Open allows you to open a playlist on disk. Do this as follows: 1. In the PLAYLIST menu, select the OPEN option. A display similar to the following appears. 03-20-20 06-20-20 03-25-20 03-30-20 EXIT SEL 2. Once the sub menu is opened, select the desired playlist from the list. A screen similar to the following appears. PLAY LIST OPENED 03-20-20 EXIT VIEW PLAY 3. Once selected, you can VIEW or PLAY the playlist.
FS-2/2E Functions 2.5.8.2 Save When a playlist has been created or modified, use the SAVE option to write it to disk. If you modify a playlist, upon exiting, the SAVE function automatically appears. If you have made modifications and wish to save them as a new playlist, modify the file name prior to saving it. SAVE PLAYLIST? 02-20-20 NEXT Select NEXT and a display similar to the following appears. CONTINUE SAVE? 02-20-20 BACK YES NO Select YES or NO. 2.5.8.
FS-2/2E Functions 2.5.8.4.1 REMOVE a Clip To remove a clip, use the following steps: 1. Select EDIT from the PLAYLIST menu and then REMOVE CLIP. You are given a list of clips in the open playlist. (If no clips are in the playlist, the message PLAYLIST EMPTY appears.) 0001 0002 0003 0004 1-001 1-004 1-001 1-003 NEXT 2. Select the clip you wish to remove and then press NEXT. DELETE ITEM? HDD: CLIP: 00:00:01:23 00:00:02:00 EXIT 01 0001 1-003 YES NO 3.
FS-2/2E Functions 3. Select between inserting at the BEGIN, END or CUSTOM (user-specified) part of playlist. Once you have selected your choice, the updated playlist is displayed. INSERT ITEM IN CLIP 1-001 OUT CLIP 1-001 1 00:00:01:23 0 00:00:02:00 EXIT 2.5.8.4.3 NEXT MOVE a Clip The MOVE CLIP option allows you to move a clip within an existing playlist. To move a clip, use the following steps: 1. Select MOVE CLIP from the PLAYLIST > EDIT menu. 2. Once selected, scroll to the clip you wish to move.
FS-2/2E Functions 2.5.8.5 View The VIEW option allows you to view the track information of an OPEN playlist. A playlist must be opened in order to view. 1. Select VIEW from the PLAYLIST > EDIT menu. 0001 0002 0003 0004 1-001 1-004 1-001 1-003 NEXT 2. Scroll to the desired clip, then select NEXT. The clip information is displayed. HDD: CLIP: 00:00:01:23 00:00:02:00 EXIT 2.5.8.6 CLIP INFO 01 0001 NEXT BACK Delete List The DELETE LIST option allows you to delete an entire playlist. 1.
FS-2/2E Functions 2.5.9 HDD Bypass GO TO HDD BYPASS? EXIT YES NO HDD Bypass mode allows the connected FireWire hard drives to be mounted or dismounted to a computer without removing them from the FS-2E. Attach FireWire Cable Before Enabling HDD Bypass Before enabling HDD Bypass, attach a FireWire cable to the computer and HDD I/O port on the rear panel of the FS-2E. For more details, see Connecting the FS2/2E to a Network on page 98.
FS-2/2E Functions 2.5.11 Record Format Menu RAW DV AVI TYPE1 AVI TYPE2 CANOPUS AVI MATROX AVI QUICKTIME EXIT The RECORD FORMAT menu allows selection of particular DTE Technology native NLE file formats prior to recording. All files are in the DV25 standard. • The FS-2E supports the RAW DV formats: • AVI TYPE1 • AVI TYPE2 • CANOPUS AVI • MATROX AVI • QUICKTIME • • • • AVID OMF PINNACLE 24P AVI TYPE2* 24P QUICKTIME* * NTSC only. 1. Select a format to activate it.
FS-2/2E Functions 2.5.12 Setup Menu SET DATE&TIME OS VERSION # OS UPGRADE PAL/NTSC EXIT SEL The SETUP menu allows you to set various functions of the FS-2/2E. • • • • Select the menu item. Press SEL to open the sub menu (where applicable). Use to scroll through the selections. Press EXIT to return to the menu screen.
FS-2/2E Functions 2.5.12.1 Set Date & Time This selection provides a way to set date and time for file naming purposes. Date and Time are set in different menus. 1. Select the menu item. SET DATE SET TIME EXIT SEL 2. Press SEL to open one of the following sub menus. SYSTEM DATE 10/01/07 MM/DD/YY | & | MOVES CURSOR EXIT SYSTEM TIME 17:20:12 Hh:Mm:Ss | & | MOVES CURSOR EXIT 3. Move from field to field using the FORWARD and BACK INDEX Buttons. 4. Press and to scroll through digits in the value. 5.
FS-2/2E Functions On a computer, files are identified by their base file name made up of DATE and TIME. For instance, a clip named 20050615210943-01.mov is a clip that began recording at 9:09:43PM on June 15th. 2005. DATE/TIME is used when creating file names only. The FS-2/2E does not record this information into the stream. The FS-2/2E records the date and time which is in the DV stream sent from the input source. 2.5.12.2 OS Version # OS VERSION 2.0.2.
FS-2/2E Functions 2.5.12.3 OS Upgrade To upgrade operating system (OS) software, you must download a new .bin file to a FireWire drive on your computer. The latest version of FS-2/2E software can be downloaded from http:// www.focusinfo.com/support. There are three methods for installing new FS-2/2E software: • • • Via the Web Interface, see Updating FS-2E Software via FTP on page 109. Directly onto the FS-2/2E internal drive, see the following procedure.
FS-2/2E Functions 5. Select YES. The following warning appears: UPGRADE WILL ERASE CURRENT OS!! CONTINUE? EXIT YES NO 6. Select YES to begin the OS upgrade. 7. A message appears indicating the upgrade has begun. 8. After upgrade is complete, power cycle the FS-2/ 2E, to reboot the system. The new software is now loaded and ready to use. OS UPGRADE ERROR If the FS-2/2E cannot find the .bin the LCD screen displays the message OS UPGRADE ERROR.
FS-2/2E Functions 2.5.12.4 Restoring the Factory Default Operating System To restore the factory default Operating System hold down the Left and Middle soft keys located under the LCD during boot up. 2.5.12.5 PAL/NTSC NTSC PAL EXIT Use this screen to select the record standard as either PAL or NTSC. The highlighted selection is the current one after exit. The FS-2/2E uses this video standard for both playback and record. Do Not Combine PAL and NTSC Clips on the Same Drive.
FS-2/2E Functions 2.5.12.6 RS422 Remote This submenu allows you to setup the FS-2/2E for remote operation using the RS422 control port. For easy integration with existing control systems, you can make the FS-2/2E look like either a Sony BVW-75 Betacam SP deck or a generic recorder. Using the TC SOURCE submenu, you can also select the timecode source for FS-2/2E control. Options are ABS, DV and COUNTER.
FS-2/2E Functions 2.5.12.7 Audio Input COMPOSITE Y/C COMPONENT SDI EXIT SEL In this submenu, you can change the default audio input linked to a particular video input. Select the mode to activate it. 1. Press SEL for the highlighted menu item to open the sub- menu. In the sub-menu, the currently highlighted mode is the current mode after exit. 2. Press EXIT to return to the menu screen. These settings are saved on power down.
FS-2/2E Functions 2.5.12.8 Audio In Levels 0.0dB |--------------X------------| EXIT This menu item allows you to set the audio input levels for FS-2/ 2E. Adjust the audio level between -34.5dB and +4.5dB in 1.5dB increments. 2.5.12.9 TC Mode EXT TC REC RUN REGEN FREE RUN EXIT SEL This submenu allows you to select different timecode options for use when the FS-2/2E is recording. Select the mode. 1. Press SEL to open the sub-menu.
FS-2/2E Functions This submenu contains the following selections: • • EXT TC - Whatever the incoming timecode, the FS-2/2E records it. You can select between SELECTED INPUT and LTC. Select the desired TC source: Selected Input TC Source Composite, Component, & Y/C VITC SDI LTC DV Embedded DV TC Choosing EXT TC mode will clear any stored timecode value. If the FS-2/2E is set to EXT TC when in SYNCRO SLAVE mode, EXT TC stops once the tape in the camcorder ends.
FS-2/2E Functions 2.5.12.10 TC Set TC PRESET UB PRESET TC DELAY DROP/NON DROP EXIT SEL This menu allows you to set Timecode values for various modes. It also allows the selection of drop or non-drop frame (NTSC only) settings. The FS-2E, or FS-2 (with the 2.0 upgrade), has the added ability to delay the recorded timecode relative to the content. Once a timecode value is set and the FS-2/2E is set to REC RUN or FREE RUN timecode settings, the TC preset value becomes the starting point for timecode.
FS-2/2E Functions 3. Press EXIT to return to the menu screen. 2.5.12.10.2 UB Preset UB PRESET 00:00:00:00 | & | MOVES CURSOR EXIT You cannot set UB values after selecting EXT TC mode in the TC MODE menu. 2.5.12.10.3 TC Delay (FS-2E only) The TC DELAY menu is only available for the FS-2E, or FS-2 (with the 2.0 upgrade). This menu allows you to delay the recorded timecode up to 29 frames. TC DELAY: 00 1. Use (middle soft key) and adjust the delay value. 2. Press EXIT when done. (right soft key) to 2.
FS-2/2E Functions 2.5.12.11 On Screen Display ABS TC MENU OFF EXIT This selection allows you to turn on or off the on-screen display on FS-2/2E's Monitor Output. The highlighted item is saved after exit. When you select ABS, the absolute timecode value, or amount of time recorded to the disk, appears on the bottom center of the monitor output. When you select TC, the TC (Counter) timecode value appears on the bottom center of the monitor output.
FS-2/2E Functions • • The highlighted mode is the current mode after exit. Press EXIT to return to the menu screen. 2.5.12.13 GPI Port DISABLE PAUSE/UNPAUSE INDEX / NEW FILE) REC SNAPSHOT EXIT This menu allows you to change the setting of the GPI port. • • • The highlighted function is the current setting after exit. Press EXIT to return to the menu screen. DISABLE - This selection allows you to connect a 3.
FS-2/2E Functions 2.5.12.14 Backlight ON OFF AUTO OFF EXIT This selection enables or disables the FS-2/2E LCD backlight. • • The highlighted state is saved after exit. Press EXIT to return to the menu screen. The ON setting leaves the LCD backlight on continuously and OFF setting turns it off. AUTO OFF turns off the backlight after one minute. Press any keypad button on the FS-2/2E to turn the LCD backlight back. 2.5.12.
FS-2/2E Functions • CUSTOM - The FS-2/2E looks on disk drive volume 1 for any clip named SPLASH.dv and always displays the first frame of that clip. You can name any RawDV clip Splash.dv and the first frame from that clip appears as the default output in STOP mode. 2.5.12.16 Audio Correct OFF MEDIUM HIGH EXIT This sub-menu allows you to change the AUDIO CORRECTION setting on the FS-2/2E. • • The highlighted state is saved after exiting. Press EXIT to return to the menu screen.
FS-2/2E Functions 2.5.12.17 Preferences PREFERENCES SAVE RESTORE EXIT SEL This menu allows you to save and restore system preferences. When you select SAVE, you are prompted with the message SAVE CURRENT PREFERENCES?. Press YES and a file is written to the disk drive saving the current user settings. When you select RESTORE the FS-2/2E searches for a saved user preference on the disk and if found, restores your preferences. Preferences are a snapshot of all settings that can be saved on the FS-2/2E.
FS-2/2E Functions 2.5.12.18 Folder Pref SCENE MARK AUTO MARK EXIT SEL The FOLDER PREF menu allows you to determine the folders to which your clips are moved when you choose to do a ORGANIZE CLIPS from the UTILITIES menu. This menu contains the following sections: • • SCENE MARK - default - only marks those clips you explicitly mark during record or playback. AUTO MARK - marks all recorded clips with the last selected FOLDER.
FS-2/2E Functions 2.5.12.20 Network Setup IP SETTINGS USER/PASSWORD VIEW IP INFO SERVICES EXIT SEL With NETWORK SETUP, you can connect the FS-2/2E to a network. When this is done, you can do FTP file transfers to or from the FS-2/2E or control the FS-2/2E using Telnet. The FS-2E, or FS-2, with the 2.0 software upgrade also allows you to control the FS-2 using your internet browser. FOCUS Enhancements is in no way liable for device security (Telnet and FTP).
FS-2/2E Functions • CustomIP - If you select CUSTOM IP, a submenu opens to ask you to enter an IP number, Sub Net Mask, and Gateway. IP 000.000. 000.000 255.255. 255.000 000.000. 000.000 MSK GWY EXIT NEXT SEL If you do not have these values, contact your system administrator. The default values for the IP address are 000.000.000.000, Sub Net Mask 255.255.255.000 and Gateway 000.000.000.000. To modify the custom IP values use the following steps: 1. Select the item to modify. 2.
FS-2/2E Functions 2.5.12.20.2 USER/PASSWORD USER: PASWD: EXIT SAVE fs2 focus NEXT This screen allows you to set a username and password for the FS-2/2E. If you are unsure what username and password to use, contact your system administrator. • Username may have up to 4 characters. • Password may have up to 6 characters. To modify the username and password, use the following steps: 1. Select the item to modify and then press the right arrow key to select the field. 2.
FS-2/2E Functions 2.5.12.20.3 VIEW IP INFO IP 000.000 000.00 255.255 255.000 000.000 000.000 MSK GW NEXT In cases where DHCP is being used, by selecting VIEW IP INFO, you can see the IP address that the network has provided the FS-2/2E. If the FS-2/2E is not connected to a network or was not able to successfully log on, this screen displays DHCP DISABLED NOT CONNECTED. Check your settings or contact your system administrator for further assistance. 2.5.12.20.
FS-2/2E Functions Web Interface Use the web interface to control, change settings, edit playlists, and even delete tracks on the FS-2/2E. Below is an example of the web interface. For more information about the web interface, see FS-2E Web Interface on page 99. Remote Use of HDD Bypass System Config Tab HDD Bypass HDD Bypass allows you to make your content files available on the host computer. This permits more efficient and flexible transfer of files using your available network.
FS-2/2E Functions 2. Connect a host computer to the TO COMPUTER port on the back of the FS-2E next to the EtherNet port. FS-2E Backpanel Ethernet 10/100 Base T To Computer 2.5.12.21 GENLOCK The GENLOCK menu allows you to select and adjust the reference video source and whether the video out will be locked to the reference video input in playback modes. • • SOURCE - Selects the source of the sync pulses used to time the output video during playback.
FS-2/2E Functions 2.5.12.22 Video Out Adj The VIDEO OUT ADJ menu options allow you to make adjustments to FS-2/2E analog output sources.
FS-2/2E Functions 2.5.13 Utilities Menu ORGANIZE PINN ORGANIZE CLIP ORGANIZE OMF DELETE CLIP EXIT SEL This menu allows you to access various utilities. • • Select the menu item. Press SEL to open the sub menu (where applicable). Press EXIT to return to the menu screen. This menu contains the following selections: • • • • • • • • • • ORGANIZE PINN ORGANIZE CLIP ORGANIZE OMF DELETE CLIP FORMAT PARTITION REPAIR FILE NAME FACTORY RESET DIAGNOSTIC 2.5.13.
FS-2/2E Functions Once clips have been imported into Liquid Edition, an Index file is created on the disk drive per clip. Do not delete this file since it is required to continue work in the particular project. The illustration below shows this.
FS-2/2E Functions 2.5.13.2 Organize Clip ORGANIZE KEEP CLIPS? EXIT YES NO This selection places all files that were identified as a KEEPER or were SCENE MARKED during recording into a folder marked KEEPER or the prenamed SCENE MARKING folders on the disk drive. These folders can be imported directly into most DV NLE bins. 2.5.13.
FS-2/2E Functions 2.5.13.4 Delete Clip DELETE CLIP 1-001? BASE: 210612-165423 EXIT • • • YES In the DELETE CLIP X-XXX screen, select between clips by pressing the and buttons. If you select YES, a message appears indicating that the selected clip is being deleted. Press EXIT to return to the menu screen. Once a clip has been deleted, the FS-2/2E display re-organizes the clip number sequence.
FS-2/2E Functions 2. Select the volume and press YES, the following screen appears: FORMAT WILL ERASE ALL DATA!! CONTINUE FORMAT VOL. 1 EXIT NO YES 3. When you select YES, a message indicating the formatting appears. 4. Press EXIT to return to the menu screen. 2.5.13.6 Partition Select Drive SIZE 115 Gib Disk 1 FREE 524 Min EXIT YES NO 1. Go to Utilities and select Partition. 2. The display shown above appears. 3. Press Select. The following display appears.
FS-2/2E Functions 4. Press Yes. The following message appears. PARTITIONING VOLUME Select Partition to partition a connected disk drive. When an unknown volume type (HDD) is connected to the FS-2/2E, the Partition process puts a FAT32 format onto the drive. It erases any previous partition and data. FS-2/2E Does Not Support Multiple Partitions on Drives Less Than 128GB You cannot add multiple partitions an a single drive using the FS-2/2E.
FS-2/2E Functions 2.5.13.7.2 CURRENT CLIP This selection performs a similar function, but on the selected clip only. If an error is found, the FS-2/2E prompts you to repair the problem. CURRENT CLIP repairs the last file in the current session if it has been damaged. | • Select between volumes by pressing the buttons. Press EXIT to return to the and | menu screen. 2.5.13.8 File Name CLIP 1-001 BASE: 20010612-166523 EXIT This selection displays the base file name of the selected clip. 2.5.13.
FS-2/2E Studio DTE Disk Recorder User Guide 84
Chapter 3 Using the FS-2/2E This chapter contains the following procedures: How to Make a Recording page 86 How to Playback page 86 How to Put Recorded Clips on a Computer System page 87 How to Create a Playlist page 94 How to Mark Scenes page 95 Connecting the FS-2/2E to a Network page 98 To perform these procedures use input and output targets as illustrated in the following diagram.
Using the FS-2/2E 3.1 How to Make a Recording 1. Use the following procedure to make a recording using the FS-2/2E. 2. Make sure the FS-2/2E is connected to power and has been turned on using 3. 4. 5. 6. 7. the power switch on the rear of the chassis. Connect the required devices as explained in Chapter 1. For this example, that would include a video source (audio and video), speakers or headset if desired, and a monitor if desired. Make sure the drive in the FS-2/2E has been formatted.
Using the FS-2/2E 3.3 How to Put Recorded Clips on a Computer System Once you have recorded clips to a FireWire disk drive using FS-2/2E, you can use those clips in most computer based DV NLE systems. Traditionally, in order to get footage into an NLE system, it was necessary to capture or digitize that footage utilizing a video capture card.
Using the FS-2/2E 3.3.1 Mounting FireWire Disk Drives (Windows XP, 2000, 98SE and ME) 1. On a Windows-based computer system, double click the My Computer icon on the top left hand corner of the desktop. You will see a window similar to the following: 2. Locate your FireWire disk drive. This will probably be labeled E:, F:, G:, and so on. (drive C: is usually your computer's main disk drive). 3. Once you have identified it, double click on the FireWire disk drive.
Using the FS-2/2E The FireWire disk drive can contain several different files. Clips can appear as • • • • • • • • RawDV (.dv) AVI Type 1 (YYYYMMDDHHMMSSa01) AVI Type 2 or 24p AVI Type 2 (YYYYMMDDHHMMSSb01) Canopus AVI (YYYYMMDD-HHMMSSb01) Matrox AVI (YYYYMMDD-HHMMSSm01 with a separate .wav audio file per track) Pinnacle AVI (YYYYMMDD-HHMMSSp01 with two separate .wav audio files per track) QuickTime or 24p Quicktime (.mov) Avid OMF (.omf with two separate .aif audio files per track).
Using the FS-2/2E 3.3.2 Using FS-2/2E Recorded Avid OMF Clips on Avid Editing Systems The Avid DV OMF file format was developed for use with Avid editing systems on Windows 2000, Windows XP or Mac 0S10. These include Avid Xpress Pro, NewsCutter, Media Composer Adrenaline, and Symphony (with the DV option). The Avid DV OMF file format creates three files simultaneously; an OMF video file and two separate AIF audio files. On the computer's desktop, the files appear as shown in the next illustration.
Using the FS-2/2E 3. Drag all the OMF and AIF files into the new folder (do not drag in the files titled Desktop DB or Desktop DF). If you are using the ORGANIZE OMF function on the FS-2/2E prior to using the disk on a computer, steps 2 and 3 are not necessary. 4. Launch Avid. 5. Once you have opened the desired project or created a new project, select Tools > MediaTool. The following window appears: 6. Locate and select the external FireWire drive under Media Drive(s).
Using the FS-2/2E 3.3.3 Dismounting FireWire Disk Drives (Windows XP, 2000, 98SE and ME) Once you have completed working with your disk drive on a Windows XP, Windows 2000, Windows 98SE or Windows ME computer system, you must dismount the drive before unplugging it. To do this, use the following procedure: 1. Click the Safely Remove Hardware icon at the bottom right side of the Windows task bar as shown below. 2. The computer system prompts you to “remove” the connected FireWire disk drive.
Using the FS-2/2E When mounted, your FireWire disk drive should appear on the computer's desktop as shown below: The FS-2/2E formatted disk drive appears as a FAT32 volume with a PC label. This is not always the case on Version 10 of the Macintosh operating system however. 3. Once you have located your FireWire disk drive on the desktop, double click the disk icon to open it up. Once opened, you will see the following: 3.3.
Using the FS-2/2E 3.4 How to Create a Playlist Use the following procedure to create a simple playlist on the FS-2/2E. 1. Ensure no playlist is open. 2. TO ADD A CLIP - Play a clip you wish to add to the playlist. Using the front panel buttons, press MARK IN and MARK OUT for the particular portion of the 3. 4. 5. 6. 7. 8. clip to add to the playlist. Both buttons will light. Once marked, press the front panel PLAYLIST button. The MARK IN and MARK OUT key lights will go out.
Using the FS-2/2E 3.5 How to Mark Scenes The FS-2/2E Scene Marking feature allows you to mark clips for placement in particular folders during recording, playback or stop mode. When a drive is formatted using FS-2/2E, ten folders are created numbered 0 through 9.
Using the FS-2/2E 3.5.1 Marking Scenes Use the following procedure: 1. Play your pre-recorded clip from the FS-2/2E. 2. When you encounter the start of your scene, pause the FS-2/2E and then press the MARK IN button. The MARK IN button should light up. 3. Play your clip again to the end point and pause. 4. Press MARK OUT. The MARK OUT button lights. 5. Press the PLAYLIST button to save the marked scene. 6. Mark the rest of your scenes using the same procedure. 7.
Using the FS-2/2E If the FS-2/2E PLAY FROM is set to TRACKLIST the name of the SCENE MARK, or assigned, folder appears without brackets on the LCD display (for example, 2 SCENE 2). COUNTER 00:00:00:00 DISK 1 <2SCENE 2> EXIT 184 Min DISP SHFT If the PLAY FROM menu is set to FOLDERS, the name of the assigned folder appears in brackets on the LCD display (for example, 2 . Using the SCENE MARK menu, you can assign clips to folders using the numeric keypad on the optional remote control unit.
Using the FS-2/2E 3.6 Connecting the FS-2/2E to a Network You can connect the FS-2/2E to a network using the Ethernet 10/100 Base T port on the rear panel. Do the following: 1. Use a standard RJ85 cable to connect between the Ethernet port on the rear panel to a network. FS-2E Rear Panel Ethernet 10/100 Base T Connector 2. Power up the FS-2/2E and make sure your network is functioning properly. 3. 4. 5. 6. Contact your system administrator for additional help. Navigate to the FS-2/2E NETWORK menu.
Chapter 4 FS-2E Web Interface The FS-2E may be configured and operated over the network via the FS-2E Web Interface. This application provides functions for recorder/player operations and a reduced set of system management functions similar to those accessed through FS2E front panel controls, see FS-2/2E Menus and Functions.
FS-2E Web Interface 4.1 Web Interface Home Page Record / Play Controls Recorder Config Tracklist Recorder Status Tracklist Playlist System Config To open the Web Interface for a FS-2E, enter the IP address of that FS-2E in the browser address window and press Enter. JAVA Software for the Desktop The Web Interface control functions require that the Java Runtime Environment be installed. Download this software from http://www.java.com.
FS-2E Web Interface 4.2 The Web Interface 4.2.1 Recorder/Player Controls Rewind Play Pause Stop Record Previous Track Forward Next Track The Record and Play buttons function in the same manner as controls on a video tape recorder (VTR) and the control panel buttons on the front of the FS-2E, see Front Control Panel on page 8 for more information. 4.2.1.1 Record 1. Verify that the input device is connected to the FS-2E. Refer to Setting Up the FS-2/2E. 2.
FS-2E Web Interface 4.2.
FS-2E Web Interface 4.2.3 Tracklist Clicking the Insert Icon Opens the Insert Form The Tracklist, which is available in both sets of tabs, is similar to a hard drive directory and displays the list of Tracks that may be used when creating playlist. Adding a track from this list to a playlist does not remove the track from the Tracklist. Likewise, deleting a track from a playlist does not delete the track from the tracklist. Tracklist offers four list administration tools.
FS-2E Web Interface 4.2.3.1 Adding Tracks to a Playlist 1. To add multiple tracks to a playlist: Select the tracks by placing check marks in their check boxes. • Select the button Add to Playlist in the menu bar above the list of tracks. 2. To add a specific video clip within a track to a playlist, enter the run-time and frame number of the first and last frames of the clip in the Mark In and Mark Out fields respectively.
FS-2E Web Interface 4.2.4 Recorder Configuration Use the Recorder Config form to set up the FS-2E recorder function. The FS-2E provides the following Recording Settings: For specific details about the parameters listed below, see FS-2/2E Menus and Functions on page 30 and Using the FS-2/2E on page 85. • Input Select - Pick the type of input signal: • • • • • Composite, YC, Component, default SDI, DV, Failed to Change Value Please Try Again The FS-2E detects if the selected input signal type is present.
FS-2E Web Interface • Record Format: Raw DV, AVI Type 1, AVI Type 2, Canopus AVI, Matrox AVI, Quicktime, Avid OMF, Pinnacle, 24P AVI Type 2, 24P Quicktime, Control Mode: • Local, default • Remote, • AVC, • Syncro Slave, Audio Record Level: -34.5db to +4.5db, 0.0 default Syncro Record Pref: (Requires camera and tape, for details, see Syncro Slave on page 41.
FS-2E Web Interface 4.2.5 Playlist The FS-2E provides the ability to create simple playlists. The Playlist tab displays a listing of selected tracks in the order they are to play. In the button bar above the list, there are three playlist administration tools: • • • Select All - Clicking this button selects all tracks listed and check marks appear in all of the track check boxes. Deselect All - Clears the check boxes for all selected tracks. Remove - Removes any selected track from the playlist.
FS-2E Web Interface 4.2.6 System Configuration FS-2E’s System Config form provides the ability to adjust system settings. When a system setting is changed, the FS-2E immediately applies it and refreshes the System Config form. For more information about these settings, see FS-2/2E Menus and Functions on page 30.
FS-2E Web Interface 4.3 Updating FS-2E Software via FTP Periodically check the Focus Enhancements web site for FS-2E software updates, go to http://www.focusinfo.com/support. Before uploading the software, verify the file name and determine that the FS-2E is enabled for FTP operations. 1. Unzip the update software and verify that the file name is fs2.bin. If not, rename the file. 2. Select the System Config tab. 3. Verify that FTP is enabled, see System Configuration on page 108. 4.3.
FS-2E Web Interface 5. If the FS-2/2E is configured for an anonymous logon a dialogue window appears: Enter the Logon and Password: Factory default logon: fs2. Factory default password: focus. Logon and password are case sensitive. It is not possible to change the logon or password through the web interface. Use the front panel controls, see Network Setup on page 70. 6. Select the directory VOL01. VOL01 is the root directory for the FS-2E. 7. Move the update software file to VOL01. 8.
Chapter 5 Reference This chapter contains reference information for the FS-2/2E as follows: Technical Specifications page 112 FS-2/2E LCD Display Modes page 114 Supported RS-422 Commands page 116 Shuttle Speed Parameters page 116 Jog Speed Parameters page 117 Custom Commands page 117 FS-2/2E Studio DTE Disk Recorder User Guide 111
Reference 5.1 Technical Specifications 5.1.
Reference Stereo Audio Monitor (1 x 1/4” TRS jack) General Audio Specifications Balanced Inputs • • • • Input Impedance 600 Ohms +/-10 Ohms Quantization 16 bits 48Khz Common mode rejection @1 KHz (dB) 100 dB Analog Input adjustment range -34dB to +4.5dB (in 1.5dB steps, default setting 0dB) • Amplitude with no clipping 3.5Vp-p Balanced Outputs • • • • • • THD@1 Khz Channel Separation SNR Quantization Output Impedance Bandwidth at -3dB points Less than 0.
Reference 5.1.6 DTE File Formats • • FS-2 and FS-2E: RawDV (.dv), AVI Type 1, AVI Type 2, Canopus AVI and Matrox AVI (.avi), QuickTime (.mov), Pinnacle (.avi) or Avid DVOMF (.omf) FS-2E (or FS-2 with 2.0 upgrade): 24P AVI Type 2, and 24P Quicktime. 5.1.
Reference CONTROLTYPE AV/C* (Stop) AV/C* (Rec Pause) AV/C* (Rec) A AV/C* (Play Pause) AV/C* (Play) Syncro Slave (Pause) Syncro Slave (Rec) LCD Display A STOP ll A REC REC ll A PLAY A ALL ll Y REC Y REC * AV/C is only for use when the FS-2/2E is connected to a computer system. To control the FS-2/2E from a camcorder, use Syncro Slave mode.
Reference 5.3 Supported RS-422 Commands RS-422 Command Shuttle FWD Shuttle Rev Jog FWD Jog Rev Stop Play Pause Record Goto Timecode 21, 13, Shuttle Speed 21, 23, Shuttle Speed 21, 11, Jog Speed 21, 21, Jog Speed 20, 00 20, 01 21, 13, 0 20, 02 24, 31, timecode 5.
Reference 5.5 Jog Speed Parameters Command Parameters Pause Step 1 Frame Play Slow 4 Play Slow 3 Play Slow 2 Play Slow 1 Play Normal 0 1 to 200 201 to 300 301 to 400 401 to 500 501 to 800 1000 to 8999 5.6 Custom Commands The following commands are currently supported. Warnings No feedback occurs indicating that the command was processed successfully.
Reference Command 24 31 ## ## ## ## 48 80 82 2A ## 00 00 00 00 00 48 80 82 06 ## 00 00 00 00 00 48 80 82 0A 00 00 00 00 00 00 48 80 82 0A 01 00 00 00 00 00 48 80 82 0A 02 00 00 00 00 00 48 80 82 0A 03 00 00 00 00 00 48 80 82 0A 04 00 00 00 00 00 48 80 82 0A 05 00 00 00 00 00 48 80 82 0B 00 00 00 00 00 00 48 80 82 0B 01 00 00 00 00 00 48 80 82 0C 00 00 00 00 00 00 48 80 82 0C 01 00 00 00 00 00 48 80 82 0C 02 00 00 00 00 00 48 80 82 0C 03 00 00 00 00 00 48 80 82 0D 00 00 00 00 00 00 48 80 82 0D 01 00 00 00 0
Reference Command 48 80 82 0F 05 00 00 00 00 00 48 80 82 0F 06 00 00 00 00 00 48 80 82 0F 07 00 00 00 00 00 48 80 82 0F 0B 00 00 00 00 00 48 80 82 0F 0C 00 00 00 00 00 48 80 82 10 00 00 00 00 00 00 48 80 82 10 01 00 00 00 00 00 48 80 82 11 00 00 00 00 00 00 48 80 82 11 01 00 00 00 00 00 48 80 82 12 00 00 00 00 00 00 48 80 82 12 01 00 00 00 00 00 48 80 82 12 02 00 00 00 00 00 48 80 82 12 03 00 00 00 00 00 48 80 82 16 00 00 00 00 00 00 48 80 82 16 00 00 00 00 00 00 48 80 82 16 01 00 00 00 00 00 48 80 82 16 0
Reference Command 48 80 82 1D 04 00 00 00 00 00 48 80 82 1D 05 00 00 00 00 00 48 80 82 1D 06 00 00 00 00 00 48 80 82 1D 07 00 00 00 00 00 48 80 82 1D 08 00 00 00 00 00 48 80 82 1D 09 00 00 00 00 00 48 80 82 1D 0A 00 00 00 00 00 48 80 82 1D 0B 00 00 00 00 00 48 80 82 1D 0C 00 00 00 00 00 48 80 82 1D 0D 00 00 00 00 00 48 80 82 1D 0E 00 00 00 00 00 48 80 82 1D 0F 00 00 00 00 00 48 80 82 1D 10 00 00 00 00 00 48 80 82 1D 11 00 00 00 00 00 48 80 82 1D 12 00 00 00 00 00 48 80 82 1D 13 00 00 00 00 00 48 80 82 1D 1
Index A absolute timecode value adding track to playlist adding tracks to playlist AES/EBU input/output air temperature analog out applications audio correction audio input levels audiometer AV/C available space indicator Avid DV OMF file format, editing 28 103 104 11 5 69, 108 3 67, 106 60, 106 28 40 29 90 B back index key back search key backlight balanced analog audio input/output brightness BVW-75 BVW-75 control functions 23 24 66, 108 11 106 58 39 C clip loop loop all play play all preview compone
Index file type files organize folder preferences folder display folder key folder list folder pref menu format disk formatting drives forward index key forward search key FREE RUN Mode front control panel FTP fuse replacement 102 108 108 29 19 43 69 80 13 24 25 61 8 108, 109 15 G genlock play mode GPI mode GPI plug GPI port 108 106 10 65 H H phase HDD bypass HDD bypass key headphones hi res fwd/rew home page 108 108 20 9 108 100 I IDE drive, inserting illustration home page input sources output targ
Index organize Pinnacle OS upgrade OSD 77 55 20, 108 P package contents password password/username Pb input/output phase H SC PINN play all play clip play from mode menu play key play list play mode menu play/record status symbol playback web interface playback, front panel controls player controls web interface playlist adding track removing track playlist key playlist menu playlist, creating power connection power module, fuse replacement power switch Pr input/output preferences folder preview clip 4
Index Sync input/output syncro record preference syncro slave still system configuration system preferences 11 106 41 37 108 68 T TC delay TC options technical support Telnet time and date setting time lapse timecode timecode input/output timecode mode timecode options timecode/user bit display mode timecode/user bit value track removing from playlist track from tracklist track length tracklist adding track to playlist delete track deleting tracks transport control keys recorder controls recorder status
FS-2/2E Studio DTE Disk Recorder, User Guide MANL-0927-04