
Installation Guide


Moulding Installation
(Patent Pending)
General
• Quick Clips™ are compatible only with Focal Point® 4-1/8” and 5-7/8” mouldings.
• Focal Point mouldings have the same density and workability as white pine and
can be installed using the same tools.
• Use only Focal Point AD3 Adhesive (part # 33333) or PL Premium brand
Polyurethane adhesive.
• All mouldings should be allowed to acclimatize to room temperature for at least
24 hours before installation.
• Focal Point mouldings are factory primed. Use only quality latex or oil-based
paints. Do not use lacquer paints.
• For a faster and easier project, paint or faux finish moulding prior to installation.
Recommended Tools:
Cordless drill with magnetic bit , Tape
measure, Pencil, Ladder, Screws (recommended size: 1-5/8”, #6 sheetrock screw),
Focal Point corner and connector blocks (optional), Polyurethane construction
adhesive (such as PL Premium brand polyurethane adhesive or Focal Point brand
Adhesive 3)
©2005 Focal Point Architectural Products Inc.
Focal Point Architectural Products Inc. assumes no liability for improper installation. Focal Point Architectural Products Inc.
will not be held liable for any damage of any kind arising from use of this product.
FP-0175-0505
Installation Methods
Option #1 - Using Focal Point corner blocks: drill a 3/16” hole in center of each tab on the blocks. Install corner blocks
in each corner and connector blocks in the center of each wall. Install blocks prior to installing the Quick Clips. Use
polyurethane adhesive between mouldings and blocks.
Option #2 – Using mitered corners: cut 45 degree compound miters for inside and outside corner of the room (do not
cope inside corners). Cut butt joints for all straight joints (do not use scarf or lap joints). You must use polyurethane
adhesive on all moulding joints.
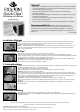
1. Installing Quick Clips
TM
• Measure 8 to 12 inches from each block or corner of room and install a clip.
• Make sure that clip is flush on the ceiling and the wall, use 1-5/8” screws to secure the Quick Clips to the wall.
• Install a clip approximately every 12 inches or equally spaced to insure proper fit. A minimum of 6 Quick Clips should be
used for every 8 feet of moulding. (If wall is not straight use more clips.)
Quick Tip: Measure 2” down from each clip and mark placement with pencil or tape to make moulding installation easier.
This marks the position of the clips so you will know where to tap in step 2.
• Clips will fit into groove on back of moulding for a tight fit.
2. Cutting Moulding
• Measure distance between blocks or length of wall and cut moulding 1/16” longer than measurement for every 4 feet of
moulding. (example: measurement 8’ - cut moulding 8’-1/8”)
• Choose from Option #1 or #2 explained above for installation
• Apply 2” of polyurethane construction adhesive on the bedding edge of each of the mouldings.
Quick Tip: Clean up any excess adhesive immediately.
• Position point of miter cut or end of moulding in corner or against block and install it onto the clips by lining up the
grooves milled in the back of moulding with the barbed ends of the clips. Move down the length of moulding pressing
(where each clip is installed) both the top and the bottom of the moulding with even pressure and firmly tap, onto
barbs until the moulding mates flush to both the ceiling and the wall.
Quick Tip: Keep length of moulding straight as you install to help with alignment of moulding to clip.
• Before installing moulding on last two clips slightly bend moulding out to force onto block or into corner to create a
tight joint.
Quick Tip: If needed use a scrap piece of moulding and a hammer to lightly tap moulding at top or bottom to center
moulding on block.
3. Finishing Moulding
• Use paintable latex caulk to fill in any gaps between joints, corners, or moulding edge.
Quick Tip: If factory primer is scuffed or damaged during installation, apply vinyl spackle to area, lightly sand with fine grit
sand paper and prime.
Questions? Call 1.800.662.5550 8am-5pm EST Monday-Friday. Visit our website at www.focalpointproducts.com for complete
installation instructions or a video clip of the Quick Clips™ Installation.
Quick Clips
™